Ricoh 5510L Operating Instructions - Page 118
Clearing Paper Jams
 |
View all Ricoh 5510L manuals
Add to My Manuals
Save this manual to your list of manuals |
Page 118 highlights
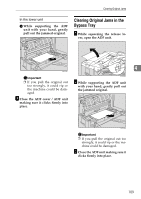
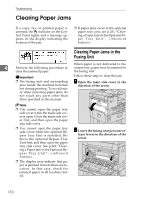
Troubleshooting Clearing Paper Jams If a copy, fax, or printed paper is jammed, the x indicator on the Control Panel lights and a message appears on the display indicating the location of the jam. ❒ If paper jams occur in the optional paper tray unit, see p.261 "Clearing a Paper Jam in the Optional Paper Tray Unit", . Clearing Paper Jams in the Fusing Unit When paper is not delivered to the 4 Perform the following procedure to output tray, paper may be jammed in clear the jammed paper. the fusing unit. Important ❒ The fusing unit and surrounding area inside the machine becomes hot during printing. To avoid injury when removing paper jams, do not touch any parts other than those specified in this manual. Follow these steps to clear the jam. A Open the main side cover in the direction of the arrow. Note ❒ You cannot open the paper tray side cover when the main side cover is open. Close the main side cover first, and then open the paper tray side cover. ❒ You cannot open the paper tray side cover when the optional Bypass Tray Unit is installed. Remove the optional Bypass Tray Unit first, and then open the paper tray side cover. See p.262 "Clearing a Paper Jam in the Optional Bypass Tray Unit", . ❒ The display may indicate that paper is jammed in more than one location. In this case, check for jammed paper in all locations listed. B Lower the fusing unit pressure re- lease levers in the direction of the arrow. 110
-
 1
1 -
2
-
3
-
4
-
5
-
6
-
7
-
8
-
9
-
10
-
11
-
12
-
13
-
14
-
15
-
16
-
17
-
18
-
19
-
20
-
21
-
22
-
23
-
24
-
25
-
26
-
27
-
28
-
29
-
30
-
31
-
32
-
33
-
34
-
35
-
36
-
37
-
38
-
39
-
40
-
41
-
42
-
43
-
44
-
45
-
46
-
47
-
48
-
49
-
50
-
51
-
52
-
53
-
54
-
55
-
56
-
57
-
58
-
59
-
60
-
61
-
62
-
63
-
64
-
65
-
66
-
67
-
68
-
69
-
70
-
71
-
72
-
73
-
74
-
75
-
76
-
77
-
78
-
79
-
80
-
81
-
82
-
83
-
84
-
85
-
86
-
87
-
88
-
89
-
90
-
91
-
92
-
93
-
94
-
95
-
96
-
97
-
98
-
99
-
100
-
101
-
102
-
103
-
104
-
105
-
106
-
107
-
108
-
109
-
110
-
111
-
112
-
 113
113 -
 114
114 -
 115
115 -
 116
116 -
 117
117 -
 118
118 -
 119
119 -
 120
120 -
 121
121 -
 122
122 -
 123
123 -
124
-
125
-
126
-
127
-
128
 |
 |
