Ricoh SP4100N Operating Instructions - Page 19
Installing Options, Available Options, Option List, Option Installation Flow Chart
 |
UPC - 026649027994
View all Ricoh SP4100N manuals
Add to My Manuals
Save this manual to your list of manuals |
Page 19 highlights
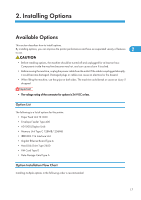
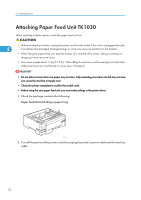
2. Installing Options Available Options This section describes how to install options. By installing options, you can improve the printer performance and have an expanded variety of features 2 to use. • Before installing options, the machine should be turned off and unplugged for at least an hour. Components inside the machine become very hot, and can cause a burn if touched. • Before moving the machine, unplug the power cable from the outlet. If the cable is unplugged abruptly, it could become damaged. Damaged plugs or cables can cause an electrical or fire hazard. • When lifting the machine, use the grips on both sides. The machine could break or cause an injury if dropped. • The voltage rating of the connector for options is 24 V DC or less. Option List The following is a list of options for this printer. • Paper Feed Unit TK1030 • Envelope Feeder Type 400 • AD1000 (Duplex Unit) • Memory Unit Type C 128MB/ 256MB • IEEE 802.11b Interface Unit • Gigabit Ethernet Board Type A • Hard Disk Drive Type 2650 • VM Card Type D • Data Storage Card Type A Option Installation Flow Chart Installing multiple options in the following order is recommended: 17
-
 1
1 -
2
-
3
-
4
-
5
-
6
-
7
-
8
-
9
-
10
-
11
-
12
-
13
-
 14
14 -
 15
15 -
 16
16 -
 17
17 -
 18
18 -
 19
19 -
 20
20 -
 21
21 -
 22
22 -
 23
23 -
 24
24 -
25
-
26
-
27
-
28
-
29
-
30
-
31
-
32
-
33
-
34
-
35
-
36
-
37
-
38
-
39
-
40
-
41
-
42
-
43
-
44
-
45
-
46
-
47
-
48
-
49
-
50
-
51
-
52
-
53
-
54
-
55
-
56
-
57
-
58
-
59
-
60
-
61
-
62
-
63
-
64
-
65
-
66
-
67
-
68
-
69
-
70
-
71
-
72
-
73
-
74
-
75
-
76
-
77
-
78
-
79
-
80
-
81
-
82
-
83
-
84
-
85
-
86
-
87
-
88
-
89
-
90
-
91
-
92
-
93
-
94
-
95
-
96
-
97
-
98
-
99
-
100
-
101
-
102
-
103
-
104
-
105
-
106
-
107
-
108
-
109
-
110
-
111
-
112
-
113
-
114
-
115
-
116
-
117
-
118
-
119
-
120
-
121
-
122
-
123
-
124
-
125
-
126
-
127
-
128
-
129
-
130
-
131
-
132
-
133
-
134
-
135
-
136
-
137
-
138
-
139
-
140
-
141
-
142
-
143
-
144
-
145
-
146
-
147
-
148
-
149
-
150
-
151
-
152
-
153
-
154
-
155
-
156
-
157
-
158
-
159
-
160
-
161
-
162
-
163
-
164
-
165
-
166
-
167
-
168
-
169
-
170
-
171
-
172
-
173
-
174
-
175
-
176
-
177
-
178
-
179
-
180
-
181
-
182
-
183
-
184
-
185
-
186
-
187
-
188
-
189
-
190
-
191
-
192
-
193
-
194
-
195
-
196
-
197
-
198
-
199
-
200
-
201
-
202
-
203
-
204
 |
 |