Ricoh SP4100N Operating Instructions - Page 83
Tray 2, Tray 3 Envelope Feeder Type 400, Envelope Lever.
 |
UPC - 026649027994
View all Ricoh SP4100N manuals
Add to My Manuals
Save this manual to your list of manuals |
Page 83 highlights
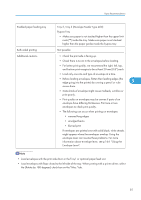
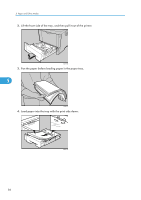
Paper Recommendations Enabled paper feeding tray Both-sided printing Additional cautions Tray 2, Tray 3 (Envelope Feeder Type 400) Bypass Tray • Make sure paper is not stacked higher than the upper limit mark ( ) inside the tray. Make sure paper is not stacked higher than the paper guides inside the bypass tray. Not possible • Check the print side is facing up. • Check there is no air in the envelopes before loading. • For better print quality, we recommend the right, left, top, and bottom print margins to be at least 20 mm (0.8") each. • Load only one size and type of envelope at a time. • Before loading envelopes, flatten their leading edges (the edge going into the printer) by running a pencil or ruler 5 across them. • Some kinds of envelope might cause misfeeds, wrinkles or print poorly. • Print quality on envelopes may be uneven if parts of an envelope have differing thicknesses. Print one or two envelopes to check print quality. • The following can occur when printing on envelopes: • creased long edges • smudged backs • blurred print If envelopes are printed over with solid black, white streaks might appear where the envelopes overlap. Using the envelope lever can resolve these problems. For more information about envelope lever, see p.164 "Using the Envelope Lever". • Load envelopes with the print side down in the Tray1 or optional paper feed unit. • Load envelopes with flaps closed to the left side of the tray. When printing with a printer driver, select the [Rotate by 180 degrees] check box on the "Misc." tab. 81
-
 1
1 -
2
-
3
-
4
-
5
-
6
-
7
-
8
-
9
-
10
-
11
-
12
-
13
-
14
-
15
-
16
-
17
-
18
-
19
-
20
-
21
-
22
-
23
-
24
-
25
-
26
-
27
-
28
-
29
-
30
-
31
-
32
-
33
-
34
-
35
-
36
-
37
-
38
-
39
-
40
-
41
-
42
-
43
-
44
-
45
-
46
-
47
-
48
-
49
-
50
-
51
-
52
-
53
-
54
-
55
-
56
-
57
-
58
-
59
-
60
-
61
-
62
-
63
-
64
-
65
-
66
-
67
-
68
-
69
-
70
-
71
-
72
-
73
-
74
-
75
-
76
-
77
-
 78
78 -
 79
79 -
 80
80 -
 81
81 -
 82
82 -
 83
83 -
 84
84 -
 85
85 -
 86
86 -
 87
87 -
 88
88 -
89
-
90
-
91
-
92
-
93
-
94
-
95
-
96
-
97
-
98
-
99
-
100
-
101
-
102
-
103
-
104
-
105
-
106
-
107
-
108
-
109
-
110
-
111
-
112
-
113
-
114
-
115
-
116
-
117
-
118
-
119
-
120
-
121
-
122
-
123
-
124
-
125
-
126
-
127
-
128
-
129
-
130
-
131
-
132
-
133
-
134
-
135
-
136
-
137
-
138
-
139
-
140
-
141
-
142
-
143
-
144
-
145
-
146
-
147
-
148
-
149
-
150
-
151
-
152
-
153
-
154
-
155
-
156
-
157
-
158
-
159
-
160
-
161
-
162
-
163
-
164
-
165
-
166
-
167
-
168
-
169
-
170
-
171
-
172
-
173
-
174
-
175
-
176
-
177
-
178
-
179
-
180
-
181
-
182
-
183
-
184
-
185
-
186
-
187
-
188
-
189
-
190
-
191
-
192
-
193
-
194
-
195
-
196
-
197
-
198
-
199
-
200
-
201
-
202
-
203
-
204
 |
 |
