Ricoh SP4100N Operating Instructions - Page 40
Remove the two screws and the cover of the Gigabit Ethernet board mounting bracket.
 |
UPC - 026649027994
View all Ricoh SP4100N manuals
Add to My Manuals
Save this manual to your list of manuals |
Page 40 highlights
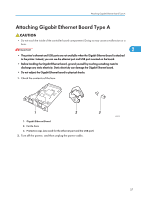
2. Installing Options 3. Disconnect the cables from the Ethernet port and the USB port of the printer, and cover each port with its protective cap. 2 AUB237S 4. Remove the two screws and the cover of the Gigabit Ethernet board mounting bracket. AUB210S The removed cover is not used when installing the Gigabit Ethernet board. Keep it for possible future use. 5. Attach the Gigabit Ethernet board to the controller board. Insert the end of the Gigabit Ethernet board into the slot. 38 AUB238S
-
 1
1 -
2
-
3
-
4
-
5
-
6
-
7
-
8
-
9
-
10
-
11
-
12
-
13
-
14
-
15
-
16
-
17
-
18
-
19
-
20
-
21
-
22
-
23
-
24
-
25
-
26
-
27
-
28
-
29
-
30
-
31
-
32
-
33
-
34
-
 35
35 -
 36
36 -
 37
37 -
 38
38 -
 39
39 -
 40
40 -
 41
41 -
 42
42 -
 43
43 -
 44
44 -
 45
45 -
46
-
47
-
48
-
49
-
50
-
51
-
52
-
53
-
54
-
55
-
56
-
57
-
58
-
59
-
60
-
61
-
62
-
63
-
64
-
65
-
66
-
67
-
68
-
69
-
70
-
71
-
72
-
73
-
74
-
75
-
76
-
77
-
78
-
79
-
80
-
81
-
82
-
83
-
84
-
85
-
86
-
87
-
88
-
89
-
90
-
91
-
92
-
93
-
94
-
95
-
96
-
97
-
98
-
99
-
100
-
101
-
102
-
103
-
104
-
105
-
106
-
107
-
108
-
109
-
110
-
111
-
112
-
113
-
114
-
115
-
116
-
117
-
118
-
119
-
120
-
121
-
122
-
123
-
124
-
125
-
126
-
127
-
128
-
129
-
130
-
131
-
132
-
133
-
134
-
135
-
136
-
137
-
138
-
139
-
140
-
141
-
142
-
143
-
144
-
145
-
146
-
147
-
148
-
149
-
150
-
151
-
152
-
153
-
154
-
155
-
156
-
157
-
158
-
159
-
160
-
161
-
162
-
163
-
164
-
165
-
166
-
167
-
168
-
169
-
170
-
171
-
172
-
173
-
174
-
175
-
176
-
177
-
178
-
179
-
180
-
181
-
182
-
183
-
184
-
185
-
186
-
187
-
188
-
189
-
190
-
191
-
192
-
193
-
194
-
195
-
196
-
197
-
198
-
199
-
200
-
201
-
202
-
203
-
204
 |
 |
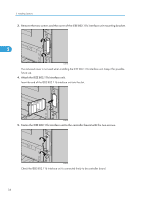
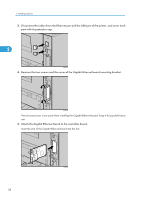
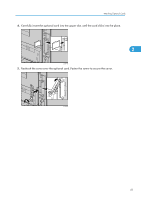
3.
Disconnect the cables from the Ethernet port and the USB port of the printer, and cover each
port with its protective cap.
AUB237S
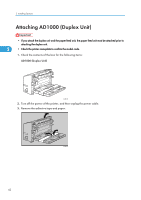
4.
Remove the two screws and the cover of the Gigabit Ethernet board mounting bracket.
AUB210S
The removed cover is not used when installing the Gigabit Ethernet board. Keep it for possible future
use.
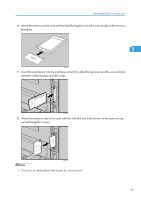
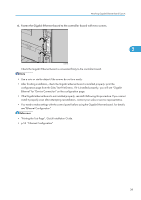
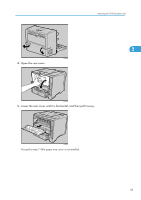
5.
Attach the Gigabit Ethernet board to the controller board.
Insert the end of the Gigabit Ethernet board into the slot.
AUB238S
2. Installing Options
38
2