Samsung SCH-R390 User Manual Ver.fd04_f2 (English(north America)) - Page 41
Drafts, Create a Draft Message, View and Edit Draft Text Messages, New Message - setting up email
 |
View all Samsung SCH-R390 manuals
Add to My Manuals
Save this manual to your list of manuals |
Page 41 highlights
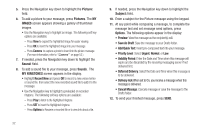
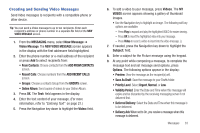
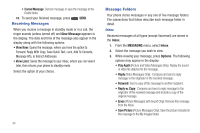
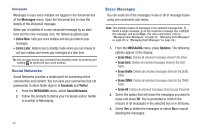
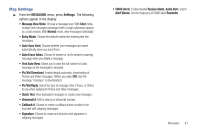
Drafts Messages in the Draft folder are those that have been composed but never sent. You can return to the Draft folder at any time to view, edit, or send a draft message. Create a Draft Message 1. From the MESSAGING menu, select New Message and then select one of the following Send Message options: • Text Message • Picture Message • Video Message The NEW TEXT / PICTURE / VIDEO MESSAGE screen appears in the display showing the To: list. 2. Enter the phone Number or Email address of a recipient, then press OK. Tip: Press Add to display a pop-up menu containing: Contacts, Groups, and Recent Calls. These options allow you to find and add recipients to the Send To: list. 3. Compose your message using the keypad, press Options, then select Save As Draft. "MESSAGE SAVED" appears in the display and your message is saved to the Drafts folder. View and Edit Draft Text Messages 1. From the MESSAGING menu, select Drafts. A list of draft messages appears in the display. 2. Select a message that you wish to view or edit. The NEW TEXT MESSAGE screen appears in the display. 3. If desired, enter or change the message text. 4. If desired, highlight the To: field and enter or change the recipient's number and/or e-mail address and the message text. 5. Press OK to move to the next field. 6. To complete the message text and set message send options, press Options. The following options appear in the display: • Add Quick Text: Insert pre-composed text into your message. • Save As Draft: Save the message to your Drafts box. • Priority Level: Choose Urgent or Normal. • Validity Period: Enter the Date when this message will cease to be valid, then use the Left and Right navigation keys to choose the Time. • Deferred Delivery: Enter the Date and Time when this message will be delivered. • Delivery Ack: Requests confirmation when your message is received. Messages 37
-
 1
1 -
2
-
3
-
4
-
5
-
6
-
7
-
8
-
9
-
10
-
11
-
12
-
13
-
14
-
15
-
16
-
17
-
18
-
19
-
20
-
21
-
22
-
23
-
24
-
25
-
26
-
27
-
28
-
29
-
30
-
31
-
32
-
33
-
34
-
35
-
 36
36 -
 37
37 -
 38
38 -
 39
39 -
 40
40 -
 41
41 -
 42
42 -
 43
43 -
 44
44 -
 45
45 -
 46
46 -
47
-
48
-
49
-
50
-
51
-
52
-
53
-
54
-
55
-
56
-
57
-
58
-
59
-
60
-
61
-
62
-
63
-
64
-
65
-
66
-
67
-
68
-
69
-
70
-
71
-
72
-
73
-
74
-
75
-
76
-
77
-
78
-
79
-
80
-
81
-
82
-
83
-
84
-
85
-
86
-
87
-
88
-
89
-
90
-
91
-
92
-
93
-
94
-
95
-
96
-
97
-
98
-
99
-
100
-
101
-
102
-
103
-
104
-
105
-
106
-
107
-
108
-
109
-
110
-
111
-
112
-
113
-
114
-
115
-
116
-
117
 |
 |
