Samsung SCH-R830 User Manual - Page 106
Taking Pictures, Camera Options, Choose Off, On, or Auto flash.
 |
View all Samsung SCH-R830 manuals
Add to My Manuals
Save this manual to your list of manuals |
Page 106 highlights
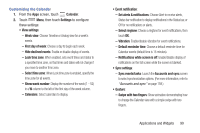
Taking Pictures 1. From the Apps screen, touch Camera. 2. Using the display as a viewfinder, compose your picture by aiming the lens at the subject. • Touch the screen to focus on the area you touched. • "Pinch" the screen, or press the Volume key, to zoom in or out. • To configure settings, see "Camera Options" on page 101. 3. To take the picture, touch the Camera button ( ). 4. After taking a picture, touch Image Viewer to view the picture. While viewing the picture, use these options: • "Pinch" the screen, or touch the zoom icons, to zoom in or out, or double-touch to zoom all the way in or out. • Touch Share to send the picture using Group Cast, Dropbox, Flipboard, Picasa, Google+, S Memo, Bluetooth, Wi-Fi Direct, Messaging, Gmail, or Email. • Touch Slideshow to view all of your pictures as a slideshow. • Touch Delete to erase the picture. • Touch Menu to access added options: Face tag, Copy to clipboard, Rotate left, Rotate right, Crop, Edit, Set as (Contact photo, Home screen, Lock screen, Home and lock screens wallpaper), Buddy photo share, Print, Rename, or Details. Camera Options While in camera mode ( ), the following options are available: • Self portrait: Switch to the front camera lens, for self- portraits. • Flash: Choose Off, On, or Auto flash. • Shooting mode: Choose an automatic shooting mode, from: - Single shot: Take a single photo. - Smile shot: Touch the Camera button to focus on the subject's face. If a smile is detected, the picture is taken automatically. - Panorama: Takes a landscape photo by taking an initial photo and then adding additional images to itself. The guide box lets you view the area where the second part of the panoramic picture should fall within. - Cartoon: Gives your photo a cartoon look. • Color effects: Choose color theme for the picture: No effect (normal color), Negative, Black and white, or Sepia. Applications and Widgets 101
-
 1
1 -
2
-
3
-
4
-
5
-
6
-
7
-
8
-
9
-
10
-
11
-
12
-
13
-
14
-
15
-
16
-
17
-
18
-
19
-
20
-
21
-
22
-
23
-
24
-
25
-
26
-
27
-
28
-
29
-
30
-
31
-
32
-
33
-
34
-
35
-
36
-
37
-
38
-
39
-
40
-
41
-
42
-
43
-
44
-
45
-
46
-
47
-
48
-
49
-
50
-
51
-
52
-
53
-
54
-
55
-
56
-
57
-
58
-
59
-
60
-
61
-
62
-
63
-
64
-
65
-
66
-
67
-
68
-
69
-
70
-
71
-
72
-
73
-
74
-
75
-
76
-
77
-
78
-
79
-
80
-
81
-
82
-
83
-
84
-
85
-
86
-
87
-
88
-
89
-
90
-
91
-
92
-
93
-
94
-
95
-
96
-
97
-
98
-
99
-
100
-
 101
101 -
 102
102 -
 103
103 -
 104
104 -
 105
105 -
 106
106 -
 107
107 -
 108
108 -
 109
109 -
 110
110 -
 111
111 -
112
-
113
-
114
-
115
-
116
-
117
-
118
-
119
-
120
-
121
-
122
-
123
-
124
-
125
-
126
-
127
-
128
-
129
-
130
-
131
-
132
-
133
-
134
-
135
-
136
-
137
-
138
-
139
-
140
-
141
-
142
-
143
-
144
-
145
-
146
-
147
-
148
-
149
-
150
-
151
-
152
-
153
-
154
-
155
-
156
-
157
-
158
-
159
-
160
-
161
-
162
-
163
-
164
-
165
-
166
-
167
-
168
-
169
-
170
-
171
-
172
-
173
-
174
-
175
-
176
-
177
-
178
-
179
-
180
-
181
-
182
-
183
-
184
-
185
-
186
-
187
-
188
-
189
-
190
-
191
-
192
-
193
-
194
-
195
-
196
-
197
-
198
-
199
-
200
-
201
-
202
-
203
-
204
-
205
-
206
-
207
-
208
-
209
-
210
-
211
-
212
-
213
-
214
-
215
-
216
-
217
-
218
-
219
-
220
-
221
-
222
-
223
-
224
-
225
 |
 |
