Sharp GX17 User Guide - Page 49
Turning the Slide Show Setting On or Off, Inserting Attached Data, Multimedia, Settings, Slide Show
 |
View all Sharp GX17 manuals
Add to My Manuals
Save this manual to your list of manuals |
Page 49 highlights
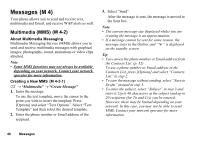
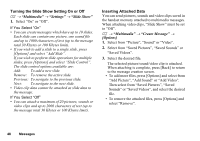
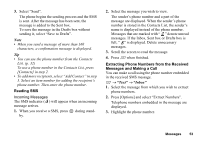
Turning the Slide Show Setting On or Off A → "Multimedia" → "Settings" → "Slide Show" 1. Select "On" or "Off". If You Select "On" • You can create messages which have up to 10 slides. Each slide can contain one picture, one sound file and up to 1000 characters of text (up to the message total 30 Kbytes or 100 Kbytes limit). • If you wish to add a slide to a single slide, press [Options] and select "Add Slide". If you wish to perform slide operations for multiple slides, press [Options] and select "Slide Control". The slide control options available are: Add: To add a new slide. Remove: To remove the active slide. Previous: To navigate to the previous slide. Next: To navigate to the next slide. • Video clip data cannot be attached as slide data to the message. If You Select "Off" • You can attach a maximum of 20 pictures, sounds or video clips and up to 2000 characters of text (up to the message total 30 Kbytes or 100 Kbytes limit). Inserting Attached Data You can send pictures, sounds and video clips saved in the handset memory attached to multimedia messages. When attaching video clips, "Slide Show" must be set to "Off". A → "Multimedia" → "Create Message" → [Options] 1. Select from "Picture", "Sound" or "Video". 2. Select from "Saved Pictures", "Saved Sounds" or "Saved Videos". 3. Select the desired file. The selected picture/sound/video clip is attached. When attaching is complete, press [Back] to return to the message creation screen. • To add more files, press [Options] and select from "Add Picture", "Add Sound" or "Add Video". Then select from "Saved Pictures", "Saved Sounds" or "Saved Videos", and select the desired file. • To remove the attached files, press [Options] and select "Remove". 48 Messages
-
 1
1 -
2
-
3
-
4
-
5
-
6
-
7
-
8
-
9
-
10
-
11
-
12
-
13
-
14
-
15
-
16
-
17
-
18
-
19
-
20
-
21
-
22
-
23
-
24
-
25
-
26
-
27
-
28
-
29
-
30
-
31
-
32
-
33
-
34
-
35
-
36
-
37
-
38
-
39
-
40
-
41
-
42
-
43
-
 44
44 -
 45
45 -
 46
46 -
 47
47 -
 48
48 -
 49
49 -
 50
50 -
 51
51 -
 52
52 -
 53
53 -
 54
54 -
55
-
56
-
57
-
58
-
59
-
60
-
61
-
62
-
63
-
64
-
65
-
66
-
67
-
68
-
69
-
70
-
71
-
72
-
73
-
74
-
75
-
76
-
77
-
78
-
79
-
80
-
81
-
82
-
83
-
84
-
85
-
86
-
87
-
88
-
89
-
90
-
91
-
92
-
93
-
94
-
95
-
96
-
97
-
98
-
99
-
100
-
101
-
102
-
103
-
104
-
105
-
106
-
107
-
108
-
109
-
110
-
111
-
112
-
113
-
114
-
115
-
116
-
117
-
118
-
119
-
120
-
121
-
122
-
123
-
124
-
125
-
126
-
127
-
128
 |
 |