Sharp UP-820N UP-820N Operation Manual - Page 213
Logo Text Programming
 |
View all Sharp UP-820N manuals
Add to My Manuals
Save this manual to your list of manuals |
Page 213 highlights
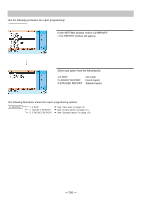
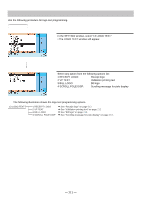
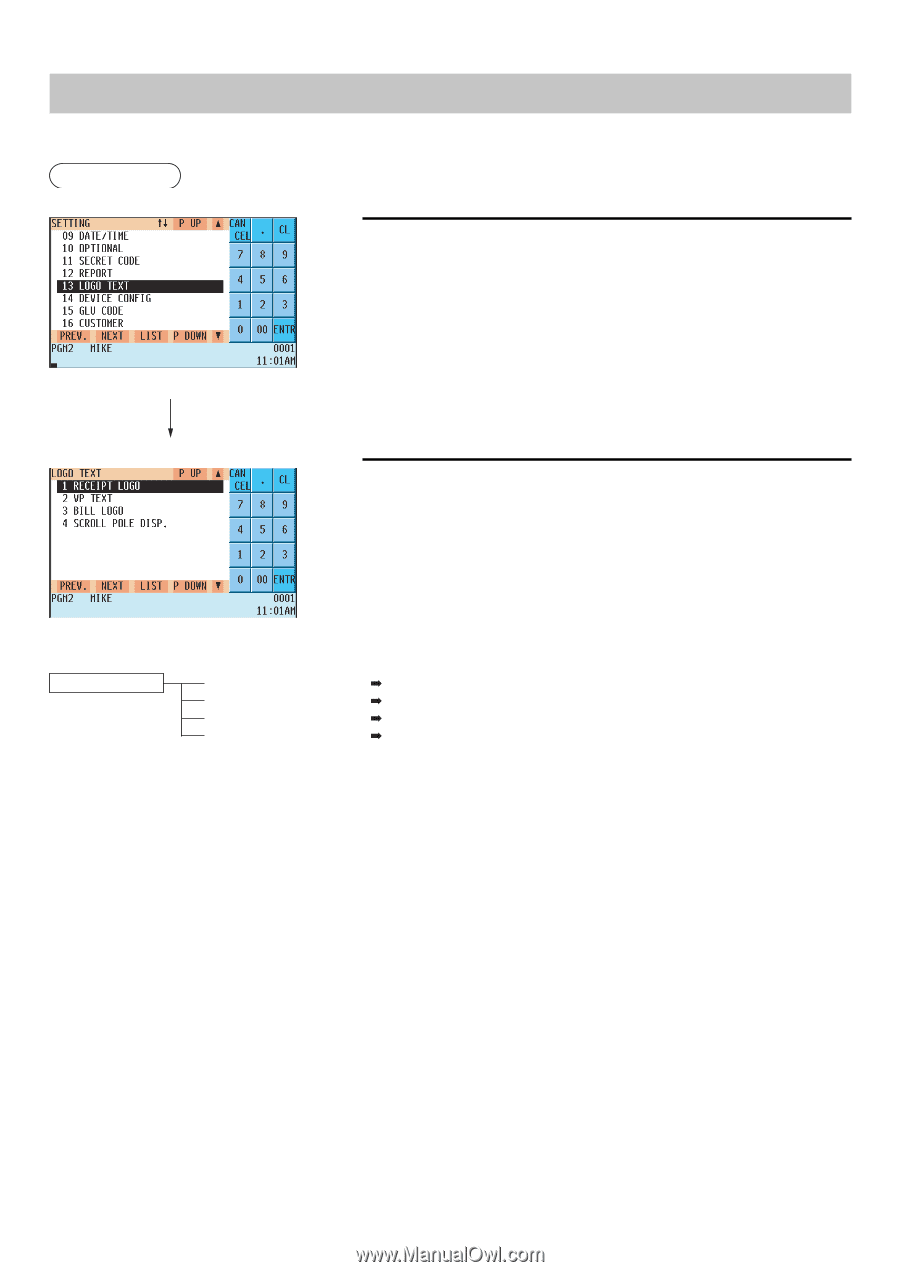
Logo Text Programming Use the following procedure for logo text programming. Procedure 1. In the SETTING window, select "13 LOGO TEXT." • The LOGO TEXT window will appear. 2. Select any option from the following options list: 1 RECEIPT LOGO: Receipt logo 2 VP TEXT: Validation printing text 3 BILL LOGO: Bill logo 4 SCROLL POLE DISP: Scrolling message for pole display The following illustration shows the logo text programming options. 13 LOGO TEXT 1 RECEIPT LOGO 2 VP TEXT 3 BILL LOGO 4 SCROLL POLE DISP See "Receipt logo" on page 212. See "Validation printing text" on page 212. See "Bill logo" on page 213. See "Scrolling message for pole display" on page 213. - 211 -
-
 1
1 -
2
-
3
-
4
-
5
-
6
-
7
-
8
-
9
-
10
-
11
-
12
-
13
-
14
-
15
-
16
-
17
-
18
-
19
-
20
-
21
-
22
-
23
-
24
-
25
-
26
-
27
-
28
-
29
-
30
-
31
-
32
-
33
-
34
-
35
-
36
-
37
-
38
-
39
-
40
-
41
-
42
-
43
-
44
-
45
-
46
-
47
-
48
-
49
-
50
-
51
-
52
-
53
-
54
-
55
-
56
-
57
-
58
-
59
-
60
-
61
-
62
-
63
-
64
-
65
-
66
-
67
-
68
-
69
-
70
-
71
-
72
-
73
-
74
-
75
-
76
-
77
-
78
-
79
-
80
-
81
-
82
-
83
-
84
-
85
-
86
-
87
-
88
-
89
-
90
-
91
-
92
-
93
-
94
-
95
-
96
-
97
-
98
-
99
-
100
-
101
-
102
-
103
-
104
-
105
-
106
-
107
-
108
-
109
-
110
-
111
-
112
-
113
-
114
-
115
-
116
-
117
-
118
-
119
-
120
-
121
-
122
-
123
-
124
-
125
-
126
-
127
-
128
-
129
-
130
-
131
-
132
-
133
-
134
-
135
-
136
-
137
-
138
-
139
-
140
-
141
-
142
-
143
-
144
-
145
-
146
-
147
-
148
-
149
-
150
-
151
-
152
-
153
-
154
-
155
-
156
-
157
-
158
-
159
-
160
-
161
-
162
-
163
-
164
-
165
-
166
-
167
-
168
-
169
-
170
-
171
-
172
-
173
-
174
-
175
-
176
-
177
-
178
-
179
-
180
-
181
-
182
-
183
-
184
-
185
-
186
-
187
-
188
-
189
-
190
-
191
-
192
-
193
-
194
-
195
-
196
-
197
-
198
-
199
-
200
-
201
-
202
-
203
-
204
-
205
-
206
-
207
-
 208
208 -
 209
209 -
 210
210 -
 211
211 -
 212
212 -
 213
213 -
 214
214 -
 215
215 -
 216
216 -
 217
217 -
 218
218 -
219
-
220
-
221
-
222
-
223
-
224
-
225
-
226
-
227
-
228
-
229
-
230
-
231
-
232
-
233
-
234
-
235
-
236
-
237
-
238
-
239
-
240
-
241
-
242
-
243
-
244
-
245
-
246
-
247
-
248
-
249
-
250
-
251
-
252
-
253
-
254
-
255
-
256
-
257
-
258
-
259
-
260
-
261
-
262
-
263
-
264
-
265
-
266
-
267
-
268
-
269
-
270
-
271
-
272
-
273
-
274
-
275
-
276
-
277
 |
 |
— 211 —
Logo Text Programming
Use the following procedure for logo text programming.
Procedure
1.
In the SETTING window, select “13 LOGO TEXT.”
• The LOGO TEXT window will appear.
2.
Select any option from the following options list:
1 RECEIPT LOGO:
Receipt logo
2 VP TEXT:
Validation printing text
3 BILL LOGO:
Bill logo
4 SCROLL POLE DISP:
Scrolling message for pole display
The following illustration shows the logo text programming options.
13 LOGO TEXT
1 RECEIPT LOGO
See “Receipt logo” on page
212
.
2 VP TEXT
See “Validation printing text” on page
212
.
3 BILL LOGO
See “Bill logo” on page
213
.
4 SCROLL POLE DISP
See “Scrolling message for pole display” on page
213
.