Sharp UP-820N UP-820N Operation Manual - Page 269
Removing the journal paper roll
 |
View all Sharp UP-820N manuals
Add to My Manuals
Save this manual to your list of manuals |
Page 269 highlights
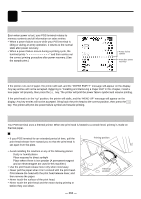
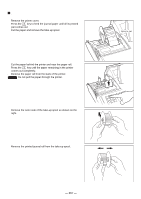
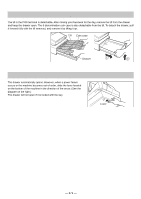
Removing the journal paper roll 1. Remove the printer cover. 2. Press the key to feed the journal paper until all its printed part comes out. 3. Cut the paper and remove the take-up spool. 4. Cut the paper behind the printer and near the paper roll. 5. Press the key until the paper remaining in the printer comes out completely. 6. Remove the paper roll from the back of the printer. NOTE Do not pull the paper through the printer. 7. Remove the outer side of the take-up spool as shown on the right. 8. Remove the printed journal roll from the take-up spool. Area to cut - 267 -
-
 1
1 -
2
-
3
-
4
-
5
-
6
-
7
-
8
-
9
-
10
-
11
-
12
-
13
-
14
-
15
-
16
-
17
-
18
-
19
-
20
-
21
-
22
-
23
-
24
-
25
-
26
-
27
-
28
-
29
-
30
-
31
-
32
-
33
-
34
-
35
-
36
-
37
-
38
-
39
-
40
-
41
-
42
-
43
-
44
-
45
-
46
-
47
-
48
-
49
-
50
-
51
-
52
-
53
-
54
-
55
-
56
-
57
-
58
-
59
-
60
-
61
-
62
-
63
-
64
-
65
-
66
-
67
-
68
-
69
-
70
-
71
-
72
-
73
-
74
-
75
-
76
-
77
-
78
-
79
-
80
-
81
-
82
-
83
-
84
-
85
-
86
-
87
-
88
-
89
-
90
-
91
-
92
-
93
-
94
-
95
-
96
-
97
-
98
-
99
-
100
-
101
-
102
-
103
-
104
-
105
-
106
-
107
-
108
-
109
-
110
-
111
-
112
-
113
-
114
-
115
-
116
-
117
-
118
-
119
-
120
-
121
-
122
-
123
-
124
-
125
-
126
-
127
-
128
-
129
-
130
-
131
-
132
-
133
-
134
-
135
-
136
-
137
-
138
-
139
-
140
-
141
-
142
-
143
-
144
-
145
-
146
-
147
-
148
-
149
-
150
-
151
-
152
-
153
-
154
-
155
-
156
-
157
-
158
-
159
-
160
-
161
-
162
-
163
-
164
-
165
-
166
-
167
-
168
-
169
-
170
-
171
-
172
-
173
-
174
-
175
-
176
-
177
-
178
-
179
-
180
-
181
-
182
-
183
-
184
-
185
-
186
-
187
-
188
-
189
-
190
-
191
-
192
-
193
-
194
-
195
-
196
-
197
-
198
-
199
-
200
-
201
-
202
-
203
-
204
-
205
-
206
-
207
-
208
-
209
-
210
-
211
-
212
-
213
-
214
-
215
-
216
-
217
-
218
-
219
-
220
-
221
-
222
-
223
-
224
-
225
-
226
-
227
-
228
-
229
-
230
-
231
-
232
-
233
-
234
-
235
-
236
-
237
-
238
-
239
-
240
-
241
-
242
-
243
-
244
-
245
-
246
-
247
-
248
-
249
-
250
-
251
-
252
-
253
-
254
-
255
-
256
-
257
-
258
-
259
-
260
-
261
-
262
-
263
-
 264
264 -
 265
265 -
 266
266 -
 267
267 -
 268
268 -
 269
269 -
 270
270 -
 271
271 -
 272
272 -
 273
273 -
 274
274 -
275
-
276
-
277
 |
 |

— 267 —
Removing the journal paper roll
1.
Remove the printer cover.
2.
Press the
key to feed the journal paper until all its printed
part comes out.
3.
Cut the paper and remove the take-up spool.
4.
Cut the paper behind the printer and near the paper roll.
5.
Press the
key until the paper remaining in the printer
comes out completely.
6.
Remove the paper roll from the back of the printer.
NOTE
Do not pull the paper through the printer.
7.
Remove the outer side of the take-up spool as shown on the
right.
8.
Remove the printed journal roll from the take-up spool.
Area to cut