TP-Link TD-W8950ND User Guide - Page 33
Bridge PPPoE Frames Between WAN and Local Ports: If you check this box, you can - bridge mode
 |
UPC - 845973060404
View all TP-Link TD-W8950ND manuals
Add to My Manuals
Save this manual to your list of manuals |
Page 33 highlights
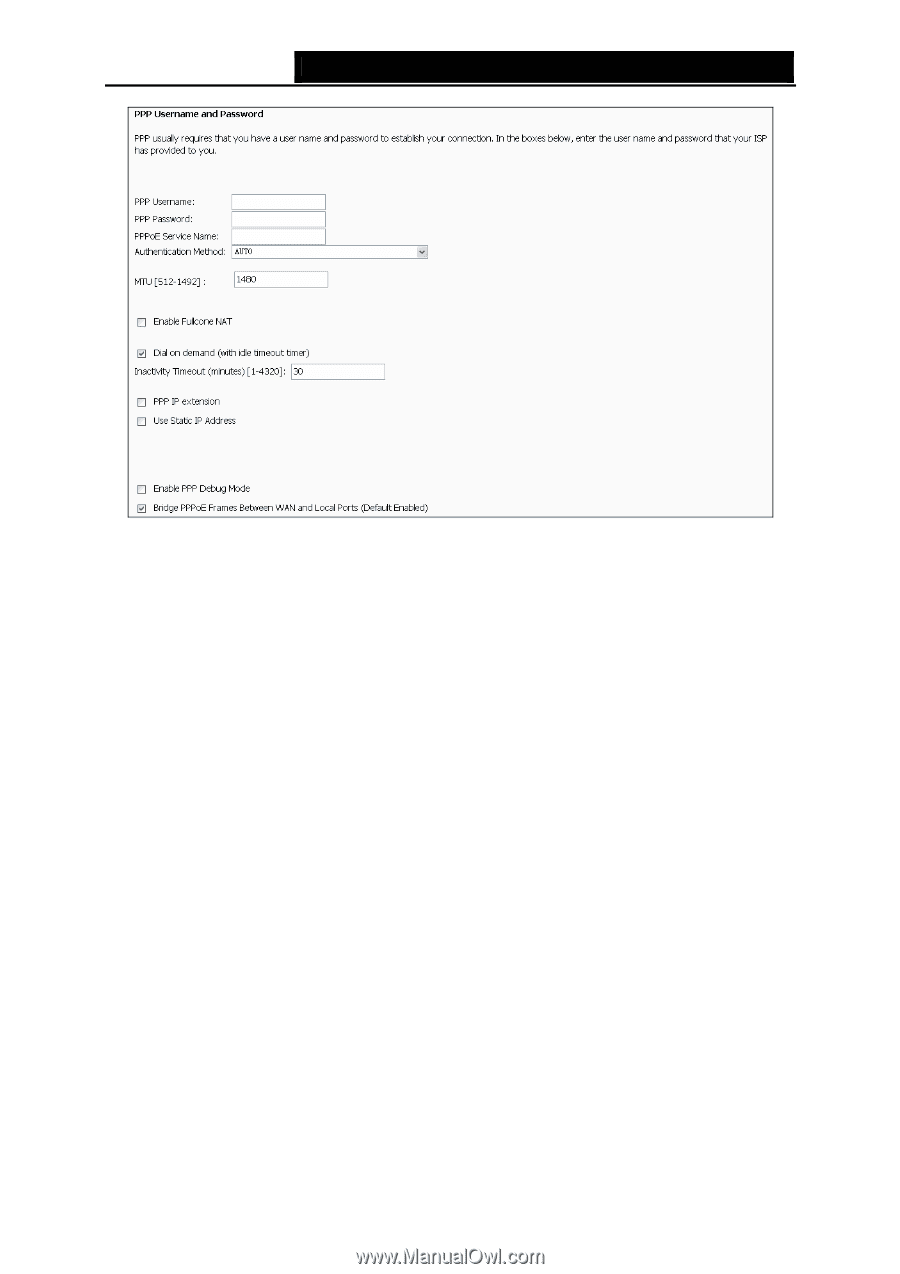
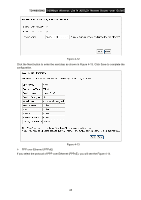
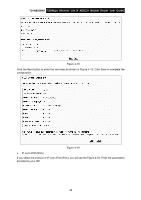
TD-W8950ND 150Mbps Wireless Lite N ADSL2+ Modem Router User Guide Figure 4-14 „ PPP Username: Enter your username for your PPPoE connection to identify and verify your account to the ISP. „ PPP Password: Enter your password for your PPPoE connection. „ PPPoE Service Name: Enter a name for the PPPoE connection for recognition. „ Authentication Method: Choose a method of authentication, AUTO, PAP, CHAP, or MSCHAP. „ MTU: The default MTU value is 1480 Bytes. It is not recommended that you change the default value unless required by your ISP. The value should be between 512 and 1492. „ Enable Fullcone NAT: Check this box to enable the Fullcone NAT function. The default value is disabled. „ Dial on demand: If you check this box, the Internet connection can be terminated automatically after a specified inactivity period (Inactivity Timeout) and be re-established when you attempt to access the Internet again. The default value of Inactivity Timeout is 30. The value should be between 1 and 4320. „ PPP IP extension: If this box is checked, the IP address obtained by the Router will be assigned to the computer, and the NAT and Firewall will be disabled. „ Use Static IP Address: Check this box to use the static IP address to dial. The default value is disabled. „ Enable PPP Debug Mode: Check this box to enable the debug mode. The default value is disabled. „ Bridge PPPoE Frames Between WAN and Local Ports: If you check this box, you can establish dial-up connection in this Router or on the PC. By default, the checkbox is selected. Click Next button in Figure 4-14, and then you will Figure 4-15. Check or uncheck the Enable WAN Service box according to your needs. 26
-
 1
1 -
2
-
3
-
4
-
5
-
6
-
7
-
8
-
9
-
10
-
11
-
12
-
13
-
14
-
15
-
16
-
17
-
18
-
19
-
20
-
21
-
22
-
23
-
24
-
25
-
26
-
27
-
 28
28 -
 29
29 -
 30
30 -
 31
31 -
 32
32 -
 33
33 -
 34
34 -
 35
35 -
 36
36 -
 37
37 -
 38
38 -
39
-
40
-
41
-
42
-
43
-
44
-
45
-
46
-
47
-
48
-
49
-
50
-
51
-
52
-
53
-
54
-
55
-
56
-
57
-
58
-
59
-
60
-
61
-
62
-
63
-
64
-
65
-
66
-
67
-
68
-
69
-
70
-
71
-
72
-
73
-
74
-
75
-
76
-
77
-
78
-
79
-
80
-
81
-
82
-
83
-
84
-
85
-
86
-
87
-
88
-
89
-
90
-
91
-
92
-
93
-
94
 |
 |