TP-Link TD-W8950ND User Guide - Page 41
To Reserve an IP address, you can con a second IP address and subnet mask for the LAN interface.
 |
UPC - 845973060404
View all TP-Link TD-W8950ND manuals
Add to My Manuals
Save this manual to your list of manuals |
Page 41 highlights
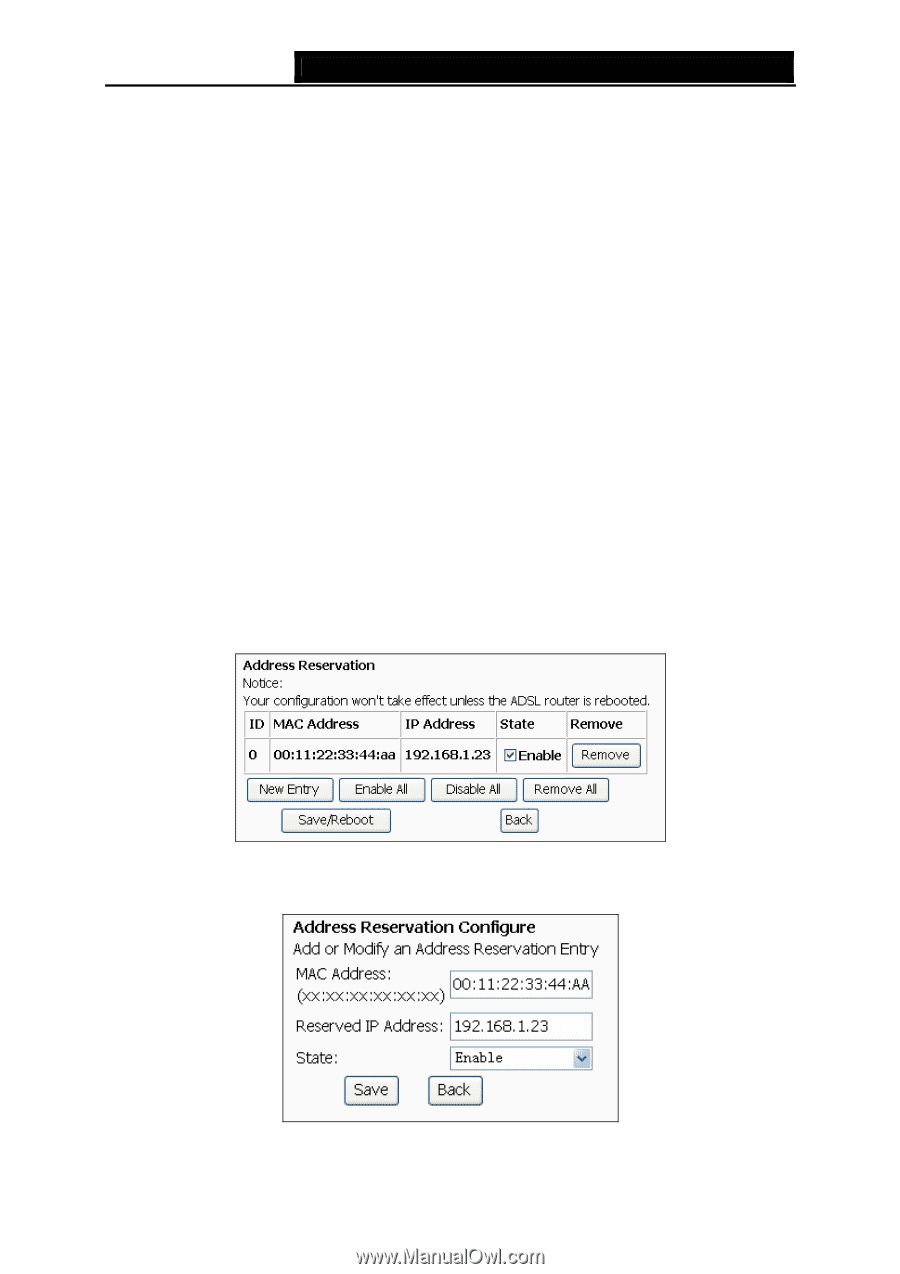
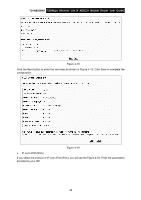
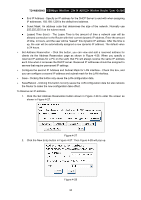
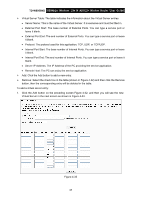
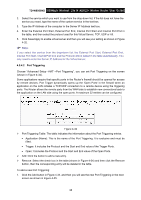
TD-W8950ND 150Mbps Wireless Lite N ADSL2+ Modem Router User Guide z End IP Address - Specify an IP address for the DHCP Server to end with when assigning IP addresses. 192.168.1.200 is the default end address. z Sunet Mask: An address code that determines the size of the network. Normally use 255.255.255.0 as the subnet mask. z Leased Time (hour) - The Lease Time is the amount of time a network user will be allowed connection to the Router with their current dynamic IP address. Enter the amount of time, in hours, and the user will be "leased" this dynamic IP address. After the time is up, the user will be automatically assigned a new dynamic IP address. The default value is 24 hours. ¾ Set Address Reservation - Click this button, you can view and add a reserved address for clients via the Address Reservation page as shown in Figure 4-26. When you specify a reserved IP address for a PC on the LAN, that PC will always receive the same IP address each time when it accesses the DHCP server. Reserved IP addresses should be assigned to servers that require permanent IP settings. ¾ Configure the second IP Address and Subnet Mask for LAN interface - Check this box, and you can configure a second IP address and subnet mask for the LAN interface. ¾ Save - Clicking this button only saves the LAN configuration data. ¾ Save/Reboot - Clicking this button not only saves the LAN configuration data but also reboots the Router to make the new configuration take effect. To Reserve an IP address: 1. Click the Set Address Reservation button shown in Figure 4-26 to enter the screen as shown in Figure 4-27. Figure 4-27 2. Click the New Entry button in Figure 4-27. Then Figure 4-28 will pop up. Figure 4-28 34
-
 1
1 -
2
-
3
-
4
-
5
-
6
-
7
-
8
-
9
-
10
-
11
-
12
-
13
-
14
-
15
-
16
-
17
-
18
-
19
-
20
-
21
-
22
-
23
-
24
-
25
-
26
-
27
-
28
-
29
-
30
-
31
-
32
-
33
-
34
-
35
-
 36
36 -
 37
37 -
 38
38 -
 39
39 -
 40
40 -
 41
41 -
 42
42 -
 43
43 -
 44
44 -
 45
45 -
 46
46 -
47
-
48
-
49
-
50
-
51
-
52
-
53
-
54
-
55
-
56
-
57
-
58
-
59
-
60
-
61
-
62
-
63
-
64
-
65
-
66
-
67
-
68
-
69
-
70
-
71
-
72
-
73
-
74
-
75
-
76
-
77
-
78
-
79
-
80
-
81
-
82
-
83
-
84
-
85
-
86
-
87
-
88
-
89
-
90
-
91
-
92
-
93
-
94
 |
 |