Toshiba D-R4SU Owners Manual - Page 12
Index to parts and controls - d drive
 |
View all Toshiba D-R4SU manuals
Add to My Manuals
Save this manual to your list of manuals |
Page 12 highlights
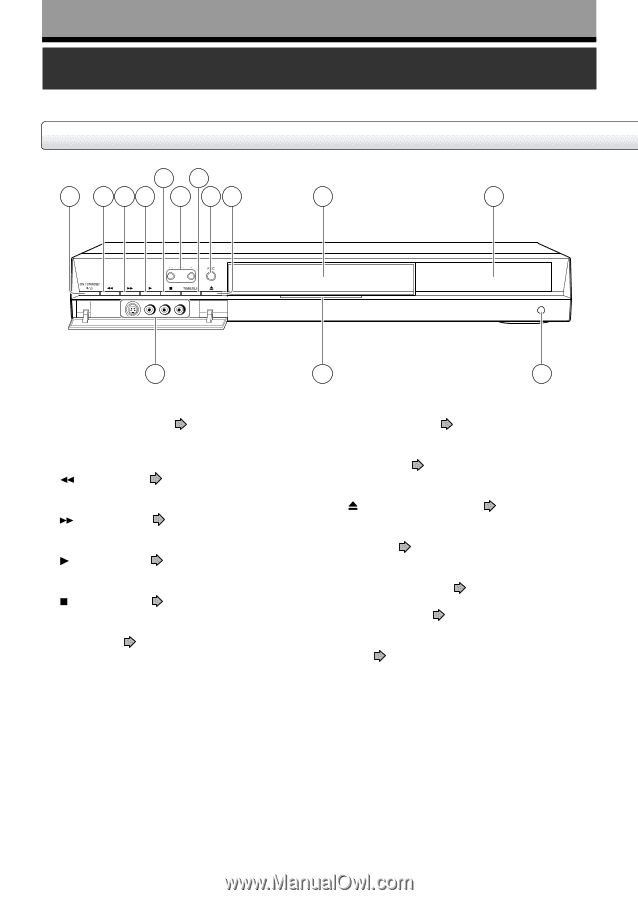
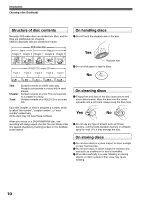
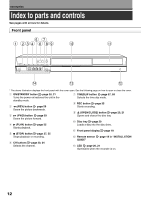
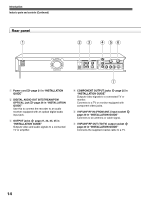
Introduction Index to parts and controls See pages with arrows for details. Front panel 57 1 234 6 89 10 11 14 13 12 * The above illustration displays the front panel with the cover open. See the following page on how to open or close the cover. q ON/STANDBY button page 20, 21 Turns the power on/restores the unit in the standby mode. w (REV) button page 59 Scans the picture backwards. e (FWD) button page 59 Scans the picture forward. r (PLAY) button page 55 Starts playback. t (STOP) button page 37, 55 Stops playback or recording. y CH buttons page 20, 34 Selects the channel. u TIMESLIP button page 57, 58 Selects the time slip mode. i REC button page 35 Starts recording. o (OPEN/CLOSE) button page 20, 21 Opens and closes the disc tray. !0 Disc tray page 20 Loads a disc into the disc drive. !1 Front panel display page 18 !2 Remote sensor page 18 in "INSTALLATION GUIDE" !3 LED page 20, 21 Illuminates when the recorder is on. 12
-
 1
1 -
2
-
3
-
4
-
5
-
6
-
 7
7 -
 8
8 -
 9
9 -
 10
10 -
 11
11 -
 12
12 -
 13
13 -
 14
14 -
 15
15 -
 16
16 -
 17
17 -
18
-
19
-
20
-
21
-
22
-
23
-
24
-
25
-
26
-
27
-
28
-
29
-
30
-
31
-
32
-
33
-
34
-
35
-
36
-
37
-
38
-
39
-
40
-
41
-
42
-
43
-
44
-
45
-
46
-
47
-
48
-
49
-
50
-
51
-
52
-
53
-
54
-
55
-
56
-
57
-
58
-
59
-
60
-
61
-
62
-
63
-
64
-
65
-
66
-
67
-
68
-
69
-
70
-
71
-
72
-
73
-
74
-
75
-
76
-
77
-
78
-
79
-
80
-
81
-
82
-
83
-
84
-
85
-
86
-
87
-
88
-
89
-
90
-
91
-
92
-
93
-
94
-
95
-
96
-
97
-
98
-
99
-
100
-
101
-
102
-
103
-
104
-
105
-
106
-
107
-
108
-
109
-
110
-
111
-
112
-
113
-
114
-
115
-
116
-
117
-
118
-
119
-
120
-
121
-
122
-
123
-
124
-
125
-
126
-
127
-
128
-
129
-
130
-
131
 |
 |