Toshiba Portege 2010 User Guide 1 - Page 42
recognize the total memory capacity. Use the Toshiba, When you turn the computer
 |
View all Toshiba Portege 2010 manuals
Add to My Manuals
Save this manual to your list of manuals |
Page 42 highlights
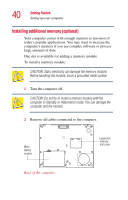
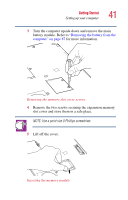
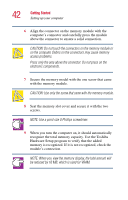
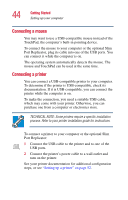
42 Getting Started Setting up your computer 6 Align the connector on the memory module with the computer's connector and carefully press the module above the connector to ensure a solid connection. CAUTION: Do not touch the connectors on the memory module or on the computer. Debris on the connectors may cause memory access problems. Press only the area above the connector. Do not press on the electronic components. 7 Secure the memory model with the one screw that came with the memory module. CAUTION: Use only the screw that came with the memory module. 8 Seat the memory slot cover and secure it with the two screws. NOTE: Use a point size 0 Phillips screwdriver. 9 When you turn the computer on, it should automatically recognize the total memory capacity. Use the Toshiba Hardware Setup program to verify that the added memory is recognized. If it is not recognized, check the module's connection. NOTE: When you view the memory display, the total amount will be reduced by 16 MB, which is used for VRAM.
-
 1
1 -
2
-
3
-
4
-
5
-
6
-
7
-
8
-
9
-
10
-
11
-
12
-
13
-
14
-
15
-
16
-
17
-
18
-
19
-
20
-
21
-
22
-
23
-
24
-
25
-
26
-
27
-
28
-
29
-
30
-
31
-
32
-
33
-
34
-
35
-
36
-
 37
37 -
 38
38 -
 39
39 -
 40
40 -
 41
41 -
 42
42 -
 43
43 -
 44
44 -
 45
45 -
 46
46 -
 47
47 -
48
-
49
-
50
-
51
-
52
-
53
-
54
-
55
-
56
-
57
-
58
-
59
-
60
-
61
-
62
-
63
-
64
-
65
-
66
-
67
-
68
-
69
-
70
-
71
-
72
-
73
-
74
-
75
-
76
-
77
-
78
-
79
-
80
-
81
-
82
-
83
-
84
-
85
-
86
-
87
-
88
-
89
-
90
-
91
-
92
-
93
-
94
-
95
-
96
-
97
-
98
-
99
-
100
-
101
-
102
-
103
-
104
-
105
-
106
-
107
-
108
-
109
-
110
-
111
-
112
-
113
-
114
-
115
-
116
-
117
-
118
-
119
-
120
-
121
-
122
-
123
-
124
-
125
-
126
-
127
-
128
-
129
-
130
-
131
-
132
-
133
-
134
-
135
-
136
-
137
-
138
-
139
-
140
-
141
-
142
-
143
-
144
-
145
-
146
-
147
-
148
-
149
-
150
-
151
-
152
-
153
-
154
-
155
-
156
-
157
-
158
-
159
-
160
-
161
-
162
-
163
-
164
-
165
-
166
-
167
-
168
-
169
-
170
-
171
-
172
-
173
-
174
-
175
-
176
-
177
-
178
-
179
-
180
-
181
-
182
-
183
-
184
-
185
-
186
-
187
-
188
-
189
-
190
-
191
-
192
-
193
-
194
-
195
-
196
-
197
-
198
-
199
-
200
-
201
-
202
-
203
-
204
-
205
-
206
-
207
-
208
-
209
-
210
-
211
 |
 |