3Ware 7506-8 User Guide - Page 101
Specifying a hot spare, Rebuilding a redundant array with a hot swap drive, Add Spare, Remove Drive
 |
UPC - 693494750683
View all 3Ware 7506-8 manuals
Add to My Manuals
Save this manual to your list of manuals |
Page 101 highlights
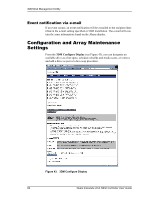
Configuration and Array Maintenance Settings Specifying a hot spare Escalade ATA RAID Controllers give you the option to specify a hot spare from one of your available ports (currently shown as offline). Hot spares should be selected after mirror or RAID 5 creation. Refer to Creating a disk array in the 3ware Disk Array Configuration Utility chapter. To specify a hot spare after the system is booted, physically add the spare drive and click on the check box next to the available offline port; then click on the Add Spare button. Note: Hot spare drives must be equal to or larger than the drives used for the redundant array. Auto rebuild of a redundant array If a hot spare is specified and the array degrades, an event notification is generated and the hot spare dynamically replaces the failed drive in a redundant array without user intervention. Rebuild will automatically be launched as background process and an event notification will notify the user when the rebuild process is complete (if 3DM is running and e-mail notification is setup). Rebuilding a redundant array with a hot swap drive Hot swap allows a user to replace a failed drive in a redundant array while the system remains up. Hot swap can be used when 24x7 system operation is a consideration. If multiple drives are faulted in a RAID 10 configuration, the drives are rebuilt sequentially starting with the lowest port number. 1 Click on the check box of the failed drive. 2 Click the Remove Drive button. 3 Physically remove the failed drive and replace it with a new drive. 4 Click on the check box of the new drive. 5 Click the Add Drive button. 6 Click on the check boxes of at least two members of the array to be rebuilt. This should include the new drive added in step 3. 7 Click the Rebuild Array button. The rebuild process will run in the background and an event notification will be sent when it is completed. Selecting Force Continue on Source Errors Selecting the Force Continue on Source Errors check box prior to rebuilding the array ensures rebuilds are not terminated if ECC errors are detected on www.3ware.com 93
-
 1
1 -
2
-
3
-
4
-
5
-
6
-
7
-
8
-
9
-
10
-
11
-
12
-
13
-
14
-
15
-
16
-
17
-
18
-
19
-
20
-
21
-
22
-
23
-
24
-
25
-
26
-
27
-
28
-
29
-
30
-
31
-
32
-
33
-
34
-
35
-
36
-
37
-
38
-
39
-
40
-
41
-
42
-
43
-
44
-
45
-
46
-
47
-
48
-
49
-
50
-
51
-
52
-
53
-
54
-
55
-
56
-
57
-
58
-
59
-
60
-
61
-
62
-
63
-
64
-
65
-
66
-
67
-
68
-
69
-
70
-
71
-
72
-
73
-
74
-
75
-
76
-
77
-
78
-
79
-
80
-
81
-
82
-
83
-
84
-
85
-
86
-
87
-
88
-
89
-
90
-
91
-
92
-
93
-
94
-
95
-
 96
96 -
 97
97 -
 98
98 -
 99
99 -
 100
100 -
 101
101 -
 102
102 -
 103
103 -
 104
104 -
 105
105 -
 106
106 -
107
-
108
-
109
-
110
-
111
-
112
-
113
-
114
-
115
-
116
-
117
-
118
-
119
-
120
-
121
-
122
-
123
-
124
-
125
-
126
 |
 |