3Ware 7506-8 User Guide - Page 88
Windows Installation, Installing 3DM for Windows 2000/XP/2003, d:\windows\3dm\3dmsetup.exe, Start
 |
UPC - 693494750683
View all 3Ware 7506-8 manuals
Add to My Manuals
Save this manual to your list of manuals |
Page 88 highlights
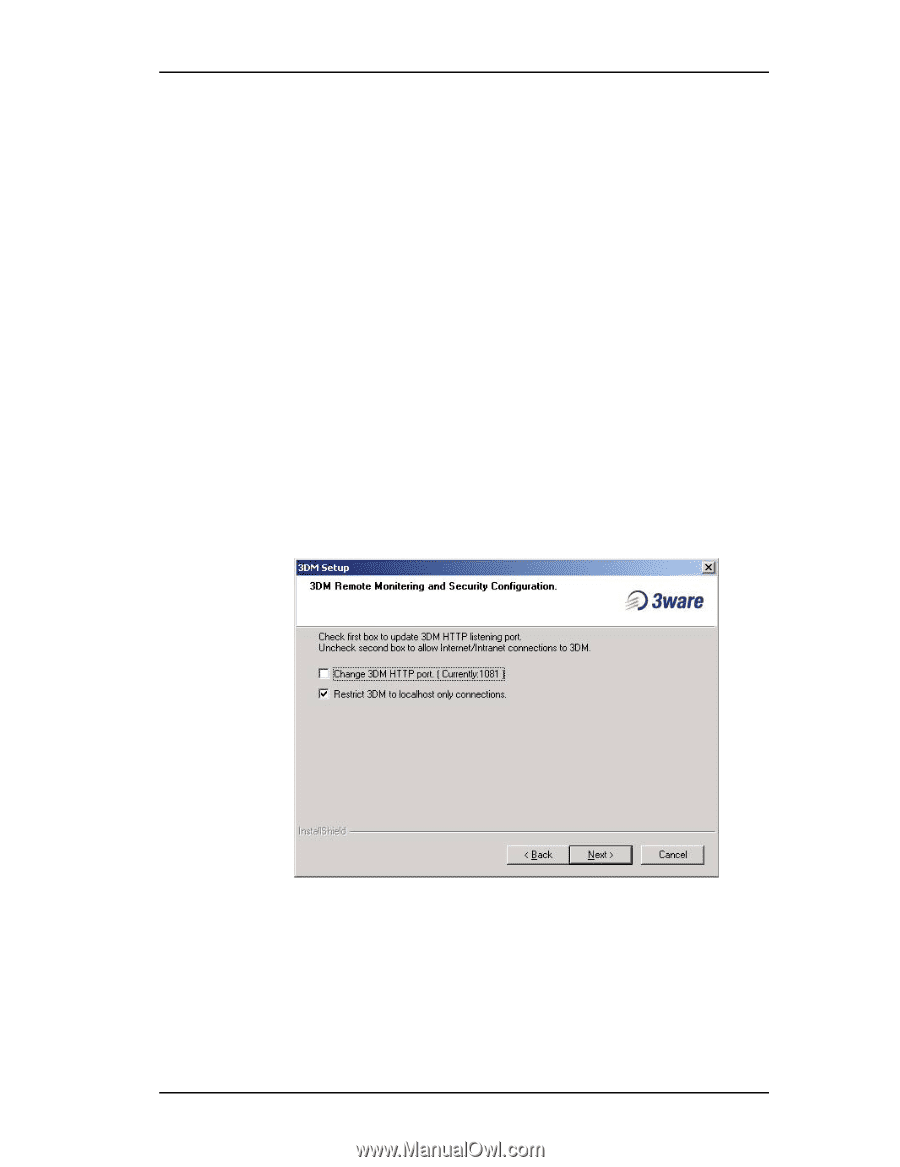
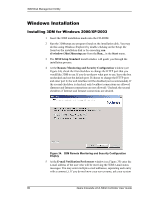
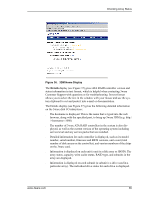
3DM Disk Management Utility Windows Installation Installing 3DM for Windows 2000/XP/2003 1 Insert the 3DM installation media into the CD-ROM. 2 Run the 3DMsetup.exe program found on the installation disk. You may do this using Windows Explorer by double-clicking on the Setup file found on the installation disk or by executing run d:\windows\3dm\3dmsetup.exe from the Run... in the Start menu. 3 The 3DM Setup Standard install window will guide you through the installation process. 4 At the Remote Monitoring and Security Configuration window (see Figure 34), check the first checkbox to change the HTTP port that you would like 3DM to use. If you do not know what port to use, leave the box unchecked and use the default port. If choose to change the HTTP port and enter port 0, the web interface will be disabled (not recommended). If the second checkbox is checked, only localhost connections are allowed (Internet and Intranet connections are not allowed). Uncheck the second checkbox if Internet and Intranet connections are desired. Figure 34. 3DM Remote Monitoring and Security Configuration Display 5 At the E-mail Notification Preferences window (see Figure 35) enter the e-mail address of the user who will be receiving the 3DM e-mail status messages. You may enter multiple e-mail addresses, separating each entry with a comma (,). If you do not know your server name, ask your system 80 3ware Escalade ATA RAID Controller User Guide
-
 1
1 -
2
-
3
-
4
-
5
-
6
-
7
-
8
-
9
-
10
-
11
-
12
-
13
-
14
-
15
-
16
-
17
-
18
-
19
-
20
-
21
-
22
-
23
-
24
-
25
-
26
-
27
-
28
-
29
-
30
-
31
-
32
-
33
-
34
-
35
-
36
-
37
-
38
-
39
-
40
-
41
-
42
-
43
-
44
-
45
-
46
-
47
-
48
-
49
-
50
-
51
-
52
-
53
-
54
-
55
-
56
-
57
-
58
-
59
-
60
-
61
-
62
-
63
-
64
-
65
-
66
-
67
-
68
-
69
-
70
-
71
-
72
-
73
-
74
-
75
-
76
-
77
-
78
-
79
-
80
-
81
-
82
-
 83
83 -
 84
84 -
 85
85 -
 86
86 -
 87
87 -
 88
88 -
 89
89 -
 90
90 -
 91
91 -
 92
92 -
 93
93 -
94
-
95
-
96
-
97
-
98
-
99
-
100
-
101
-
102
-
103
-
104
-
105
-
106
-
107
-
108
-
109
-
110
-
111
-
112
-
113
-
114
-
115
-
116
-
117
-
118
-
119
-
120
-
121
-
122
-
123
-
124
-
125
-
126
 |
 |