3Ware 7506-8 User Guide - Page 49
Rebuild, Disk Array Configuration Utility, Available Drives, Enter,
 |
UPC - 693494750683
View all 3Ware 7506-8 manuals
Add to My Manuals
Save this manual to your list of manuals |
Page 49 highlights
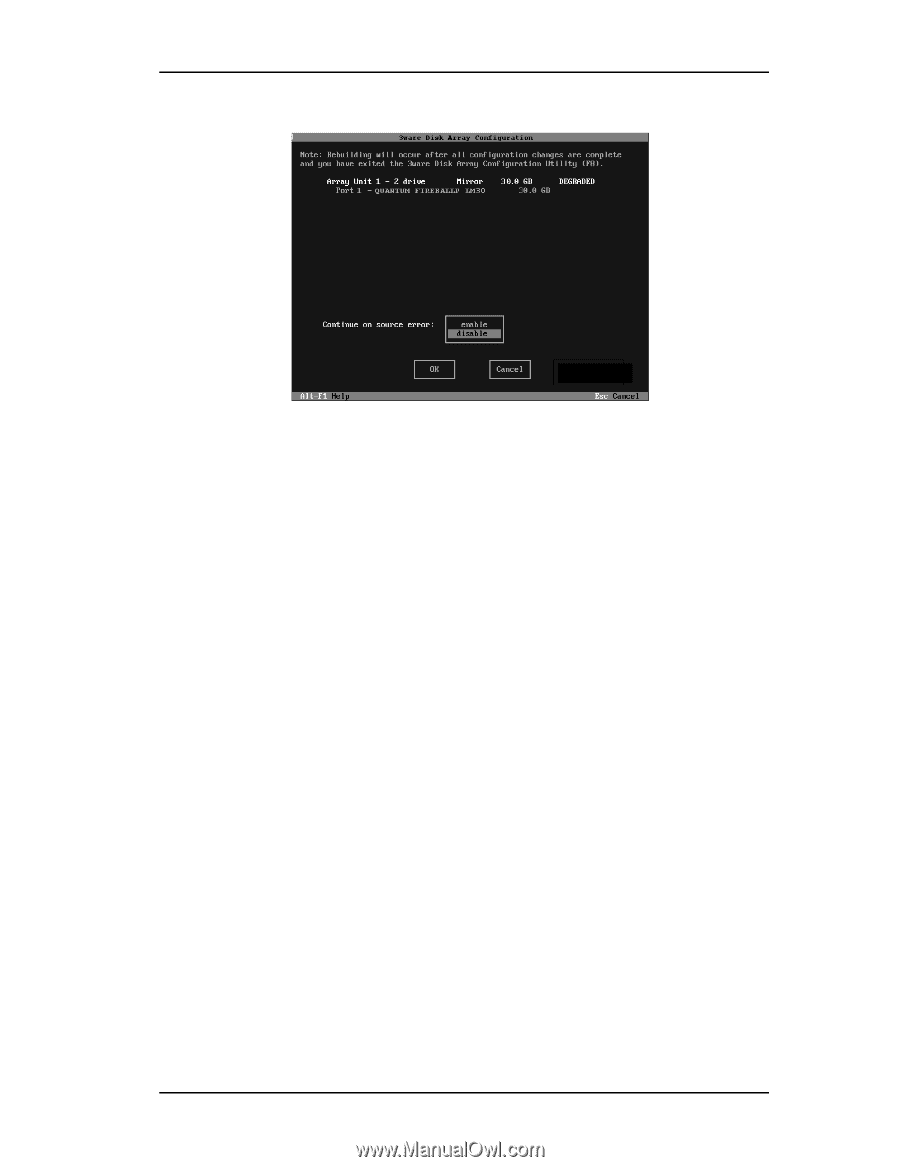
Rebuilding a RAID 5 disk array Figure 21. Continue on Source Error Example 3 (Optional) Enable "Continue on source error" if desired. You may want to enable this option if an initial rebuild failed because of an ECC error on the source disk. Enabling this option prior to rebuilding the array ensures the rebuild is not terminated if ECC errors are detected on the source disk. Uncorrectable blocks will be rewritten, but the data may be incorrect. It is recommended that you perform a file system check after the rebuild completes. 4 Confirm that you selected the correct array by hitting OK in the Rebuild confirmation display. 5 Select F8 to exit the Disk Array Configuration Utility. The array will begin rebuilding after completion of the operating system load. 6 If the rebuild fails and you have no Available Drives, you must power down the system and replace the failed or Not In Use drive. Power on the system and enter the Disk Array Configuration Utility. 7 Select an available drive to replace the faulted drive in the array by navigating the cursor over the available drive and pressing Enter (see Figure 22). An asterisk in the left most column indicates the drive is selected. 8 Navigate to the degraded array and press Enter to select it. www.3ware.com 41
-
 1
1 -
2
-
3
-
4
-
5
-
6
-
7
-
8
-
9
-
10
-
11
-
12
-
13
-
14
-
15
-
16
-
17
-
18
-
19
-
20
-
21
-
22
-
23
-
24
-
25
-
26
-
27
-
28
-
29
-
30
-
31
-
32
-
33
-
34
-
35
-
36
-
37
-
38
-
39
-
40
-
41
-
42
-
43
-
 44
44 -
 45
45 -
 46
46 -
 47
47 -
 48
48 -
 49
49 -
 50
50 -
 51
51 -
 52
52 -
 53
53 -
 54
54 -
55
-
56
-
57
-
58
-
59
-
60
-
61
-
62
-
63
-
64
-
65
-
66
-
67
-
68
-
69
-
70
-
71
-
72
-
73
-
74
-
75
-
76
-
77
-
78
-
79
-
80
-
81
-
82
-
83
-
84
-
85
-
86
-
87
-
88
-
89
-
90
-
91
-
92
-
93
-
94
-
95
-
96
-
97
-
98
-
99
-
100
-
101
-
102
-
103
-
104
-
105
-
106
-
107
-
108
-
109
-
110
-
111
-
112
-
113
-
114
-
115
-
116
-
117
-
118
-
119
-
120
-
121
-
122
-
123
-
124
-
125
-
126
 |
 |