Brother International BAS-375E Instruction Manual - English - Page 37
Shifting a stitch pattern
 |
View all Brother International BAS-375E manuals
Add to My Manuals
Save this manual to your list of manuals |
Page 37 highlights
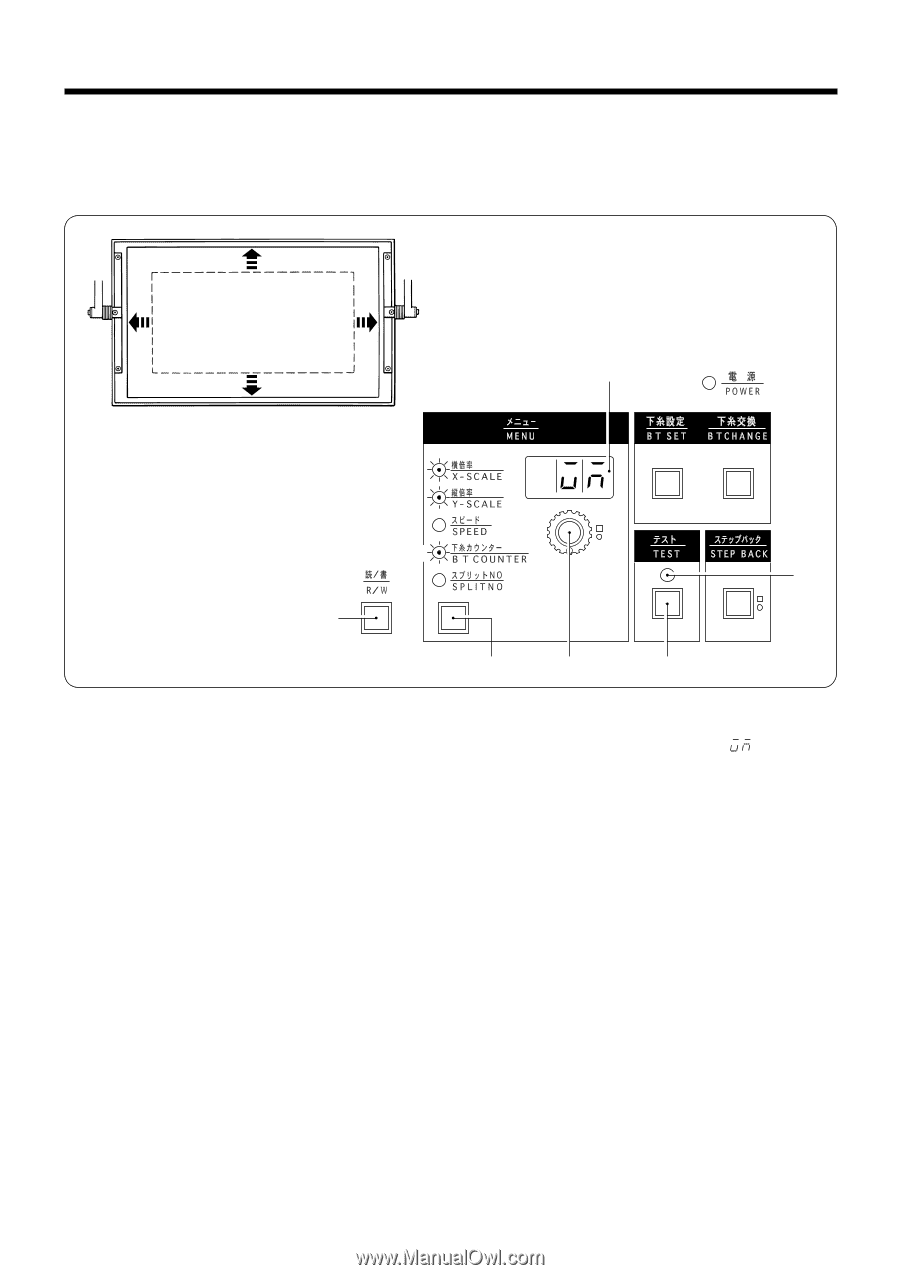
Chapter 5 OPERATING PROCEDURE 12. Shifting a stitch pattern q Programs which have already been programmed can be moved up, down and to the left and right. (However, such patterns will be reset if the power supply is turned off or the program number is changed.) q The feed position can be set to the any position desired. C A B t D u i !0 !6 r y !2 !5 1. Press the MENU switch y until the B.T.COUNTER indicator !0 illuminates. 2. Press and hold the TEST switch !5 and press R/W switch r. The test indicator !6 will light, and < > will appear in the counter t. 3. Press the MENU switch y so the either the X-SCALE indicator u or Y-SCALE indicator i illuminates. 4. Turn the setting dial !2 to move the feed mechanism one pulse at a time. q If the setting dial is turned counterclockwise while the X-SCALE indicator is illuminated, the feed mechanism will move to the right. q If the setting dial is turned clockwise while the X-SCALE indicator is illuminated, the feed mechanism will move to the left. q If the setting dial is turned counterclockwise while the Y-SCALE indicator is illuminated, the feed mechanism will move up. q If the setting dial is turned clockwise while the Y-SCALE indicator is illuminated, the feed mechanism will move down. * When moving the stitch pattern, the sewing start position can be moved to any desired point within the sewing area, but if the pattern goes outside the sewing area, an error will not be able to sew the pattern. Give consideration to the pattern as a whole when moving it. 5. When the TEST switch !5 is pressed, the TEST indicator !6 and display window t will both switch off and they will return to the regular indication. BAS-364E, 366E, 370E, 375E 31
-
 1
1 -
2
-
3
-
4
-
5
-
6
-
7
-
8
-
9
-
10
-
11
-
12
-
13
-
14
-
15
-
16
-
17
-
18
-
19
-
20
-
21
-
22
-
23
-
24
-
25
-
26
-
27
-
28
-
29
-
30
-
31
-
 32
32 -
 33
33 -
 34
34 -
 35
35 -
 36
36 -
 37
37 -
 38
38 -
 39
39 -
 40
40 -
 41
41 -
 42
42 -
43
-
44
-
45
-
46
-
47
-
48
-
49
-
50
-
51
-
52
-
53
-
54
-
55
-
56
-
57
-
58
-
59
-
60
-
61
-
62
-
63
-
64
-
65
-
66
-
67
-
68
 |
 |