Brother International BAS-375E Instruction Manual - English - Page 39
Sewing operation
 |
View all Brother International BAS-375E manuals
Add to My Manuals
Save this manual to your list of manuals |
Page 39 highlights
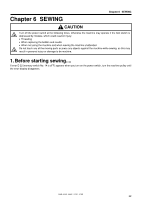
Chapter 6 SEWING 2. Sewing operation ON OFF q w t e u y r 1. Turn the power switch q on. The POWER indicator on the operation panel will light. 2. Insert the floppy disk w. 3. Press the PROGRAM No. select switch e to select the desired program number. 4. Press Program Read/Write switch r. The floppy disk drive indicator will light and the PROGRAM No. display will show a "P" while the data is being read. When reading is completed, an alarm will sound and the indicator will go out, then the PROGRAM No. display will show the program number. 5. Step on the work clamp lift switch t to raise the work clamp. 6. Insert the work piece under the work clamp, and press the work clamp lift switch y to lower the clamp. 7. Press the start switch u. The work clamp will return to the origin, and will then advance to the sewing start position. This is only required the fist time a program is sewing. 8. Press the start switch u again to start sewing. 9. After sewing is completed, the thread cutter will operate, then the work clamp will rise. When the power is turned on after once being turned off, the same pattern of sewing can be continued since the machine still stored the sewing data from the last time. BAS-364E, 366E, 370E, 375E 33
-
 1
1 -
2
-
3
-
4
-
5
-
6
-
7
-
8
-
9
-
10
-
11
-
12
-
13
-
14
-
15
-
16
-
17
-
18
-
19
-
20
-
21
-
22
-
23
-
24
-
25
-
26
-
27
-
28
-
29
-
30
-
31
-
32
-
33
-
 34
34 -
 35
35 -
 36
36 -
 37
37 -
 38
38 -
 39
39 -
 40
40 -
 41
41 -
 42
42 -
 43
43 -
 44
44 -
45
-
46
-
47
-
48
-
49
-
50
-
51
-
52
-
53
-
54
-
55
-
56
-
57
-
58
-
59
-
60
-
61
-
62
-
63
-
64
-
65
-
66
-
67
-
68
 |
 |