Brother International DCP 8045D Users Manual - English - Page 213
Scan To Button, PC Name in the Display Name field. The DCP's LCD displays
 |
UPC - 012502610335
View all Brother International DCP 8045D manuals
Add to My Manuals
Save this manual to your list of manuals |
Page 213 highlights
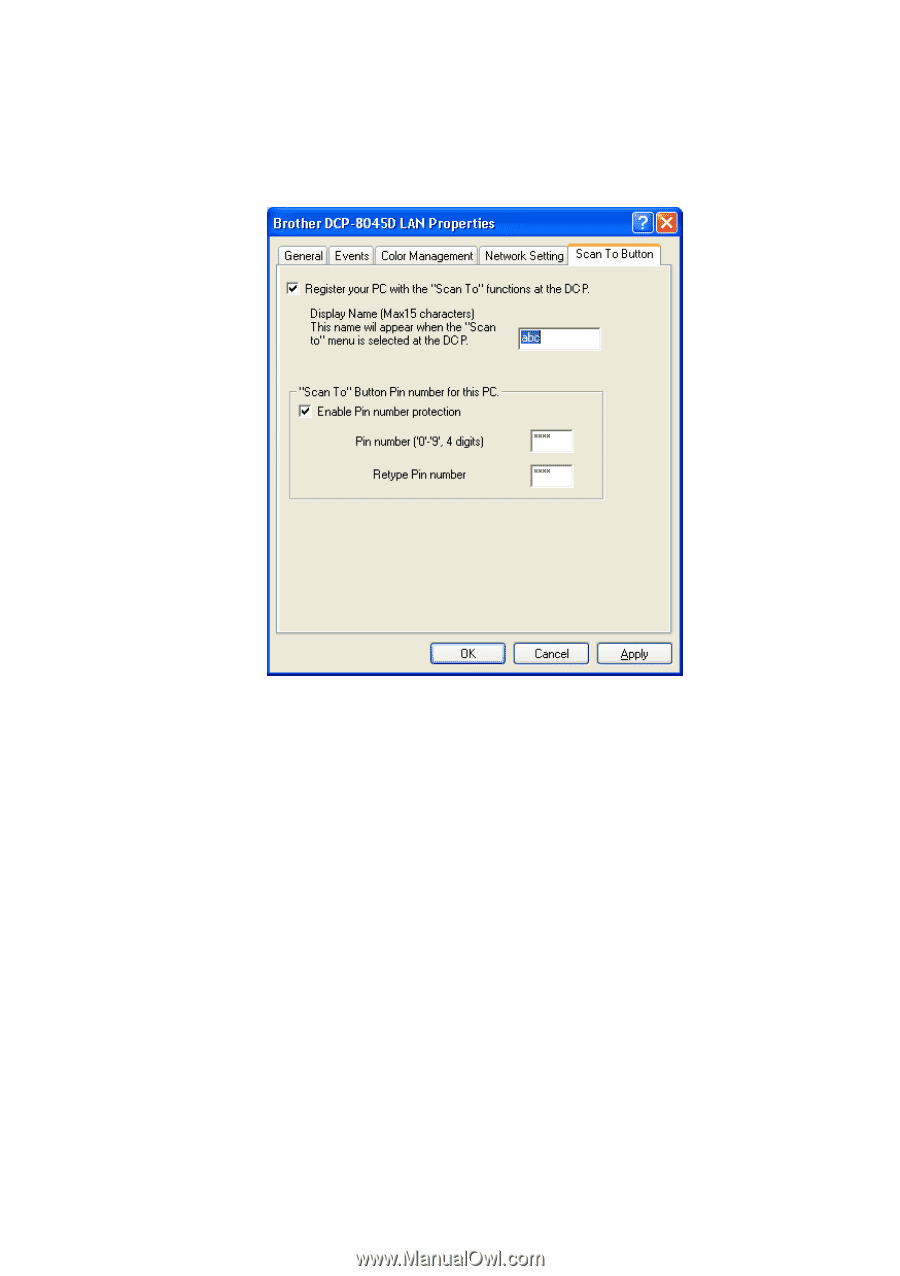
3 Click the Scan To Button tab in the dialog box and enter your PC Name in the Display Name field. The DCP's LCD displays the Name you enter. Default setting is your PC Name. You can enter a name if you like. 4 You can avoid receiving unwanted documents by setting a 4-digit PIN Number. Enter your PIN Number in the PIN Number and Retype PIN Number field. To send data to a PC protected by a PIN Number, the LCD prompts to enter the PIN Number before the document can be scanned and sent to the DCP. (See Using the Scan key on page 12-5 to 12-8.) NETWORK SCANNING (WINDOWS® 98/98SE/ME/2000 PROFESSIONAL AND XP ONLY) 12 - 4
-
 1
1 -
2
-
3
-
4
-
5
-
6
-
7
-
8
-
9
-
10
-
11
-
12
-
13
-
14
-
15
-
16
-
17
-
18
-
19
-
20
-
21
-
22
-
23
-
24
-
25
-
26
-
27
-
28
-
29
-
30
-
31
-
32
-
33
-
34
-
35
-
36
-
37
-
38
-
39
-
40
-
41
-
42
-
43
-
44
-
45
-
46
-
47
-
48
-
49
-
50
-
51
-
52
-
53
-
54
-
55
-
56
-
57
-
58
-
59
-
60
-
61
-
62
-
63
-
64
-
65
-
66
-
67
-
68
-
69
-
70
-
71
-
72
-
73
-
74
-
75
-
76
-
77
-
78
-
79
-
80
-
81
-
82
-
83
-
84
-
85
-
86
-
87
-
88
-
89
-
90
-
91
-
92
-
93
-
94
-
95
-
96
-
97
-
98
-
99
-
100
-
101
-
102
-
103
-
104
-
105
-
106
-
107
-
108
-
109
-
110
-
111
-
112
-
113
-
114
-
115
-
116
-
117
-
118
-
119
-
120
-
121
-
122
-
123
-
124
-
125
-
126
-
127
-
128
-
129
-
130
-
131
-
132
-
133
-
134
-
135
-
136
-
137
-
138
-
139
-
140
-
141
-
142
-
143
-
144
-
145
-
146
-
147
-
148
-
149
-
150
-
151
-
152
-
153
-
154
-
155
-
156
-
157
-
158
-
159
-
160
-
161
-
162
-
163
-
164
-
165
-
166
-
167
-
168
-
169
-
170
-
171
-
172
-
173
-
174
-
175
-
176
-
177
-
178
-
179
-
180
-
181
-
182
-
183
-
184
-
185
-
186
-
187
-
188
-
189
-
190
-
191
-
192
-
193
-
194
-
195
-
196
-
197
-
198
-
199
-
200
-
201
-
202
-
203
-
204
-
205
-
206
-
207
-
 208
208 -
 209
209 -
 210
210 -
 211
211 -
 212
212 -
 213
213 -
 214
214 -
 215
215 -
 216
216 -
 217
217 -
 218
218 -
219
-
220
-
221
-
222
-
223
-
224
-
225
-
226
-
227
-
228
-
229
-
230
-
231
-
232
-
233
-
234
-
235
-
236
-
237
-
238
-
239
-
240
-
241
-
242
-
243
-
244
-
245
-
246
-
247
-
248
-
249
-
250
-
251
-
252
-
253
-
254
-
255
-
256
-
257
-
258
-
259
-
260
-
261
-
262
-
263
-
264
-
265
-
266
-
267
-
268
-
269
-
270
-
271
-
272
-
273
-
274
-
275
-
276
-
277
-
278
-
279
-
280
-
281
-
282
-
283
-
284
 |
 |
NETWORK SCANNING (WINDOWS
®
98/98SE/ME/2000 PROFESSIONAL AND XP ONLY)
12 - 4
3
Click the
Scan To Button
tab in the dialog box and enter your
PC Name in the Display Name field. The DCP's LCD displays
the Name you enter. Default setting is your PC Name. You can
enter a name if you like.
4
You can avoid receiving unwanted documents by setting a
4-digit PIN Number. Enter your PIN Number in the PIN Number
and Retype PIN Number field. To send data to a PC protected
by a PIN Number, the LCD prompts to enter the PIN Number
before the document can be scanned and sent to the DCP. (See
Using the Scan key
on page 12-5 to 12-8.)