Brother International DCP 8045D Users Manual - English - Page 38
The side to be printed on must be face down., When you put paper in the paper tray
 |
UPC - 012502610335
View all Brother International DCP 8045D manuals
Add to My Manuals
Save this manual to your list of manuals |
Page 38 highlights
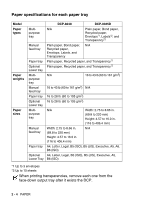
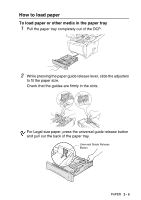
3 Fan the stack of paper well to avoid paper jams and misfeeds. 4 Put paper in the paper tray. Check that the paper is flat in the tray, below the maximum paper mark, and that the paper guide is flush against the paper stack. Up to here. 5 Put the paper tray firmly back in the DCP and unfold the support flap before you use the DCP. Support Flap with Extension When you put paper in the paper tray, please remember the following ■ The side to be printed on must be face down. ■ Put the leading edge (top of the paper) in first and push it gently into the tray. ■ To copy Legal size paper, unfold the support flap extension, too. 2 - 6 PAPER
-
 1
1 -
2
-
3
-
4
-
5
-
6
-
7
-
8
-
9
-
10
-
11
-
12
-
13
-
14
-
15
-
16
-
17
-
18
-
19
-
20
-
21
-
22
-
23
-
24
-
25
-
26
-
27
-
28
-
29
-
30
-
31
-
32
-
 33
33 -
 34
34 -
 35
35 -
 36
36 -
 37
37 -
 38
38 -
 39
39 -
 40
40 -
 41
41 -
 42
42 -
 43
43 -
44
-
45
-
46
-
47
-
48
-
49
-
50
-
51
-
52
-
53
-
54
-
55
-
56
-
57
-
58
-
59
-
60
-
61
-
62
-
63
-
64
-
65
-
66
-
67
-
68
-
69
-
70
-
71
-
72
-
73
-
74
-
75
-
76
-
77
-
78
-
79
-
80
-
81
-
82
-
83
-
84
-
85
-
86
-
87
-
88
-
89
-
90
-
91
-
92
-
93
-
94
-
95
-
96
-
97
-
98
-
99
-
100
-
101
-
102
-
103
-
104
-
105
-
106
-
107
-
108
-
109
-
110
-
111
-
112
-
113
-
114
-
115
-
116
-
117
-
118
-
119
-
120
-
121
-
122
-
123
-
124
-
125
-
126
-
127
-
128
-
129
-
130
-
131
-
132
-
133
-
134
-
135
-
136
-
137
-
138
-
139
-
140
-
141
-
142
-
143
-
144
-
145
-
146
-
147
-
148
-
149
-
150
-
151
-
152
-
153
-
154
-
155
-
156
-
157
-
158
-
159
-
160
-
161
-
162
-
163
-
164
-
165
-
166
-
167
-
168
-
169
-
170
-
171
-
172
-
173
-
174
-
175
-
176
-
177
-
178
-
179
-
180
-
181
-
182
-
183
-
184
-
185
-
186
-
187
-
188
-
189
-
190
-
191
-
192
-
193
-
194
-
195
-
196
-
197
-
198
-
199
-
200
-
201
-
202
-
203
-
204
-
205
-
206
-
207
-
208
-
209
-
210
-
211
-
212
-
213
-
214
-
215
-
216
-
217
-
218
-
219
-
220
-
221
-
222
-
223
-
224
-
225
-
226
-
227
-
228
-
229
-
230
-
231
-
232
-
233
-
234
-
235
-
236
-
237
-
238
-
239
-
240
-
241
-
242
-
243
-
244
-
245
-
246
-
247
-
248
-
249
-
250
-
251
-
252
-
253
-
254
-
255
-
256
-
257
-
258
-
259
-
260
-
261
-
262
-
263
-
264
-
265
-
266
-
267
-
268
-
269
-
270
-
271
-
272
-
273
-
274
-
275
-
276
-
277
-
278
-
279
-
280
-
281
-
282
-
283
-
284
 |
 |
2 - 6
PAPER
3
Fan the stack of paper well to avoid paper jams and misfeeds.
4
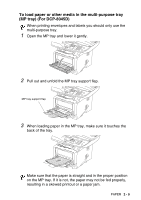
Put paper in the paper tray.
Check that the paper is flat in the tray, below the maximum
paper mark, and that the paper guide is flush against the paper
stack.
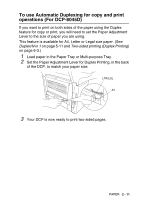
5
Put the paper tray firmly back in the DCP and unfold the support
flap before you use the DCP.
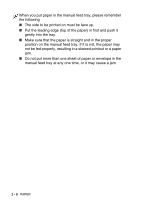
When you put paper in the paper tray, please remember the
following
■
The side to be printed on must be face down.
■
Put the leading edge (top of the paper) in first and push it
gently into the tray.
■
To copy Legal size paper, unfold the support flap extension,
too.
Up to here.
Support Flap with Extension