Brother International HL 1240 Service Manual - Page 100
Paper Feed Roller ASSY
 |
UPC - 012502600855
View all Brother International HL 1240 manuals
Add to My Manuals
Save this manual to your list of manuals |
Page 100 highlights
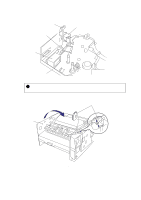
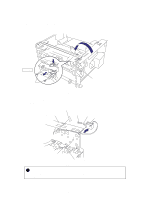
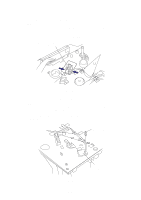
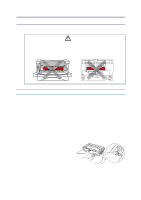
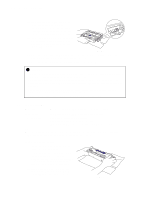
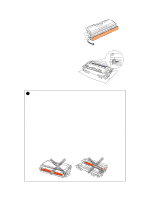
CHAPTER 4 DISASSEMBLY AND RE-ASSEMBLY 3.21 Paper Feed Roller ASSY NOTE: Be sure to remove all the covers and the PCBs before removing the paper feed roller ASSY. (1) Unhook the black plastic hook on the shaft to remove gear 21. Gear 21 (hook) Fig. 4-64 (2) Turn the main frame the right way up. (3) Unhook the hook on the bearing, then slightly slide the paper feed roller ASSY to the drive unit side. (4) Lift up and remove the paper feed roller with the bearing and joint and remove the bearing and joint from the paper feed roller ASSY. Paper feed roller ASSY Bearing Joint Fig. 4-65 Bearing 4-36 (hook)
-
 1
1 -
2
-
3
-
4
-
5
-
6
-
7
-
8
-
9
-
10
-
11
-
12
-
13
-
14
-
15
-
16
-
17
-
18
-
19
-
20
-
21
-
22
-
23
-
24
-
25
-
26
-
27
-
28
-
29
-
30
-
31
-
32
-
33
-
34
-
35
-
36
-
37
-
38
-
39
-
40
-
41
-
42
-
43
-
44
-
45
-
46
-
47
-
48
-
49
-
50
-
51
-
52
-
53
-
54
-
55
-
56
-
57
-
58
-
59
-
60
-
61
-
62
-
63
-
64
-
65
-
66
-
67
-
68
-
69
-
70
-
71
-
72
-
73
-
74
-
75
-
76
-
77
-
78
-
79
-
80
-
81
-
82
-
83
-
84
-
85
-
86
-
87
-
88
-
89
-
90
-
91
-
92
-
93
-
94
-
 95
95 -
 96
96 -
 97
97 -
 98
98 -
 99
99 -
 100
100 -
 101
101 -
 102
102 -
 103
103 -
 104
104 -
 105
105 -
106
-
107
-
108
-
109
-
110
-
111
-
112
-
113
-
114
-
115
-
116
-
117
-
118
-
119
-
120
-
121
-
122
-
123
-
124
-
125
-
126
-
127
-
128
-
129
-
130
-
131
-
132
-
133
-
134
-
135
-
136
-
137
-
138
-
139
-
140
-
141
-
142
-
143
-
144
-
145
-
146
-
147
-
148
-
149
-
150
-
151
-
152
-
153
-
154
-
155
-
156
-
157
-
158
-
159
-
160
-
161
-
162
-
163
-
164
-
165
-
166
-
167
-
168
-
169
-
170
-
171
-
172
-
173
-
174
-
175
-
176
-
177
-
178
-
179
-
180
-
181
-
182
-
183
-
184
-
185
-
186
-
187
-
188
-
189
-
190
-
191
-
192
-
193
-
194
-
195
-
196
-
197
-
198
-
199
-
200
-
201
-
202
-
203
-
204
-
205
-
206
-
207
-
208
-
209
-
210
-
211
-
212
-
213
-
214
-
215
-
216
-
217
-
218
-
219
-
220
-
221
-
222
-
223
-
224
-
225
-
226
-
227
-
228
-
229
-
230
-
231
-
232
-
233
-
234
-
235
-
236
-
237
-
238
-
239
-
240
-
241
-
242
-
243
-
244
-
245
-
246
-
247
-
248
-
249
-
250
-
251
-
252
-
253
-
254
-
255
-
256
-
257
-
258
-
259
-
260
-
261
-
262
-
263
-
264
-
265
-
266
-
267
-
268
-
269
-
270
-
271
-
272
-
273
-
274
-
275
-
276
-
277
-
278
-
279
-
280
-
281
-
282
-
283
-
284
-
285
-
286
-
287
-
288
-
289
-
290
-
291
-
292
-
293
-
294
-
295
-
296
-
297
-
298
-
299
-
300
-
301
-
302
-
303
-
304
-
305
-
306
-
307
-
308
-
309
-
310
-
311
-
312
-
313
-
314
-
315
-
316
-
317
-
318
-
319
-
320
-
321
-
322
-
323
-
324
-
325
-
326
-
327
-
328
-
329
-
330
-
331
-
332
-
333
 |
 |

CHAPTER 4
DISASSEMBLY AND RE-ASSEMBLY
4-36
3.21
Paper Feed Roller ASSY
NOTE:
Be sure to remove all the covers and the PCBs before removing the paper feed roller ASSY.
(1)
Unhook the black plastic hook on the shaft to remove gear 21.
Fig. 4-64
(2)
Turn the main frame the right way up.
(3)
Unhook the hook on the bearing, then slightly slide the paper feed roller ASSY to the drive
unit side.
(4)
Lift up and remove the paper feed roller with the bearing and joint and remove the bearing
and joint from the paper feed roller ASSY.
Fig. 4-65
Gear 21
(hook)
(hook)
Bearing
Paper feed roller ASSY
Joint
Bearing