Brother International HL 1240 Service Manual - Page 121
Causes & countermeasures, Problem, Type of Jam, Cause, Remedy - alarm light on
 |
UPC - 012502600855
View all Brother International HL 1240 manuals
Add to My Manuals
Save this manual to your list of manuals |
Page 121 highlights
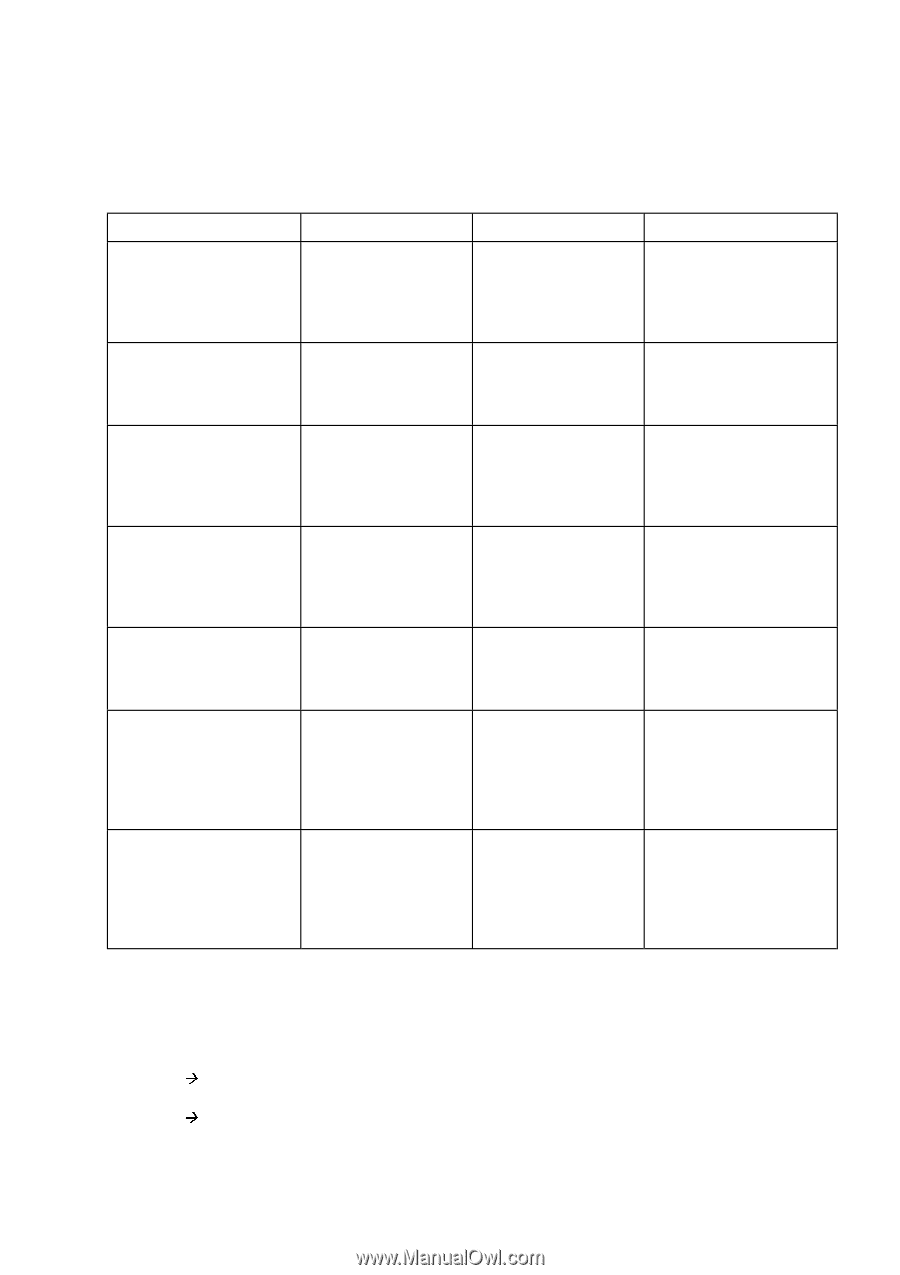
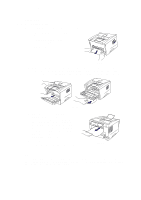
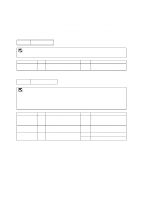
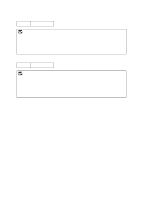
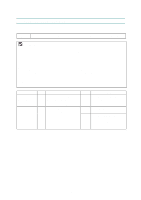
CHAPTER 6 TROUBLESHOOTING 4.2.2 Causes & countermeasures The causes for paper jam problems vary depending on the location of the paper jam. When a paper jam occurs inside the printer, you have to find the location of the paper jam first, remove the jammed paper and then take the appropriate countermeasure referring to the table below; Problem Type of Jam Cause Remedy Jam when the printer is turned on. Paper stuck The front registration sensor or paper eject sensor is turned on. Remove the paper inside the printer. If there is no paper, check the suspect sensors referring to NOTE. Top of paper stopped at 230mm from the second exit roller. Next paper is not fed. Jam caused by paper length detected as longer than 400mm (16 in). The front registration sensor is not returning properly and is not turning off. Check front registration sensor motion referring to NOTE. Bottom of paper stopped around the transfer roller. Jam caused by paper length detected as shorter than 80mm. The front registration sensor was turned off early. Malfunction of actuator or hardware noise. Check the front registration sensor referring to NOTE. Top of paper stopped between the paper feed roller and the pick-up roller. Jam caused by a paper feed delay. Paper was not fed in at the proper timing due to paper dust or wear of the rubber pick-up roller. Remove the paper dust attached to the pick-up roller. If the rubber is worn out, replace it with a new one. Top of paper stopped at 35mm from the contact point of the heat roller and pressure roller. Jam caused by the paper sensed as not being ejected from the paper eject sensor. The paper eject sensor is not working properly and has not turned off. (single printing) Check sensor motion referring to NOTE. Top of paper stopped at 30 - 40mm from the contact point of the heat roller and pressure roller. Jammed paper is not printed at all. Jam caused by incorrect paper pick up. The surface of the separation pad or the pick-up roller is dirty or worn out. 1) Clean the surface of the separation pad or pick-up roller. 2) Replace the separation pad or pick-up roller. Jam after paper is ejected. Jam caused by the paper sensed as not being ejected from the paper eject sensor. The paper eject sensor or front registration sensor is not working properly and has not turned off. (continuous printing) Check sensor motion referring to NOTE. NOTE: How to check the sensors: 1) Turn off the printer power switch, open the front cover, and remove the drum unit. 2) Turn on the printer while pressing the control panel button. The Drum LED comes ON. 3) Lightly press the panel button again. Alarm LED is ON = Front registration sensor is turned ON. 4) Press and release the panel button again. Drum LED is ON = Paper eject sensor is turned ON. For details on the sensors, see 'Factory inspection mode' in Subsection 9.2. 6-11
-
 1
1 -
2
-
3
-
4
-
5
-
6
-
7
-
8
-
9
-
10
-
11
-
12
-
13
-
14
-
15
-
16
-
17
-
18
-
19
-
20
-
21
-
22
-
23
-
24
-
25
-
26
-
27
-
28
-
29
-
30
-
31
-
32
-
33
-
34
-
35
-
36
-
37
-
38
-
39
-
40
-
41
-
42
-
43
-
44
-
45
-
46
-
47
-
48
-
49
-
50
-
51
-
52
-
53
-
54
-
55
-
56
-
57
-
58
-
59
-
60
-
61
-
62
-
63
-
64
-
65
-
66
-
67
-
68
-
69
-
70
-
71
-
72
-
73
-
74
-
75
-
76
-
77
-
78
-
79
-
80
-
81
-
82
-
83
-
84
-
85
-
86
-
87
-
88
-
89
-
90
-
91
-
92
-
93
-
94
-
95
-
96
-
97
-
98
-
99
-
100
-
101
-
102
-
103
-
104
-
105
-
106
-
107
-
108
-
109
-
110
-
111
-
112
-
113
-
114
-
115
-
 116
116 -
 117
117 -
 118
118 -
 119
119 -
 120
120 -
 121
121 -
 122
122 -
 123
123 -
 124
124 -
 125
125 -
 126
126 -
127
-
128
-
129
-
130
-
131
-
132
-
133
-
134
-
135
-
136
-
137
-
138
-
139
-
140
-
141
-
142
-
143
-
144
-
145
-
146
-
147
-
148
-
149
-
150
-
151
-
152
-
153
-
154
-
155
-
156
-
157
-
158
-
159
-
160
-
161
-
162
-
163
-
164
-
165
-
166
-
167
-
168
-
169
-
170
-
171
-
172
-
173
-
174
-
175
-
176
-
177
-
178
-
179
-
180
-
181
-
182
-
183
-
184
-
185
-
186
-
187
-
188
-
189
-
190
-
191
-
192
-
193
-
194
-
195
-
196
-
197
-
198
-
199
-
200
-
201
-
202
-
203
-
204
-
205
-
206
-
207
-
208
-
209
-
210
-
211
-
212
-
213
-
214
-
215
-
216
-
217
-
218
-
219
-
220
-
221
-
222
-
223
-
224
-
225
-
226
-
227
-
228
-
229
-
230
-
231
-
232
-
233
-
234
-
235
-
236
-
237
-
238
-
239
-
240
-
241
-
242
-
243
-
244
-
245
-
246
-
247
-
248
-
249
-
250
-
251
-
252
-
253
-
254
-
255
-
256
-
257
-
258
-
259
-
260
-
261
-
262
-
263
-
264
-
265
-
266
-
267
-
268
-
269
-
270
-
271
-
272
-
273
-
274
-
275
-
276
-
277
-
278
-
279
-
280
-
281
-
282
-
283
-
284
-
285
-
286
-
287
-
288
-
289
-
290
-
291
-
292
-
293
-
294
-
295
-
296
-
297
-
298
-
299
-
300
-
301
-
302
-
303
-
304
-
305
-
306
-
307
-
308
-
309
-
310
-
311
-
312
-
313
-
314
-
315
-
316
-
317
-
318
-
319
-
320
-
321
-
322
-
323
-
324
-
325
-
326
-
327
-
328
-
329
-
330
-
331
-
332
-
333
 |
 |