Brother International MFC 3100C Users Manual - English - Page 161
Send Fax, Stored Fax Numbers, Destination Fax, Numbers, Input Fax Number, Destination Fax Numbers
 |
UPC - 012502565819
View all Brother International MFC 3100C manuals
Add to My Manuals
Save this manual to your list of manuals |
Page 161 highlights
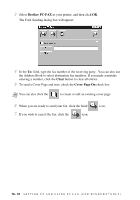
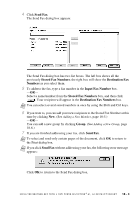
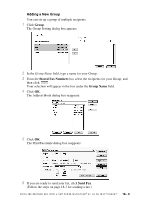
4 Click Send Fax. The Send Fax dialog box appears: The Send Fax dialog box has two list boxes. The left box shows all the previously Stored Fax Numbers; the right box will show the Destination Fax Numbers as you select them. 5 To address the fax, type a fax number in the Input Fax Number box. -OR- Select a name/number from the Stored Fax Numbers box, and then click . Your recipient will appear in the Destination Fax Numbers box. Note You can select several stored numbers at once by using the Shift and Ctrl keys. 6 If you want to, you can add your new recipients to the Stored Fax Number at this time by clicking New. (See Adding a New Member, page 18-5.) -OR- You can add a new group by clicking Group. (See Adding a New Group, page 18-6.) 7 If you are finished addressing your fax, click Send Fax. Note To select and send only certain pages of the document, click OK to return to the Print dialog box. Note If you click Send Fax without addressing your fax, the following error message appears: Click OK to return to the Send Fax dialog box. U S I N G T H E B R O T H E R M F C W I T H A N E W P O W E R M A C I N T O S H ® G 3 , G 4 O R I M A C ™ / I B O O K ™ 18 - 4
-
 1
1 -
2
-
3
-
4
-
5
-
6
-
7
-
8
-
9
-
10
-
11
-
12
-
13
-
14
-
15
-
16
-
17
-
18
-
19
-
20
-
21
-
22
-
23
-
24
-
25
-
26
-
27
-
28
-
29
-
30
-
31
-
32
-
33
-
34
-
35
-
36
-
37
-
38
-
39
-
40
-
41
-
42
-
43
-
44
-
45
-
46
-
47
-
48
-
49
-
50
-
51
-
52
-
53
-
54
-
55
-
56
-
57
-
58
-
59
-
60
-
61
-
62
-
63
-
64
-
65
-
66
-
67
-
68
-
69
-
70
-
71
-
72
-
73
-
74
-
75
-
76
-
77
-
78
-
79
-
80
-
81
-
82
-
83
-
84
-
85
-
86
-
87
-
88
-
89
-
90
-
91
-
92
-
93
-
94
-
95
-
96
-
97
-
98
-
99
-
100
-
101
-
102
-
103
-
104
-
105
-
106
-
107
-
108
-
109
-
110
-
111
-
112
-
113
-
114
-
115
-
116
-
117
-
118
-
119
-
120
-
121
-
122
-
123
-
124
-
125
-
126
-
127
-
128
-
129
-
130
-
131
-
132
-
133
-
134
-
135
-
136
-
137
-
138
-
139
-
140
-
141
-
142
-
143
-
144
-
145
-
146
-
147
-
148
-
149
-
150
-
151
-
152
-
153
-
154
-
155
-
 156
156 -
 157
157 -
 158
158 -
 159
159 -
 160
160 -
 161
161 -
 162
162 -
 163
163 -
 164
164 -
 165
165 -
 166
166 -
167
-
168
-
169
-
170
-
171
-
172
-
173
-
174
-
175
-
176
-
177
-
178
-
179
-
180
-
181
-
182
-
183
-
184
-
185
-
186
-
187
-
188
-
189
-
190
-
191
-
192
-
193
-
194
-
195
-
196
-
197
-
198
-
199
-
200
-
201
-
202
-
203
-
204
-
205
-
206
-
207
-
208
-
209
-
210
 |
 |
