Brother International MFC-J4710DW Users Manual Basic - English - Page 34
Important
 |
View all Brother International MFC-J4710DW manuals
Add to My Manuals
Save this manual to your list of manuals |
Page 34 highlights
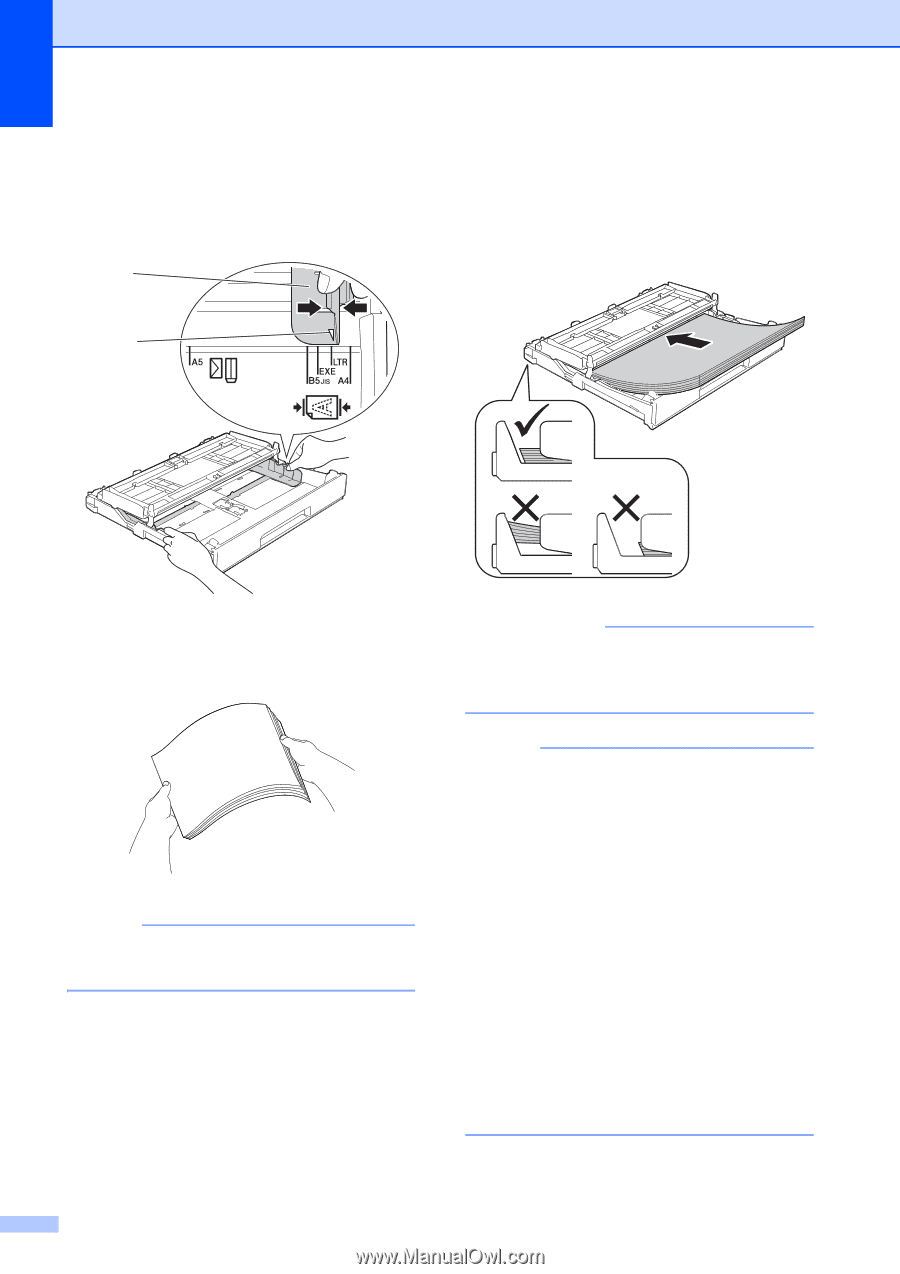
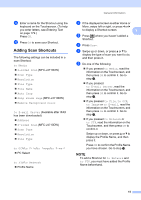
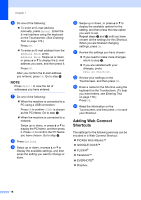
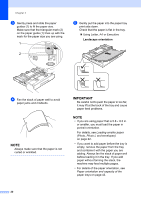
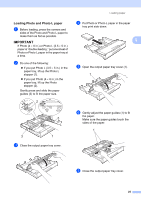
Chapter 2 c Gently press and slide the paper guides (1) to fit the paper size. Make sure that the triangular mark (2) on the paper guide (1) lines up with the mark for the paper size you are using. 1 2 e Gently put the paper into the paper tray print side down. Check that the paper is flat in the tray. Using Letter, A4 or Executive Landscape orientation 2 d Fan the stack of paper well to avoid paper jams and misfeeds. NOTE Always make sure that the paper is not curled or wrinkled. IMPORTANT Be careful not to push the paper in too far; it may lift at the back of the tray and cause paper feed problems. NOTE • If you are using paper that is 5.8 8.3 in. or smaller, you must load the paper in portrait orientation. For details, see Loading smaller paper (Photo, Photo L and envelopes) on page 22. • If you want to add paper before the tray is empty, remove the paper from the tray and combine it with the paper you are adding. Always fan the stack of paper well before loading it in the tray. If you add paper without fanning the stack, the machine may feed multiple pages. • For details of the paper orientation, see Paper orientation and capacity of the paper trays on page 43. 20
-
 1
1 -
2
-
3
-
4
-
5
-
6
-
7
-
8
-
9
-
10
-
11
-
12
-
13
-
14
-
15
-
16
-
17
-
18
-
19
-
20
-
21
-
22
-
23
-
24
-
25
-
26
-
27
-
28
-
 29
29 -
 30
30 -
 31
31 -
 32
32 -
 33
33 -
 34
34 -
 35
35 -
 36
36 -
 37
37 -
 38
38 -
 39
39 -
40
-
41
-
42
-
43
-
44
-
45
-
46
-
47
-
48
-
49
-
50
-
51
-
52
-
53
-
54
-
55
-
56
-
57
-
58
-
59
-
60
-
61
-
62
-
63
-
64
-
65
-
66
-
67
-
68
-
69
-
70
-
71
-
72
-
73
-
74
-
75
-
76
-
77
-
78
-
79
-
80
-
81
-
82
-
83
-
84
-
85
-
86
-
87
-
88
-
89
-
90
-
91
-
92
-
93
-
94
-
95
-
96
-
97
-
98
-
99
-
100
-
101
-
102
-
103
-
104
-
105
-
106
-
107
-
108
-
109
-
110
-
111
-
112
-
113
-
114
-
115
-
116
-
117
-
118
-
119
-
120
-
121
-
122
-
123
-
124
-
125
-
126
-
127
-
128
-
129
-
130
-
131
-
132
-
133
-
134
-
135
-
136
-
137
-
138
-
139
-
140
-
141
-
142
-
143
-
144
-
145
-
146
-
147
-
148
-
149
-
150
-
151
-
152
-
153
-
154
-
155
-
156
-
157
-
158
-
159
-
160
-
161
-
162
-
163
-
164
-
165
-
166
-
167
-
168
-
169
-
170
-
171
-
172
-
173
-
174
-
175
-
176
-
177
-
178
-
179
-
180
-
181
-
182
-
183
-
184
-
185
-
186
-
187
-
188
-
189
-
190
-
191
-
192
-
193
-
194
-
195
-
196
-
197
-
198
-
199
-
200
-
201
-
202
-
203
-
204
-
205
-
206
-
207
-
208
-
209
-
210
-
211
 |
 |