Brother International MFC-J4710DW Users Manual Basic - English - Page 54
Tray use in Fax mode (MFC-J4710DW), Acceptable paper and other print media, Tray use in Fax mode - inkjet all in one printer
 |
View all Brother International MFC-J4710DW manuals
Add to My Manuals
Save this manual to your list of manuals |
Page 54 highlights
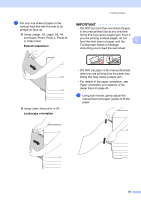
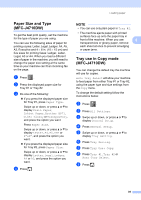
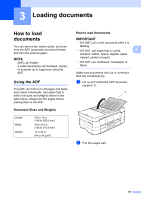
Chapter 2 NOTE You can change the paper size and tray selection temporarily for the next copy. (See Paper Size on page 76 and Tray Select (MFC-J4710DW) on page 76.) Tray use in Fax mode (MFC-J4710DW) 2 You can change the default tray the machine will use for printing received faxes. Auto Tray Select will allow your machine to take paper from Tray #1 first, or from Tray #2 if: Tray #2 is set to a different paper size that is more suitable for the received faxes. Both trays are using the same size paper and Tray #1 is not set to use plain paper. a Press . b Press All Settings. c Swipe up or down, or press a or b to display General Setup. d Press General Setup. e Swipe up or down, or press a or b to display Tray Setting. f Press Tray Setting. g Press Tray Use: Fax. h Press Tray #1, Tray #2 or Auto Tray Select. i Press . Acceptable paper and other print media 2 The print quality can be affected by the type of paper you use in the machine. To get the best print quality for the settings you have chosen, always set the Paper Type to match the type of paper you load. You can use plain paper, inkjet paper (coated paper), glossy paper, transparencies and envelopes. We recommend testing various paper types before buying large quantities. For best results, use Brother paper. When you print on inkjet paper (coated paper), transparencies and glossy paper, be sure to choose the proper print media in the Basic tab of the printer driver or in the Paper Type setting of the machine's menu. (MFC-J4510DW: See Paper Type on page 38.) (MFC-J4710DW: See Paper Size and Type (MFC-J4710DW) on page 39.) When you print on Brother Photo paper, load one extra sheet of the same photo paper in the paper tray. An extra sheet has been included in the paper package for this purpose. When using transparencies or photo paper, remove each sheet at once to prevent smudging or paper jams. Avoid touching the printed surface of the paper immediately after printing; the surface may not be completely dry and may stain your fingers. 40
-
 1
1 -
2
-
3
-
4
-
5
-
6
-
7
-
8
-
9
-
10
-
11
-
12
-
13
-
14
-
15
-
16
-
17
-
18
-
19
-
20
-
21
-
22
-
23
-
24
-
25
-
26
-
27
-
28
-
29
-
30
-
31
-
32
-
33
-
34
-
35
-
36
-
37
-
38
-
39
-
40
-
41
-
42
-
43
-
44
-
45
-
46
-
47
-
48
-
 49
49 -
 50
50 -
 51
51 -
 52
52 -
 53
53 -
 54
54 -
 55
55 -
 56
56 -
 57
57 -
 58
58 -
 59
59 -
60
-
61
-
62
-
63
-
64
-
65
-
66
-
67
-
68
-
69
-
70
-
71
-
72
-
73
-
74
-
75
-
76
-
77
-
78
-
79
-
80
-
81
-
82
-
83
-
84
-
85
-
86
-
87
-
88
-
89
-
90
-
91
-
92
-
93
-
94
-
95
-
96
-
97
-
98
-
99
-
100
-
101
-
102
-
103
-
104
-
105
-
106
-
107
-
108
-
109
-
110
-
111
-
112
-
113
-
114
-
115
-
116
-
117
-
118
-
119
-
120
-
121
-
122
-
123
-
124
-
125
-
126
-
127
-
128
-
129
-
130
-
131
-
132
-
133
-
134
-
135
-
136
-
137
-
138
-
139
-
140
-
141
-
142
-
143
-
144
-
145
-
146
-
147
-
148
-
149
-
150
-
151
-
152
-
153
-
154
-
155
-
156
-
157
-
158
-
159
-
160
-
161
-
162
-
163
-
164
-
165
-
166
-
167
-
168
-
169
-
170
-
171
-
172
-
173
-
174
-
175
-
176
-
177
-
178
-
179
-
180
-
181
-
182
-
183
-
184
-
185
-
186
-
187
-
188
-
189
-
190
-
191
-
192
-
193
-
194
-
195
-
196
-
197
-
198
-
199
-
200
-
201
-
202
-
203
-
204
-
205
-
206
-
207
-
208
-
209
-
210
-
211
 |
 |
