Brother International andtrade; QL-500 Users Manual - English - Page 40
Creating an Address Label, in the Object
 |
View all Brother International andtrade; QL-500 manuals
Add to My Manuals
Save this manual to your list of manuals |
Page 40 highlights
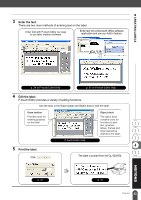
CREATING LABELS Creating an Address Label This section describes the process of creating an address label as an example. In this example we will create a standard sized address label with the addressee's name in bold and a slightly larger font size, and with a simple single-line frame with rounded corners. 1 In the Page properties box, select Standard Address from the pull-down list of label types. The tape length and width settings are automatically set to the size of a standard address label. If the Page property box is not displayed in the Property dock click to open it. 2 Click the Text icon in the Object dock to create a text box, and then type in the name and address. 3 Select the name (the first line of text) and then apply bold and slightly larger font size settings using the Text properties box. The settings are applied to the selected text. The label should now be ready for printing. Refer to Printing the Label for further details. If the Text property box is not displayed in the Property dock click to open it. 36 Using P-touch Editor
-
 1
1 -
2
-
3
-
4
-
5
-
6
-
7
-
8
-
9
-
10
-
11
-
12
-
13
-
14
-
15
-
16
-
17
-
18
-
19
-
20
-
21
-
22
-
23
-
24
-
25
-
26
-
27
-
28
-
29
-
30
-
31
-
32
-
33
-
34
-
 35
35 -
 36
36 -
 37
37 -
 38
38 -
 39
39 -
 40
40 -
 41
41 -
 42
42 -
 43
43 -
 44
44 -
 45
45 -
46
-
47
-
48
-
49
-
50
-
51
-
52
-
53
-
54
-
55
-
56
-
57
-
58
-
59
-
60
-
61
-
62
-
63
-
64
-
65
-
66
-
67
-
68
-
69
-
70
-
71
-
72
-
73
-
74
-
75
-
76
 |
 |
