Brother International andtrade; QL-500 Users Manual - English - Page 43
Creating Bar Code Labels
 |
View all Brother International andtrade; QL-500 manuals
Add to My Manuals
Save this manual to your list of manuals |
Page 43 highlights
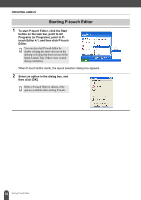
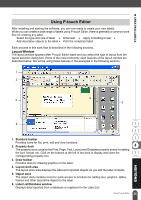
z CREATING LABELS Creating Bar Code Labels You can create labels with bar codes for use with cash registers, stock control systems or other bar code reader systems. 1 In the Page properties box, select Normal Format from the pull-down list of label types. The tape length and width settings are automatically set to the size of a standard address label. If the Page property box is not displayed in the Property dock click to open it. 2 Click the in the Object dock. The Bar Code Properties dialog box appears. 3 Click the [Protocol] tab to open the Protocol page, and then select a bar code protocol from the "Protocol:" list box. A description of the selected protocol appears below the "Protocol:" list box. 4 Click the [Setup] tab to open the Setup page, and then select any bar code format options for the selected protocol. The options that can be chosen may differ depending on the protocol selected. 5 Click the [Input] tab to open the Input page, type the data for the bar code in the Data text box, and select any options that are available for the selected protocol The options that can be chosen may differ depending on the protocol selected. 6 Click [OK]. The bar code appears on the label in the layout work area. 39 Using P-touch Editor
-
 1
1 -
2
-
3
-
4
-
5
-
6
-
7
-
8
-
9
-
10
-
11
-
12
-
13
-
14
-
15
-
16
-
17
-
18
-
19
-
20
-
21
-
22
-
23
-
24
-
25
-
26
-
27
-
28
-
29
-
30
-
31
-
32
-
33
-
34
-
35
-
36
-
37
-
 38
38 -
 39
39 -
 40
40 -
 41
41 -
 42
42 -
 43
43 -
 44
44 -
 45
45 -
 46
46 -
 47
47 -
 48
48 -
49
-
50
-
51
-
52
-
53
-
54
-
55
-
56
-
57
-
58
-
59
-
60
-
61
-
62
-
63
-
64
-
65
-
66
-
67
-
68
-
69
-
70
-
71
-
72
-
73
-
74
-
75
-
76
 |
 |
