Brother International andtrade; QL-500 Users Manual - English - Page 68
Changing Cutter Unit
 |
View all Brother International andtrade; QL-500 manuals
Add to My Manuals
Save this manual to your list of manuals |
Page 68 highlights
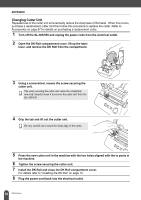
APPENDIX Changing Cutter Unit Repeated use of the cutter unit will eventually reduce the sharpness of the blade. When this occurs, purchase a replacement cutter and then follow this procedure to replace the cutter. Refer to Accessories on page 67 for details on purchasing a replacement cutter. 1 Turn off the QL-500/550 and unplug the power code from the electrical outlet. 2 Open the DK Roll compartment cover, lift up the label lever, and remove the DK Roll from the compartment. 3 Using a screw driver, loosen the screw securing the cutter unit. The screw securing the cutter unit cannot be completely removed. Simply loosen it to remove the cutter unit from the QL-500/550. 4 Grip the tab and lift out the cutter unit. Be very careful not to touch the sharp edge of the cutter. 5 Press the new cutter unit in the machine with the two holes aligned with the to posts in the machine. 6 Tighten the screw securing the cutter unit. 7 Install the DK Roll and close the DK Roll compartment cover. For details refer to "Installing the DK Roll" on page 13. 8 Plug the power cord back into the electrical outlet. 64 Maintenance
-
 1
1 -
2
-
3
-
4
-
5
-
6
-
7
-
8
-
9
-
10
-
11
-
12
-
13
-
14
-
15
-
16
-
17
-
18
-
19
-
20
-
21
-
22
-
23
-
24
-
25
-
26
-
27
-
28
-
29
-
30
-
31
-
32
-
33
-
34
-
35
-
36
-
37
-
38
-
39
-
40
-
41
-
42
-
43
-
44
-
45
-
46
-
47
-
48
-
49
-
50
-
51
-
52
-
53
-
54
-
55
-
56
-
57
-
58
-
59
-
60
-
61
-
62
-
 63
63 -
 64
64 -
 65
65 -
 66
66 -
 67
67 -
 68
68 -
 69
69 -
 70
70 -
 71
71 -
 72
72 -
 73
73 -
74
-
75
-
76
 |
 |
