Canon EOS 30D Digital Photo Professional Instruction Manual Macintosh (EOS 30D - Page 10
Starting up Digital Photo Professional, Introduction, Troubleshooting, Index, Shortcut Key List
 |
UPC - 013803065114
View all Canon EOS 30D manuals
Add to My Manuals
Save this manual to your list of manuals |
Page 10 highlights
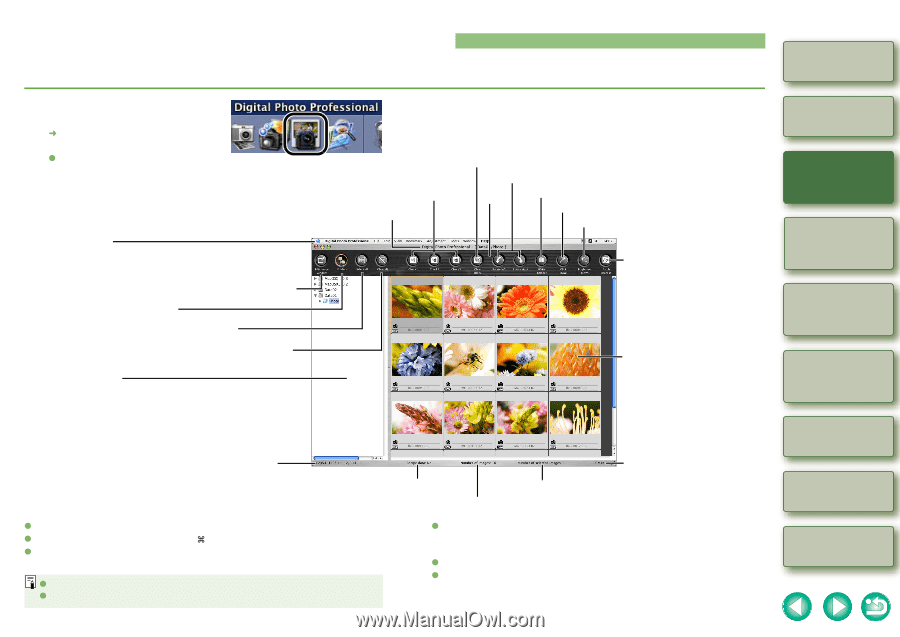
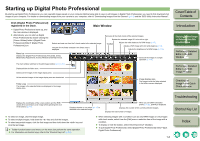
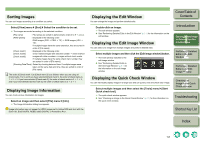
Starting up Digital Photo Professional By starting up Digital Photo Professional, you can view/edit images saved on your computer. Before being able to view or edit images in Digital Photo Professional, you need to first download shot images to your computer. For details on downloading images from your camera to your computer, refer to "Downloading Images from the Camera" (p.1-3) and the "EOS Utility Instruction Manual". Click [Digital Photo Professional] registered in the Dock. ¿ Digital Photo Professional starts up, and the main window is displayed. O Alternatively, you can start up Digital Photo Professional by double-clicking the [Canon Utilities] folder [Digital Photo Professional] folder [Digital Photo Professional] icon. Main Window Selects and sets one from the 3 check marks to the selected image. The path for the folder selected in the folder area is displayed. Removes all the check marks of the selected images. Rotates the selected image 90° to the left or right. Toolbar Adjusts the white balance of a RAW image (p.1-7). Adjusts a RAW image with click white balance (p.1-9). Adjusts the brightness of a RAW image (p.1-10). Menu bar Displays the [Digital Photo Professional], [File], [Edit], [View], [Bookmark], [Adjustment], [Tools], [Window] and [Help] menus. Saves all the images in a single operation (p.1-19). The main window switches to the edit image window (p.1-6, p.3-1). Displays/hides the folder area. Selects all the images in the image display area. All the selected images in the image display area are deselected. Folder area The images in the selected folder are displayed in the image display area. Image display area The images inside the folder selected in the folder area are displayed. Cover/Table of Contents Introduction 1 Displaying Thumbnail Images and Performing Basic Edits in the Main Window 2 Performing Detailed Edits in the Edit Window 3 Performing Detailed Edits in the Edit Image Window 4 Checking an Image in the Quick Check Window Displays the coordinates of the cursor position and the RGB values (8-bit conversion) of an image while operating the click white balance (p.1-9). Displays whether or not recipe (p.1-15) is attached to the selected image. When you set CMYK simulation profile (p.1-26), [CMYK] is displayed. Displays the number of the currently selected images. Displays the total number of images. O To select an image, click the target image. O To select multiple images, hold down the < > key and click the images. O To select sequential images, click the first image and then hold down the key and click the last image. O Toolbar function buttons and menus on the menu bar perform the same operation. O For information on shortcut keys, refer to the "Shortcut Key List" (p.5-2). O When selecting images with a condition such as only RAW images or only images with check marks, select from the [Edit] menu a selection item of the image with a condition. O To display or hide the toolbar, select the [View] menu [Toolbar]. O To quit Digital Photo Professional, select [Digital Photo Professional] menu [Quit Digital Photo Professional]. 1-2 Troubleshooting Shortcut Key List Index
-
 1
1 -
2
-
3
-
4
-
 5
5 -
 6
6 -
 7
7 -
 8
8 -
 9
9 -
 10
10 -
 11
11 -
 12
12 -
 13
13 -
 14
14 -
 15
15 -
16
-
17
-
18
-
19
-
20
-
21
-
22
-
23
-
24
-
25
-
26
-
27
-
28
-
29
-
30
-
31
-
32
-
33
-
34
-
35
-
36
-
37
-
38
-
39
-
40
-
41
-
42
-
43
-
44
-
45
-
46
-
47
-
48
-
49
-
50
-
51
-
52
 |
 |