Canon EOS 30D Digital Photo Professional Instruction Manual Macintosh (EOS 30D - Page 7
Function Contents
 |
UPC - 013803065114
View all Canon EOS 30D manuals
Add to My Manuals
Save this manual to your list of manuals |
Page 7 highlights
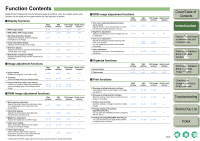
Function Contents Digital Photo Professional has the following types of functions. Also, the window where each function can be used and the page number for that operation is shown. Q Display functions O RAW image display O RGB (JPEG, TIFF) image display O Shooting information display Displays the histogram and the shooting information for an image. O Image information display Displays the information of an image. O Grid lines display Displays grid lines to check the horizontal and vertical level of an image. O Before/after comparison display Displays the edited image and the original at the same time. Main window p.1-2 p.1-2 p.1-5 p.1-6 - - Edit window p.2-2 p.2-2 Edit image Quick check window window p.3-1 p.4-1 p.3-1 p.4-1 - - - p.1-6 p.1-6 - p.2-3 p.2-3 - p.2-3 p.2-3 - Q Image adjustment functions O Image rotation Rotates an image 90° to the left or right. O Trimming Trims an image within your desired range. O Image correcting (repair, copy stamp) Corrects an image by blending unwanted spot with surrounding color or by pasting another image. Main window p.1-2 p.1-12 p.1-13 p.1-14 Edit window p.2-2 Edit image Quick check window window p.3-2 p.4-1 p.1-12 p.1-12 - p.1-13 p.1-14 p.1-13 p.1-14 - Q RAW image adjustment functions O White balance adjustment Adjusts the white balance by selecting a value or by operating the color wheel and color temperature. O Click white balance Adjusts the white balance by making the selected point standard white. O Brightness adjustment Adjusts the brightness of a RAW image. O Color space setting Sets a color space different to the default settings on individual images. O Picture Style setting Select a Picture Style and/or adjust its parameters (color tone, color saturation and sharpness) and apply to an image. Main window p.1-7 p.1-9 p.1-10 p.1-10 - Edit Edit image Quick check window window window p.2-5 p.2-5 - p.2-5 p.2-5 - p.2-4 p.2-4 - p.1-10 p.1-10 - p.2-6 p.2-6 - * Editing with the RAW image adjustment function causes almost no image deterioration. Q RGB image adjustment functions O Tone curve automatic adjustment (tone curve assist) Adjusts the tone curve automatically to match the standard image brightness and color. O Brightness adjustment Adjusts the brightness of all the images that can be displayed. O Tone curve adjustment Adjusts the image by directly adjusting each tone curve channel. You can adjust the luminance and contrast individually. O Color adjustment Adjusts the color tone, color saturation and sharpness. Main window p.1-11 p.1-11 - - Edit Edit image Quick check window window window p.2-8 p.2-8 - - - - p.2-9 p.2-10 p.2-9 p.2-10 - p.2-10 p.2-10 - Q Organize functions O Image sorting O Check marks Main window p.1-6 p.1-2 Edit window - p.2-2 Edit image Quick check window window - - p.3-2 p.4-1 Cover/Table of Contents Introduction 1 Displaying Thumbnail Images and Performing Basic Edits in the Main Window 2 Performing Detailed Edits in the Edit Window 3 Performing Detailed Edits in the Edit Image Window Q Print functions O One-page printing (automatic settings) Automatically lays out one image on one page and prints it. O One-page printing (detailed settings) Specifies settings, freely lays out and prints one image on one page. O Contact sheet printing Specifies settings, arranges and prints multiple images. O Printing with Easy-PhotoPrint, Easy-PhotoPrint Pro You can print with PIXMA/BJ printers compatible with the above. O Printing with imagePROGRAF Print Plug-In You can print with Canon large-format printers compatible with the above. Main window p.1-22 p.1-22 p.1-23 p.1-23 p.1-24 Edit Edit image Quick check window window window p.1-22 p.1-22 - p.1-22 p.1-22 - p.1-23 p.1-23 - p.1-23 p.1-23 - p.1-24 p.1-24 - 4 Checking an Image in the Quick Check Window Troubleshooting Shortcut Key List Index 0-5
-
 1
1 -
 2
2 -
 3
3 -
 4
4 -
 5
5 -
 6
6 -
 7
7 -
 8
8 -
 9
9 -
 10
10 -
 11
11 -
 12
12 -
13
-
14
-
15
-
16
-
17
-
18
-
19
-
20
-
21
-
22
-
23
-
24
-
25
-
26
-
27
-
28
-
29
-
30
-
31
-
32
-
33
-
34
-
35
-
36
-
37
-
38
-
39
-
40
-
41
-
42
-
43
-
44
-
45
-
46
-
47
-
48
-
49
-
50
-
51
-
52
 |
 |