Canon EOS 30D Digital Photo Professional Instruction Manual Macintosh (EOS 30D - Page 39
Editing RAW Images with RAW Image Adjustment Functions, Performing Detailed, Edits in the Edit, Window
 |
UPC - 013803065114
View all Canon EOS 30D manuals
Add to My Manuals
Save this manual to your list of manuals |
Page 39 highlights
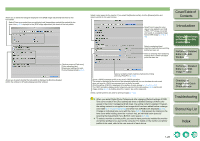
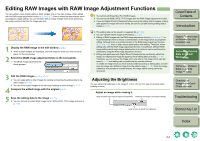
Editing RAW Images with RAW Image Adjustment Functions You can perform more detailed edits on RAW images, than in the main window. When edited with the RAW image adjustment function (p.2-4 to p.2-7), there is almost no deterioration which accompanies image editing. You can therefore edit an image multiple times while preserving the image quality at the time the image was shot. O You cannot edit PowerShot Pro1 RAW images. O You cannot edit RGB (JPEG, TIFF) images with the RAW image adjustment function. O If you quit Digital Photo Professional before saving the editing data to images, editing data applied to images will not be saved. Be sure to quit after saving editing data to images (p.1-17). 1 Display the RAW image in the edit window (p.2-2). O When multiple images are displayed, click the image for which you wish to edit to place it in the top window. 2 Select the [RAW image adjustment] tab on the tool palette. ¿ The [RAW image adjustment] tab sheet appears. 3 Edit the RAW images (p.2-4 to p.2-7). O You can apply edits to other images by copying and pasting the editing data to the other images (p.1-15). O You can revert edited images to the last saved settings or shot settings (p.1-17). 4 Compare the edited image with the original (p.2-3). 5 Save the editing data to the image (p.1-17). O You can convert an edited RAW image into an RGB (JPEG, TIFF) image and save it (p.1-18). O The editing data can be saved in a separate file (p.1-15). O You can transfer edited images to Photoshop (p.1-21). O Editing of RAW images with the RAW image adjustment function (p.2-4 to p.2-7) is recommended as there is almost no deterioration of the image which accompanies editing. Although there is a similar function in the RGB image adjustment function (p.2-7 to p.2-10), there is slight picture deterioration with editing. Therefore, where editing only with the RAW image adjustment function is insufficient, efficient RAW image editing which keeps image deterioration to a minimum can be performed by additionally using the RGB image adjustment function. O Editing data performed with Digital Photo Professional has not directly edited the image, but displays the image by applying virtual editing data (a recipe) (p.1-15). Therefore, you can recover the image which was shot or the image which was last saved (p.1-17) and editing can be performed any number of times. To create an image which you have directly edited according to editing data, convert/ save the image as a different image from the edited image (p.1-18). Since the image created by this procedure is edited directly, the image before editing cannot be recovered. Adjusting the Brightness You can adjust the brightness in the range of -2.0 to +2.0 (in 0.01-stop increments when entering a value). Adjust an image while viewing it. Drag the slider left or right to adjust the brightness. Restores the image to its original settings. Enter a value to adjust the brightness. Cover/Table of Contents Introduction 1 Displaying Thumbnail Images and Performing Basic Edits in the Main Window 2 Performing Detailed Edits in the Edit Window 3 Performing Detailed Edits in the Edit Image Window 4 Checking an Image in the Quick Check Window Troubleshooting Shortcut Key List Index 2-4
-
 1
1 -
2
-
3
-
4
-
5
-
6
-
7
-
8
-
9
-
10
-
11
-
12
-
13
-
14
-
15
-
16
-
17
-
18
-
19
-
20
-
21
-
22
-
23
-
24
-
25
-
26
-
27
-
28
-
29
-
30
-
31
-
32
-
33
-
 34
34 -
 35
35 -
 36
36 -
 37
37 -
 38
38 -
 39
39 -
 40
40 -
 41
41 -
 42
42 -
 43
43 -
 44
44 -
45
-
46
-
47
-
48
-
49
-
50
-
51
-
52
 |
 |
