Canon EOS 30D Digital Photo Professional Instruction Manual Macintosh (EOS 30D - Page 8
Example of Operation
 |
UPC - 013803065114
View all Canon EOS 30D manuals
Add to My Manuals
Save this manual to your list of manuals |
Page 8 highlights
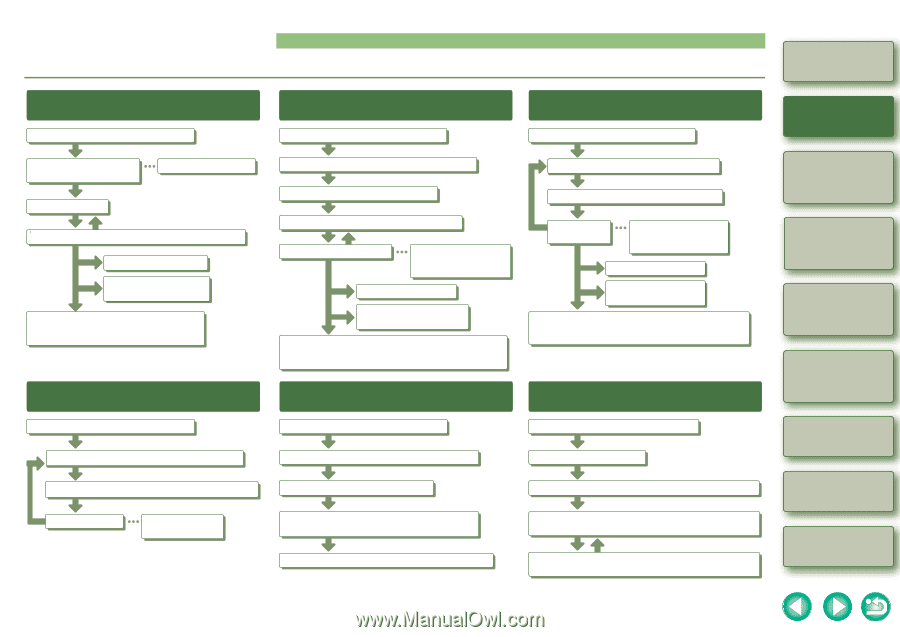
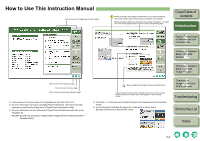
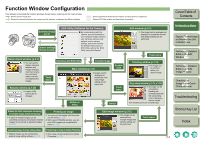
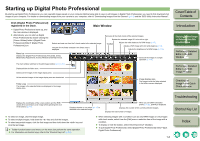
Example of Operation The following shows typical flows of operating Digital Photo Professional. Example 1: Displaying Thumbnail Images and Performing Basic Edits in the Main Window Start up Digital Photo Professional (p.1-2). Display images in the main window (p.1-2). Set check marks (p.1-2). Sort images (p.1-6). Select an image and perform basic edits (p.1-7, p.1-11). Print the images (p.1-22). Transfer images to image editing software (p.1-21). Save edits (recipe) to the image (p.1-17). Convert and save edited images as separate images in a single operation (p.1-19). Example 4: Checking Images in the Quick Check Window Start up Digital Photo Professional (p.1-2). Select multiple images in the main window (p.1-2). Display the images in the quick check window (p.4-1). Check the images. Set a check mark to an image (p.4-1). Example 2: Selecting One Image from Multiple Images and Performing Detailed Edits on the Image in the Edit Image Window Start up Digital Photo Professional (p.1-2). Example 3: Performing Detailed Edits on a Single Image in the Edit Window Start up Digital Photo Professional (p.1-2). Select multiple images in the main window (p.1-2). Switch to the edit image window (p.3-1). Select one image from multiple images (p.3-2). Edit the image (p.2-4, p.2-7). Display the image as a comparison of before and after editing (p.2-3). Print the image (p.1-22). Transfer images to image editing software (p.1-21). Save edits (recipe) to the image (p.1-17). Convert and save edited images as separate images in a single operation (p.1-19). Example 5: Applying the Editing Data (recipe) of an Edited Image to Another Image Start up Digital Photo Professional (p.1-2). Select an image in the main window (p.1-2). Display the image in the edit window (p.2-2). Edit the image (p.2-4, p.2-7). Display the image as a comparison of before and after editing (p.2-3). Print the image (p.1-22). Transfer an image to Photoshop (p.1-21). Save edits (recipe) to the image (p.1-17). Convert and save the edited image as a separate image (p.1-18). Example 6: Downloading Images or Remote Shooting with EOS Utility Start up Digital Photo Professional (p.1-2). Select the edited image in the main window (p.1-2). Start up EOS Utility (p.1-24). Copy the editing data (recipe) (p.1-15). Connect the camera to your computer and turn the camera on. Select the image to which the editing data will be applied in the main window. Downloading an image or take a shot remotely using EOS Utility (p.1-24). Apply the editing data (recipe) to the selected image (p.1-15). Check the image, which is displayed in the main or edit image window. Cover/Table of Contents Introduction 1 Displaying Thumbnail Images and Performing Basic Edits in the Main Window 2 Performing Detailed Edits in the Edit Window 3 Performing Detailed Edits in the Edit Image Window 4 Checking an Image in the Quick Check Window Troubleshooting Shortcut Key List Index 0-6
-
 1
1 -
2
-
 3
3 -
 4
4 -
 5
5 -
 6
6 -
 7
7 -
 8
8 -
 9
9 -
 10
10 -
 11
11 -
 12
12 -
 13
13 -
14
-
15
-
16
-
17
-
18
-
19
-
20
-
21
-
22
-
23
-
24
-
25
-
26
-
27
-
28
-
29
-
30
-
31
-
32
-
33
-
34
-
35
-
36
-
37
-
38
-
39
-
40
-
41
-
42
-
43
-
44
-
45
-
46
-
47
-
48
-
49
-
50
-
51
-
52
 |
 |