Canon imageCLASS MF5850dn imageCLASS MF5880dn/5850dn Basic Operation Guide - Page 213
Scanning Documents to a Computer (USB Connection), Place documents., Press, SCAN] repeatedly to select
 |
View all Canon imageCLASS MF5850dn manuals
Add to My Manuals
Save this manual to your list of manuals |
Page 213 highlights
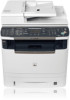
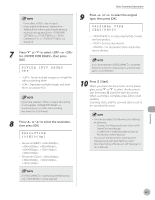
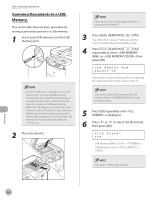
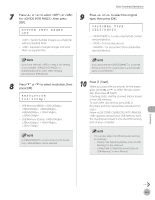
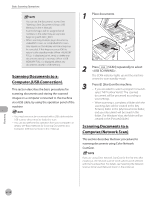
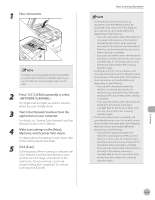
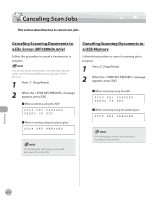
Basic Scanning Operations - You can set the document's name. (See "Naming a Sent Document Using a USB Memory," in the e-Manual.) - Scanned images will be assigned serial numbers in the order they are scanned, beginning with 0001_0001. - When scanning multiple page documents, or may appear on the display and scanning may be canceled. If this happens, press [OK] to return to the standby mode. When is displayed, print, send, or delete any documents stored in memory. When is displayed, delete any documents stored in USB memory. Scanning Documents to a Computer (USB Connection) This section describes the basic procedures for scanning documents and storing the scanned images on a computer connected to the machine via a USB cable, by using the operation panel of the machine. - Your machine must be connected with a USB cable and the USB scanner driver must be loaded to scan. - You can also perform this operation from your computer. For details, see "Basic Methods for Scanning Documents to a Computer (USB Connection)," in the e-Manual. 1 Place documents. 2 Press [SCAN] repeatedly to select . The SCAN indicator lights up and the machine enters the scan standby mode. 3 Press [Start] on the machine. - If you are asked to select a program to launch, select "MF Toolbox Ver4.9." The scanned document will be processed according to your settings. - When scanning is complete, a folder with the scanning date will be created in the [My Pictures] folder in the [My Documents] folder, and your document will be saved in this folder. (For Windows Vista, the folder will be created in the [Pictures] folder.) Scanning Documents to a Computer (Network Scan) This section describes the basic procedure for scanning documents using Color Network ScanGear. If you are using Color Network ScanGear for the first time after installing it, the network scanner to be used must be selected with the ScanGear Tool. For details, see "Selecting the Network Scanner to be Used (Network Scan)," in the e-Manual. Scanning 8-10
-
 1
1 -
2
-
3
-
4
-
5
-
6
-
7
-
8
-
9
-
10
-
11
-
12
-
13
-
14
-
15
-
16
-
17
-
18
-
19
-
20
-
21
-
22
-
23
-
24
-
25
-
26
-
27
-
28
-
29
-
30
-
31
-
32
-
33
-
34
-
35
-
36
-
37
-
38
-
39
-
40
-
41
-
42
-
43
-
44
-
45
-
46
-
47
-
48
-
49
-
50
-
51
-
52
-
53
-
54
-
55
-
56
-
57
-
58
-
59
-
60
-
61
-
62
-
63
-
64
-
65
-
66
-
67
-
68
-
69
-
70
-
71
-
72
-
73
-
74
-
75
-
76
-
77
-
78
-
79
-
80
-
81
-
82
-
83
-
84
-
85
-
86
-
87
-
88
-
89
-
90
-
91
-
92
-
93
-
94
-
95
-
96
-
97
-
98
-
99
-
100
-
101
-
102
-
103
-
104
-
105
-
106
-
107
-
108
-
109
-
110
-
111
-
112
-
113
-
114
-
115
-
116
-
117
-
118
-
119
-
120
-
121
-
122
-
123
-
124
-
125
-
126
-
127
-
128
-
129
-
130
-
131
-
132
-
133
-
134
-
135
-
136
-
137
-
138
-
139
-
140
-
141
-
142
-
143
-
144
-
145
-
146
-
147
-
148
-
149
-
150
-
151
-
152
-
153
-
154
-
155
-
156
-
157
-
158
-
159
-
160
-
161
-
162
-
163
-
164
-
165
-
166
-
167
-
168
-
169
-
170
-
171
-
172
-
173
-
174
-
175
-
176
-
177
-
178
-
179
-
180
-
181
-
182
-
183
-
184
-
185
-
186
-
187
-
188
-
189
-
190
-
191
-
192
-
193
-
194
-
195
-
196
-
197
-
198
-
199
-
200
-
201
-
202
-
203
-
204
-
205
-
206
-
207
-
 208
208 -
 209
209 -
 210
210 -
 211
211 -
 212
212 -
 213
213 -
 214
214 -
 215
215 -
 216
216 -
 217
217 -
 218
218 -
219
-
220
-
221
-
222
-
223
-
224
-
225
-
226
-
227
-
228
-
229
-
230
-
231
-
232
-
233
-
234
-
235
-
236
-
237
-
238
-
239
-
240
-
241
-
242
-
243
-
244
-
245
-
246
-
247
-
248
-
249
-
250
-
251
-
252
-
253
-
254
-
255
-
256
-
257
-
258
-
259
-
260
-
261
-
262
-
263
-
264
-
265
-
266
-
267
-
268
-
269
-
270
-
271
-
272
-
273
-
274
-
275
-
276
-
277
-
278
-
279
-
280
-
281
-
282
-
283
-
284
-
285
-
286
-
287
-
288
-
289
-
290
-
291
-
292
-
293
-
294
-
295
-
296
-
297
-
298
-
299
-
300
-
301
-
302
 |
 |