Canon imageCLASS MF5850dn imageCLASS MF5880dn/5850dn Basic Operation Guide - Page 32
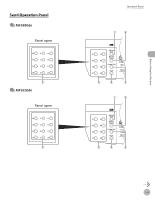
SEND/FAX] key For the MF5880dn, Log In/Out] key ID key
 |
View all Canon imageCLASS MF5850dn manuals
Add to My Manuals
Save this manual to your list of manuals |
Page 32 highlights
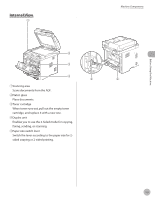
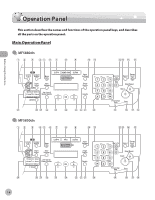
Before Using the Machine ①Paper Select indicator Indicates the selected paper source. ②[Collate/2 on 1] key Press to collate copies, or press to set 2 on 1 copying. Also press to set ID card copying. ③[Paper Select] key Press to select a paper source (paper cassette or multi-purpose tray). ④[Enlarge/Reduce] key Press to enlarge or reduce copy ratio. ⑤[Menu] key Press to select or cancel the modes in setting menus. ⑥Display Displays messages and prompts during operation. Displays selection, text, and numbers when adjusting the settings. ⑦[COPY] key Press to switch to the Copy mode. ⑧[SEND/FAX] key (For the MF5880dn) Press to switch to the Send/Fax mode. [FAX] key (For the MF5850dn) Press to switch to the Fax mode or to the mode that saves the scanned data in the USB memory. ⑨[SCAN] key Press to switch to the Scan mode. ⑩[Paper Settings] key Press to specify the paper size and type for the paper cassette or multi-purpose tray. ⑪Numeric keys Enter alphanumeric characters and symbols. ⑫[Log In/Out] key (ID key) Press when setting or enabling Department ID/ User ID management. ⑬[Clear] key Press to clear entered alphanumeric characters. ⑭[Report] key Press to print reports and lists manually. Operation Panel ⑮[Energy Saver] key Press to set or cancel the Sleep mode manually. The key lights green when the Sleep mode is set, and goes off when the mode is canceled. ⑯[Stop/Reset] key Press to stop a current job. Also press to return the machine to the standby mode. ⑰[Start] key Press to start copying, scanning and sending documents. ⑱Error indicator Blinks when an error has occurred. ⑲Processing/Data indicator Blinks when the machine is working. Lights when the machine has waiting jobs and stores the data in memory. ⑳[Tone] key Press to switch from rotary pulse to tone dialing. Also press to switch the input mode. ㉑[Density] key Press to adjust the density for copy or documents you send. ㉒[Image Quality] key Press to select image quality for copy or fax. ㉓ key Press to increase the value for various settings. Also press to see the next item in the menu. You can use this key to temporarily adjust the monitor tone volume. ㉔[OK] key Press to accept a set function or mode. Also press and hold to print a sample page when you are in the copy mode. For details, see "Printing a Sample Page," on p. 3-33. 1-7
-
 1
1 -
2
-
3
-
4
-
5
-
6
-
7
-
8
-
9
-
10
-
11
-
12
-
13
-
14
-
15
-
16
-
17
-
18
-
19
-
20
-
21
-
22
-
23
-
24
-
25
-
26
-
 27
27 -
 28
28 -
 29
29 -
 30
30 -
 31
31 -
 32
32 -
 33
33 -
 34
34 -
 35
35 -
 36
36 -
 37
37 -
38
-
39
-
40
-
41
-
42
-
43
-
44
-
45
-
46
-
47
-
48
-
49
-
50
-
51
-
52
-
53
-
54
-
55
-
56
-
57
-
58
-
59
-
60
-
61
-
62
-
63
-
64
-
65
-
66
-
67
-
68
-
69
-
70
-
71
-
72
-
73
-
74
-
75
-
76
-
77
-
78
-
79
-
80
-
81
-
82
-
83
-
84
-
85
-
86
-
87
-
88
-
89
-
90
-
91
-
92
-
93
-
94
-
95
-
96
-
97
-
98
-
99
-
100
-
101
-
102
-
103
-
104
-
105
-
106
-
107
-
108
-
109
-
110
-
111
-
112
-
113
-
114
-
115
-
116
-
117
-
118
-
119
-
120
-
121
-
122
-
123
-
124
-
125
-
126
-
127
-
128
-
129
-
130
-
131
-
132
-
133
-
134
-
135
-
136
-
137
-
138
-
139
-
140
-
141
-
142
-
143
-
144
-
145
-
146
-
147
-
148
-
149
-
150
-
151
-
152
-
153
-
154
-
155
-
156
-
157
-
158
-
159
-
160
-
161
-
162
-
163
-
164
-
165
-
166
-
167
-
168
-
169
-
170
-
171
-
172
-
173
-
174
-
175
-
176
-
177
-
178
-
179
-
180
-
181
-
182
-
183
-
184
-
185
-
186
-
187
-
188
-
189
-
190
-
191
-
192
-
193
-
194
-
195
-
196
-
197
-
198
-
199
-
200
-
201
-
202
-
203
-
204
-
205
-
206
-
207
-
208
-
209
-
210
-
211
-
212
-
213
-
214
-
215
-
216
-
217
-
218
-
219
-
220
-
221
-
222
-
223
-
224
-
225
-
226
-
227
-
228
-
229
-
230
-
231
-
232
-
233
-
234
-
235
-
236
-
237
-
238
-
239
-
240
-
241
-
242
-
243
-
244
-
245
-
246
-
247
-
248
-
249
-
250
-
251
-
252
-
253
-
254
-
255
-
256
-
257
-
258
-
259
-
260
-
261
-
262
-
263
-
264
-
265
-
266
-
267
-
268
-
269
-
270
-
271
-
272
-
273
-
274
-
275
-
276
-
277
-
278
-
279
-
280
-
281
-
282
-
283
-
284
-
285
-
286
-
287
-
288
-
289
-
290
-
291
-
292
-
293
-
294
-
295
-
296
-
297
-
298
-
299
-
300
-
301
-
302
 |
 |