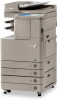
Canon imageRUNNER ADVANCE C2230 imageRUNNER ADVANCE C2200 Srs Basic Operation - Page 105
Main Unit, When No Optional Tray or Finisher Is Attached
 |
View all Canon imageRUNNER ADVANCE C2230 manuals
Add to My Manuals
Save this manual to your list of manuals |
Page 105 highlights
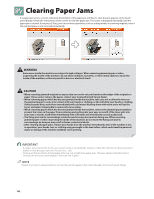
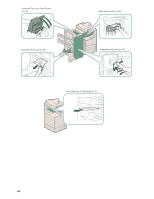
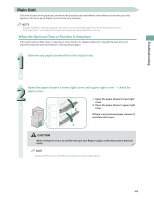
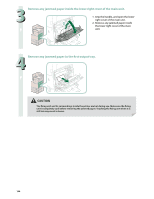
Troubleshooting Main Unit Check the location of the paper jam, and follow the procedure described below, while referring to the directions that appear on the touch panel display, to remove the jammed paper. • If paper is loaded in the multi-purpose tray, make sure to remove any paper from the multi-purpose tray first. • If the Copy Tray-J1 is attached to the main unit, remove all output paper from the tray. When No Optional Tray or Finisher Is Attached If the optional Inner 2Way Tray-F1, Copy Tray-J1, Inner Finisher-F1, Staple Finisher-M1, or Booklet Finisher-M1 is not attached, follow the instruction below to remove jammed paper. 1 Remove any paper jammed from the output tray. 2 Open the paper drawer's lower right cover and upper right cover → check for paper jams. 1. Open the paper drawer's lower right cover. 2. Open the paper drawer's upper right 2 cover. If there is any jammed paper, remove it, and close the covers. 1 When closing the covers, be careful not to get your fingers caught, as this may result in personal injury. Gently close the covers until they click into place in the closed positions. 105
-
 1
1 -
2
-
3
-
4
-
5
-
6
-
7
-
8
-
9
-
10
-
11
-
12
-
13
-
14
-
15
-
16
-
17
-
18
-
19
-
20
-
21
-
22
-
23
-
24
-
25
-
26
-
27
-
28
-
29
-
30
-
31
-
32
-
33
-
34
-
35
-
36
-
37
-
38
-
39
-
40
-
41
-
42
-
43
-
44
-
45
-
46
-
47
-
48
-
49
-
50
-
51
-
52
-
53
-
54
-
55
-
56
-
57
-
58
-
59
-
60
-
61
-
62
-
63
-
64
-
65
-
66
-
67
-
68
-
69
-
70
-
71
-
72
-
73
-
74
-
75
-
76
-
77
-
78
-
79
-
80
-
81
-
82
-
83
-
84
-
85
-
86
-
87
-
88
-
89
-
90
-
91
-
92
-
93
-
94
-
95
-
96
-
97
-
98
-
99
-
 100
100 -
 101
101 -
 102
102 -
 103
103 -
 104
104 -
 105
105 -
 106
106 -
 107
107 -
 108
108 -
 109
109 -
 110
110 -
111
-
112
-
113
-
114
-
115
-
116
-
117
-
118
-
119
-
120
-
121
-
122
-
123
-
124
-
125
-
126
-
127
-
128
-
129
-
130
-
131
-
132
-
133
-
134
-
135
-
136
-
137
-
138
-
139
-
140
-
141
-
142
-
143
-
144
-
145
-
146
-
147
-
148
-
149
-
150
-
151
-
152
-
153
-
154
-
155
-
156
-
157
-
158
-
159
-
160
-
161
-
162
-
163
-
164
-
165
-
166
-
167
-
168
-
169
-
170
-
171
-
172
-
173
-
174
-
175
-
176
-
177
-
178
-
179
-
180
 |
 |
