Canon imageRUNNER ADVANCE C2230 imageRUNNER ADVANCE C2200 Srs Basic Operation - Page 106
Remove any jammed paper inside the lower right cover of the main unit°
 |
View all Canon imageRUNNER ADVANCE C2230 manuals
Add to My Manuals
Save this manual to your list of manuals |
Page 106 highlights
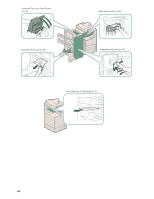
3 Remove any jammed paper inside the lower right cover of the main unit. 1. Grip the handle, and open the lower right cover of the main unit. 2 2. Remove any jammed paper inside the lower right cover of the main unit. 1 4 Remove any jammed paper in the first output tray. The fixing unit and its surroundings inside the printer are hot during use. Make sure the fixing unit is completely cool before removing the jammed paper. Touching the fixing unit when it is still hot may result in burns. 106
-
 1
1 -
2
-
3
-
4
-
5
-
6
-
7
-
8
-
9
-
10
-
11
-
12
-
13
-
14
-
15
-
16
-
17
-
18
-
19
-
20
-
21
-
22
-
23
-
24
-
25
-
26
-
27
-
28
-
29
-
30
-
31
-
32
-
33
-
34
-
35
-
36
-
37
-
38
-
39
-
40
-
41
-
42
-
43
-
44
-
45
-
46
-
47
-
48
-
49
-
50
-
51
-
52
-
53
-
54
-
55
-
56
-
57
-
58
-
59
-
60
-
61
-
62
-
63
-
64
-
65
-
66
-
67
-
68
-
69
-
70
-
71
-
72
-
73
-
74
-
75
-
76
-
77
-
78
-
79
-
80
-
81
-
82
-
83
-
84
-
85
-
86
-
87
-
88
-
89
-
90
-
91
-
92
-
93
-
94
-
95
-
96
-
97
-
98
-
99
-
100
-
 101
101 -
 102
102 -
 103
103 -
 104
104 -
 105
105 -
 106
106 -
 107
107 -
 108
108 -
 109
109 -
 110
110 -
 111
111 -
112
-
113
-
114
-
115
-
116
-
117
-
118
-
119
-
120
-
121
-
122
-
123
-
124
-
125
-
126
-
127
-
128
-
129
-
130
-
131
-
132
-
133
-
134
-
135
-
136
-
137
-
138
-
139
-
140
-
141
-
142
-
143
-
144
-
145
-
146
-
147
-
148
-
149
-
150
-
151
-
152
-
153
-
154
-
155
-
156
-
157
-
158
-
159
-
160
-
161
-
162
-
163
-
164
-
165
-
166
-
167
-
168
-
169
-
170
-
171
-
172
-
173
-
174
-
175
-
176
-
177
-
178
-
179
-
180
 |
 |

106
3
3
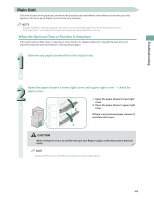
Remove any jammed paper inside the lower right cover of the main unit°
1
2
1.■ Grip■the■handle,■and■open■the■lower■
right■cover■of■the■main■unit.
2.■ Remove■any■jammed■paper■inside■
the■lower■right■cover■of■the■main■
unit.
4
4
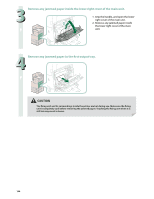
Remove any jammed paper in the first output tray°
The fixing unit and its surroundings inside the printer are hot during use° Make sure the fixing
unit is completely cool before removing the jammed paper° Touching the fixing unit when it is
still hot may result in burns°