Cisco ESR10008 Hardware Installation Guide - Page 102
Replacing the Blower Module
 |
UPC - 746320761510
View all Cisco ESR10008 manuals
Add to My Manuals
Save this manual to your list of manuals |
Page 102 highlights
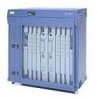
Removing and Replacing Field-Replaceable Units Chapter 5 Maintaining the Cisco 10008 Router Note The directional arrows located on the metal frame of the filter should point up (see enlargement in Figure 5-9). Replacing the Blower Module Use the following procedure to replace a blower module. The blower module supports hot-swapping (for up to 2 minutes) and can be replaced without interruption to system operation. Caution To prevent the possibility of the system overheating, be sure that the replacement blower module is out of its box and packaging, so it is ready to install as soon as the defective module is removed. Figure 5-10 Removing the Cable Brackets FANS OK FAN FAILURE MULTIFAN FAILURE sbrWeyemhsdteoeonvmnahelsoaihtnnCusduwtAdnarUodepwTeppnIrliaOntcwwgNeioltmlhmoiescnincftauumntre.utsrsaotyr, 1 2 3 4 0A PROCESSOR ONLY0B 5 6 7 8 32222 Step 1 Step 2 Remove the front cover if necessary (see Front Cover Procedures, page 5-4). Move any interface cables from the cable brackets on the blower so they are out of your work area, and then remove the cable brackets from the blower (Figure 5-10). 5-10 Cisco 10008 Router Hardware Installation Guide OL-0659-13
-
 1
1 -
2
-
3
-
4
-
5
-
6
-
7
-
8
-
9
-
10
-
11
-
12
-
13
-
14
-
15
-
16
-
17
-
18
-
19
-
20
-
21
-
22
-
23
-
24
-
25
-
26
-
27
-
28
-
29
-
30
-
31
-
32
-
33
-
34
-
35
-
36
-
37
-
38
-
39
-
40
-
41
-
42
-
43
-
44
-
45
-
46
-
47
-
48
-
49
-
50
-
51
-
52
-
53
-
54
-
55
-
56
-
57
-
58
-
59
-
60
-
61
-
62
-
63
-
64
-
65
-
66
-
67
-
68
-
69
-
70
-
71
-
72
-
73
-
74
-
75
-
76
-
77
-
78
-
79
-
80
-
81
-
82
-
83
-
84
-
85
-
86
-
87
-
88
-
89
-
90
-
91
-
92
-
93
-
94
-
95
-
96
-
 97
97 -
 98
98 -
 99
99 -
 100
100 -
 101
101 -
 102
102 -
 103
103 -
 104
104 -
 105
105 -
 106
106 -
 107
107 -
108
-
109
-
110
-
111
-
112
-
113
-
114
-
115
-
116
-
117
-
118
-
119
-
120
-
121
-
122
-
123
-
124
-
125
-
126
-
127
-
128
-
129
-
130
-
131
-
132
-
133
-
134
-
135
-
136
-
137
-
138
-
139
-
140
-
141
-
142
-
143
-
144
-
145
-
146
-
147
-
148
-
149
-
150
-
151
-
152
-
153
-
154
-
155
-
156
-
157
-
158
-
159
-
160
-
161
-
162
-
163
-
164
-
165
-
166
-
167
-
168
-
169
-
170
-
171
-
172
 |
 |
