Cisco ESR10008 Hardware Installation Guide - Page 99
Replacing the Air Filter, Replacing an Air Filter in a Chassis that Uses a Filter Tray
 |
UPC - 746320761510
View all Cisco ESR10008 manuals
Add to My Manuals
Save this manual to your list of manuals |
Page 99 highlights
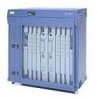
Chapter 5 Maintaining the Cisco 10008 Router Removing and Replacing Field-Replaceable Units Replacing the Air Filter If the air filter is dirty or clogged, the blower module could have a problem providing sufficient cooling air flow throughout the chassis, causing the system to overheat. To prevent a potential overheating problem, you should replace the air filter every 6 months. In certain environments where the air quality is poor, you may have to replace the filter more frequently. There are two types of air filters used in the Cisco 10008 chassis. Original model chassis use captive screws to hold the filter in a tray, while later model chassis use spring tabs to hold the filter in place without the need for a tray. The following procedures describe how to replace each type of air filter. Note The following illustrations show the cable management bracket removed for clarity. Replacing an Air Filter in a Chassis that Uses a Filter Tray Use the following procedure to remove and replace an air filter in a chassis that uses a filter tray: Figure 5-5 Loosening the Air Filter Tray Captive Screws 5 5 5 5 5 OC-12/STM-4 POS SM-IR 6XCT3-DS0 6XCT3-DS0 6XCT3-DS0 PERFORMANCE ROUTING ENGINE PERFORMANCE ROUTING ENGINE 6XCT3-DS0 6XCT3-DS0 CH OC-12-DSO SM-IR GIGABIT ETHERNET POWER FAULT MISWIRE ACO CMRAIJTOICRAL MINOR SFATAILTUS ACO CMRAIJTOICRAL MINOR SFATAILTUS PROCESSOR ONLY 132836 1 1 Filter tray captive screw Step 1 Step 2 Step 3 Step 4 Remove the front cover if necessary (see Front Cover Procedures, page 5-4). Move any interface cables from the cable brackets on the blower module so they are out of your work area, and then remove the cable brackets from the blower (Figure 5-10). Loosen the captive screws on each side of the blower module and disengage the module (Figure 5-11). Power to the blower will become disconnected. Loosen the captive screws on the air filter tray (Figure 5-5). OL-0659-13 Cisco 10008 Router Hardware Installation Guide 5-7
-
 1
1 -
2
-
3
-
4
-
5
-
6
-
7
-
8
-
9
-
10
-
11
-
12
-
13
-
14
-
15
-
16
-
17
-
18
-
19
-
20
-
21
-
22
-
23
-
24
-
25
-
26
-
27
-
28
-
29
-
30
-
31
-
32
-
33
-
34
-
35
-
36
-
37
-
38
-
39
-
40
-
41
-
42
-
43
-
44
-
45
-
46
-
47
-
48
-
49
-
50
-
51
-
52
-
53
-
54
-
55
-
56
-
57
-
58
-
59
-
60
-
61
-
62
-
63
-
64
-
65
-
66
-
67
-
68
-
69
-
70
-
71
-
72
-
73
-
74
-
75
-
76
-
77
-
78
-
79
-
80
-
81
-
82
-
83
-
84
-
85
-
86
-
87
-
88
-
89
-
90
-
91
-
92
-
93
-
 94
94 -
 95
95 -
 96
96 -
 97
97 -
 98
98 -
 99
99 -
 100
100 -
 101
101 -
 102
102 -
 103
103 -
 104
104 -
105
-
106
-
107
-
108
-
109
-
110
-
111
-
112
-
113
-
114
-
115
-
116
-
117
-
118
-
119
-
120
-
121
-
122
-
123
-
124
-
125
-
126
-
127
-
128
-
129
-
130
-
131
-
132
-
133
-
134
-
135
-
136
-
137
-
138
-
139
-
140
-
141
-
142
-
143
-
144
-
145
-
146
-
147
-
148
-
149
-
150
-
151
-
152
-
153
-
154
-
155
-
156
-
157
-
158
-
159
-
160
-
161
-
162
-
163
-
164
-
165
-
166
-
167
-
168
-
169
-
170
-
171
-
172
 |
 |
