Dell 942 All In One Inkjet Printer Dell™ Photo All-In-One Printer 94 - Page 32
Faxing, Installing Microsoft Fax Console in Windows XP
 |
View all Dell 942 All In One Inkjet Printer manuals
Add to My Manuals
Save this manual to your list of manuals |
Page 32 highlights
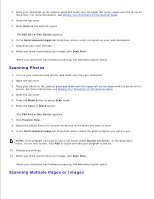
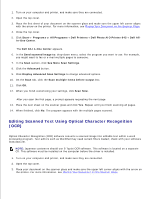
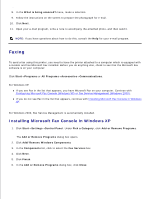
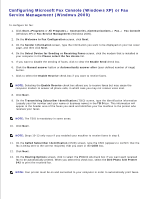
6. 7. 8. In the What is being scanned? menu, make a selection. 9. Follow the instructions on the screen to prepare the photograph for e-mail. 10. Click Next. 11. Open your e-mail program, write a note to accompany the attached photo, and then send it. NOTE: If you have questions about how to do this, consult the Help for your e-mail program. Faxing To send a fax using this printer, you need to have the printer attached to a computer which is equipped with a modem and has Microsoft Fax installed. Before you do anything else, check to see that the Microsoft Fax software is on your computer: Click Start Programs or All Programs Accessories Communications. For Windows XP: If you see Fax in the list that appears, you have Microsoft Fax on your computer. Continue with Configuring Microsoft Fax Console (Windows XP) or Fax Service Management (Windows 2000). If you do not see Fax in the list that appears, continue with Installing Microsoft Fax Console in Windows XP. For Windows 2000, Fax Service Management is automatically installed. Installing Microsoft Fax Console in Windows XP 1. Click Start Settings Control Panel. Under Pick a Category, click Add or Remove Programs. The Add or Remove Programs dialog box opens. 2. Click Add/Remove Windows Components. 3. In the Components list, click to select the Fax Services box. 4. Click Next. 5. Click Finish. 6. In the Add or Remove Programs dialog box, click Close.
-
 1
1 -
2
-
3
-
4
-
5
-
6
-
7
-
8
-
9
-
10
-
11
-
12
-
13
-
14
-
15
-
16
-
17
-
18
-
19
-
20
-
21
-
22
-
23
-
24
-
25
-
26
-
 27
27 -
 28
28 -
 29
29 -
 30
30 -
 31
31 -
 32
32 -
 33
33 -
 34
34 -
 35
35 -
 36
36 -
 37
37 -
38
-
39
-
40
-
41
-
42
-
43
-
44
-
45
-
46
-
47
-
48
-
49
-
50
-
51
-
52
-
53
-
54
-
55
-
56
-
57
-
58
-
59
-
60
-
61
-
62
-
63
-
64
-
65
-
66
-
67
-
68
-
69
-
70
-
71
-
72
-
73
-
74
-
75
-
76
-
77
 |
 |