Dell 942 All In One Inkjet Printer Dell™ Photo All-In-One Printer 94 - Page 5
Number, Description - windows 8
 |
View all Dell 942 All In One Inkjet Printer manuals
Add to My Manuals
Save this manual to your list of manuals |
Page 5 highlights
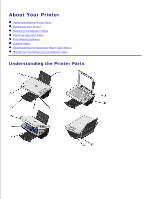
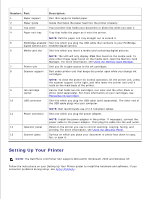
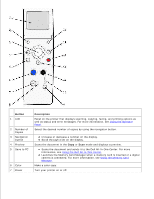
Number: Part: 1 Paper support 2 Paper guide 3 Top cover 4 Paper exit tray Description: Part that supports loaded paper. Guide that helps the paper feed into the printer properly. Top of printer that holds your document or photo flat while you scan it. Tray that holds the paper as it exits the printer. NOTE: Pull the paper exit tray straight out to extend it. 5 PictBridge-enabled Slot into which you plug the USB cable that connects to your PictBridge- digital camera port enabled digital camera. 6 Media card slot Slot into which you insert a media card containing digital pictures. NOTE: The LCD will only display JPEG files found on the media card. To view other image types found on the media card, open the Memory Card Manager. For more information, see Using the Memory Card Manager. 7 Printer unit Unit you lift to gain access to the ink cartridges. 8 Scanner support Part under printer unit that keeps the printer open while you change ink cartridges. NOTE: To close the printer for normal operation, lift the printer unit, press the scanner support to the right, and then lower the printer unit until it rests on the main body of the printer. 9 Ink cartridge Carrier that holds two ink cartridges, one color and the other black or carrier photo (sold separately). For more information on your cartridges, see Replacing Ink Cartridges. 10 USB connector Slot into which you plug the USB cable (sold separately). The other end of the USB cable plugs into your computer. NOTE: Dell recommends use of 2.0 compliant cables. 11 Power connector Slot into which you plug the power adapter. NOTE: Install the power adapter in the printer. If necessary, connect the power cable to the power adapter. Then plug the cable into the wall outlet. 12 Operator panel Panel on the printer you use to control scanning, copying, faxing, and printing. For more information, see Using the Operator Panel. 13 Scanner glass Surface on which you place your document or photo face down to copy, fax, or scan it. Setting Up Your Printer NOTE: The Dell Photo AIO Printer 942 supports Microsoft® Windows® 2000 and Windows XP. Follow the instructions on your Setting Up Your Printer poster to install the hardware and software. If you encounter problems during setup, see Setup Problems.
-
 1
1 -
 2
2 -
 3
3 -
 4
4 -
 5
5 -
 6
6 -
 7
7 -
 8
8 -
 9
9 -
 10
10 -
 11
11 -
12
-
13
-
14
-
15
-
16
-
17
-
18
-
19
-
20
-
21
-
22
-
23
-
24
-
25
-
26
-
27
-
28
-
29
-
30
-
31
-
32
-
33
-
34
-
35
-
36
-
37
-
38
-
39
-
40
-
41
-
42
-
43
-
44
-
45
-
46
-
47
-
48
-
49
-
50
-
51
-
52
-
53
-
54
-
55
-
56
-
57
-
58
-
59
-
60
-
61
-
62
-
63
-
64
-
65
-
66
-
67
-
68
-
69
-
70
-
71
-
72
-
73
-
74
-
75
-
76
-
77
 |
 |