Dell OptiPlex GX1 Dell OptiPlex GX1/GX1p Managed PC and OptiPlex NX1 Net PC S - Page 161
mation from the printouts you made earlier.
 |
View all Dell OptiPlex GX1 manuals
Add to My Manuals
Save this manual to your list of manuals |
Page 161 highlights
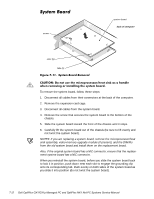
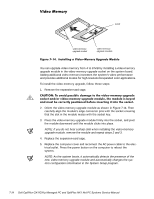
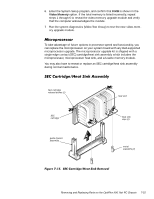
2. Turn off power to all peripherals, and disconnect the AC power cable from its electrical outlet. 3. Remove the computer cover. 4. Remove the expansion-card cage, and locate the battery in the front-right corner of the system board adjacent to the DIMM connectors. 5. Remove the battery by carefully prying it out of its socket with your fingers or with a blunt, nonconducting object, such as a plastic screwdriver. 6. Insert the battery into the socket (with the positive side labeled "+" facing upwards), and snap it into place. 7. Replace the expansion-card cage; replace the computer cover, reconnect all cabling, and reboot the system. 8. Enter the System Setup program, and configure the system using the information from the printouts you made earlier. 9. Turn off the computer; wait 10 or more minutes, and then reenter the System Setup program to ensure that the date and time are still correct, indicating that the system battery is functioning correctly. Removing and Replacing Parts on the OptiPlex NX1 Net PC Chassis 7-17
-
 1
1 -
2
-
3
-
4
-
5
-
6
-
7
-
8
-
9
-
10
-
11
-
12
-
13
-
14
-
15
-
16
-
17
-
18
-
19
-
20
-
21
-
22
-
23
-
24
-
25
-
26
-
27
-
28
-
29
-
30
-
31
-
32
-
33
-
34
-
35
-
36
-
37
-
38
-
39
-
40
-
41
-
42
-
43
-
44
-
45
-
46
-
47
-
48
-
49
-
50
-
51
-
52
-
53
-
54
-
55
-
56
-
57
-
58
-
59
-
60
-
61
-
62
-
63
-
64
-
65
-
66
-
67
-
68
-
69
-
70
-
71
-
72
-
73
-
74
-
75
-
76
-
77
-
78
-
79
-
80
-
81
-
82
-
83
-
84
-
85
-
86
-
87
-
88
-
89
-
90
-
91
-
92
-
93
-
94
-
95
-
96
-
97
-
98
-
99
-
100
-
101
-
102
-
103
-
104
-
105
-
106
-
107
-
108
-
109
-
110
-
111
-
112
-
113
-
114
-
115
-
116
-
117
-
118
-
119
-
120
-
121
-
122
-
123
-
124
-
125
-
126
-
127
-
128
-
129
-
130
-
131
-
132
-
133
-
134
-
135
-
136
-
137
-
138
-
139
-
140
-
141
-
142
-
143
-
144
-
145
-
146
-
147
-
148
-
149
-
150
-
151
-
152
-
153
-
154
-
155
-
 156
156 -
 157
157 -
 158
158 -
 159
159 -
 160
160 -
 161
161 -
 162
162 -
 163
163 -
 164
164 -
 165
165 -
 166
166 -
167
-
168
-
169
-
170
-
171
-
172
-
173
-
174
-
175
-
176
-
177
-
178
 |
 |