Dell PowerEdge R6525 EMC Installation and Service Manual - Page 64
Drive backplane
 |
View all Dell PowerEdge R6525 manuals
Add to My Manuals
Save this manual to your list of manuals |
Page 64 highlights
Figure 38. Installing a drive into the drive carrier Next steps 1. Install the drive carrier. 2. If removed, install the front bezel. Drive backplane Drive backplane Depending on your system configuration, the drive backplanes supported are listed here: Table 39. Supported backplane options System PowerEdge R6525 Supported hard drives options 3.5-inch (x4) SAS, SATA backplane 2.5-inch (x8) SAS or SATA backplane 2.5-inch (x10) SAS, SATA or NVMe backplane 2.5-inch (x2) SAS/SATA/NVME rear backplane Figure 39. 4 x 3.5-inch drive backplane 1. BP_PWR_1 (backplane power and signal cable to system board) 64 Installing and removing system components
-
 1
1 -
2
-
3
-
4
-
5
-
6
-
7
-
8
-
9
-
10
-
11
-
12
-
13
-
14
-
15
-
16
-
17
-
18
-
19
-
20
-
21
-
22
-
23
-
24
-
25
-
26
-
27
-
28
-
29
-
30
-
31
-
32
-
33
-
34
-
35
-
36
-
37
-
38
-
39
-
40
-
41
-
42
-
43
-
44
-
45
-
46
-
47
-
48
-
49
-
50
-
51
-
52
-
53
-
54
-
55
-
56
-
57
-
58
-
 59
59 -
 60
60 -
 61
61 -
 62
62 -
 63
63 -
 64
64 -
 65
65 -
 66
66 -
 67
67 -
 68
68 -
 69
69 -
70
-
71
-
72
-
73
-
74
-
75
-
76
-
77
-
78
-
79
-
80
-
81
-
82
-
83
-
84
-
85
-
86
-
87
-
88
-
89
-
90
-
91
-
92
-
93
-
94
-
95
-
96
-
97
-
98
-
99
-
100
-
101
-
102
-
103
-
104
-
105
-
106
-
107
-
108
-
109
-
110
-
111
-
112
-
113
-
114
-
115
-
116
-
117
-
118
-
119
-
120
-
121
-
122
-
123
-
124
-
125
-
126
-
127
-
128
-
129
-
130
-
131
-
132
-
133
-
134
-
135
-
136
-
137
-
138
-
139
-
140
-
141
-
142
-
143
-
144
-
145
-
146
-
147
-
148
-
149
-
150
-
151
-
152
-
153
-
154
-
155
-
156
-
157
-
158
-
159
-
160
-
161
-
162
-
163
-
164
 |
 |
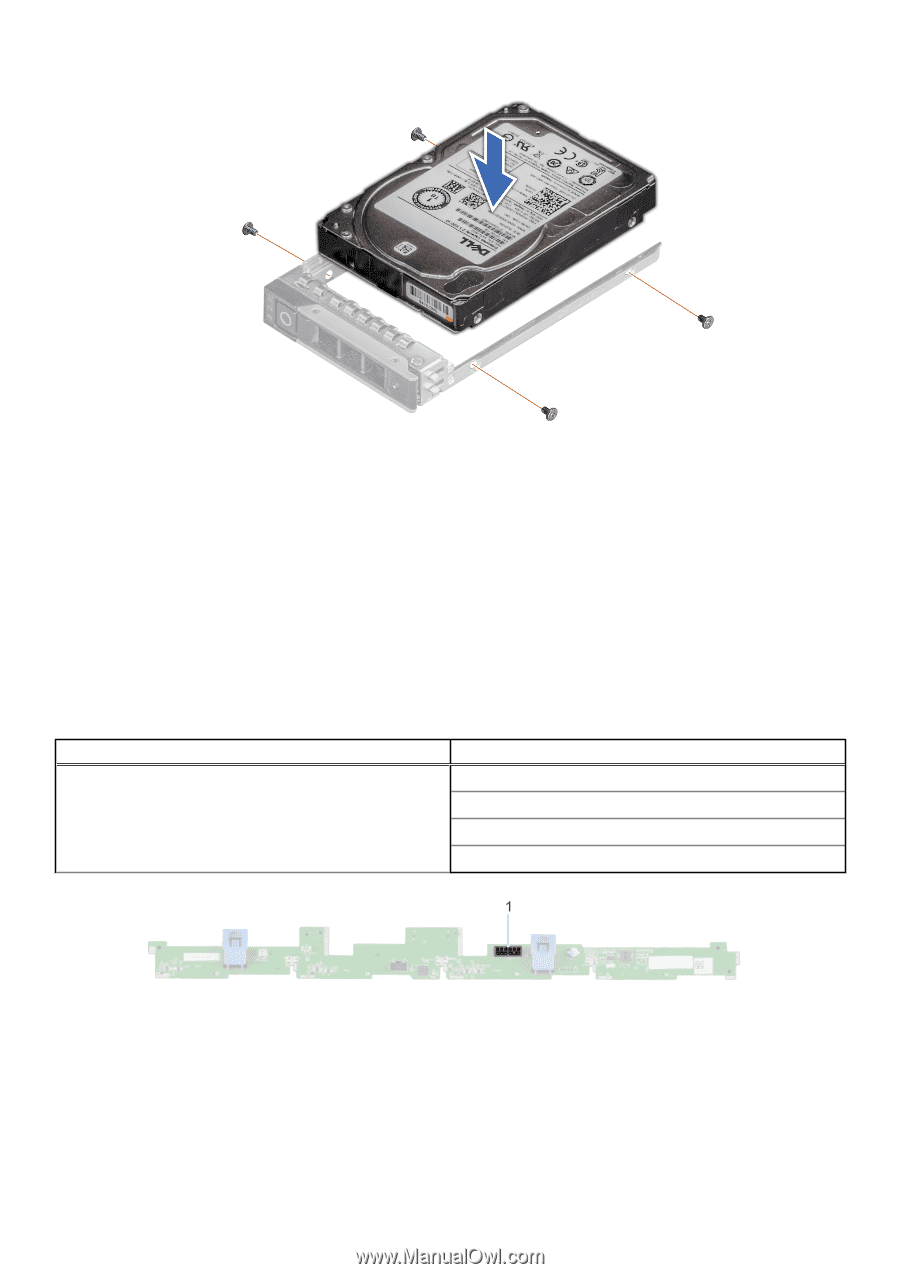
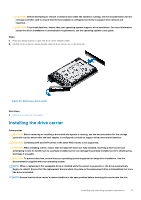
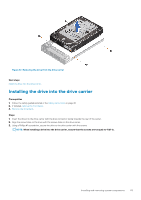
Figure 38. Installing a drive into the drive carrier
Next steps
1.
Install the drive carrier
.
2.
If removed,
install the front bezel
.
Drive backplane
Drive backplane
Depending on your system configuration, the drive backplanes supported are listed here:
Table 39. Supported backplane options
System
Supported hard drives options
PowerEdge R6525
3.5-inch (x4) SAS, SATA backplane
2.5-inch (x8) SAS or SATA backplane
2.5-inch (x10) SAS, SATA or NVMe backplane
2.5-inch (x2) SAS/SATA/NVME rear backplane
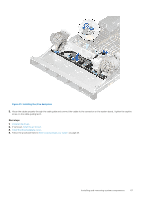
Figure 39. 4 x 3.5-inch drive backplane
1.
BP_PWR_1 (backplane power and signal cable to system board)
64
Installing and removing system components