Dell Precision 610 Dell Precision WorkStation 610 Mini Tower Systems User's Gu - Page 116
Install or replace the four large thumbscrews through the top bracket
 |
View all Dell Precision 610 manuals
Add to My Manuals
Save this manual to your list of manuals |
Page 116 highlights
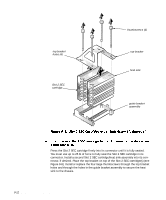
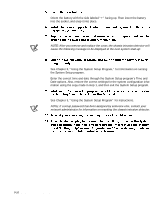
top bracket holes (4) Slot 2 SEC cartridge thumbscrews (4) top bracket heat sink guide bracket assembly Press the Slot 2 SEC cartridge firmly into its connector until it is fully seated. You must use up to 25 lb of force to fully seat the Slot 2 SEC cartridge in its connector. Install a second Slot 2 SEC cartridge/heat sink assembly into its connector, if desired. Place the top bracket on top of the Slot 2 SEC cartridge(s) (see Figure 9-8). Install or replace the four large thumbscrews through the top bracket holes and through the holes in the guide bracket assembly to secure the heat sink to the chassis. 9-12 Dell Precision 610 Mini Tower Systems User's Guide
-
 1
1 -
2
-
3
-
4
-
5
-
6
-
7
-
8
-
9
-
10
-
11
-
12
-
13
-
14
-
15
-
16
-
17
-
18
-
19
-
20
-
21
-
22
-
23
-
24
-
25
-
26
-
27
-
28
-
29
-
30
-
31
-
32
-
33
-
34
-
35
-
36
-
37
-
38
-
39
-
40
-
41
-
42
-
43
-
44
-
45
-
46
-
47
-
48
-
49
-
50
-
51
-
52
-
53
-
54
-
55
-
56
-
57
-
58
-
59
-
60
-
61
-
62
-
63
-
64
-
65
-
66
-
67
-
68
-
69
-
70
-
71
-
72
-
73
-
74
-
75
-
76
-
77
-
78
-
79
-
80
-
81
-
82
-
83
-
84
-
85
-
86
-
87
-
88
-
89
-
90
-
91
-
92
-
93
-
94
-
95
-
96
-
97
-
98
-
99
-
100
-
101
-
102
-
103
-
104
-
105
-
106
-
107
-
108
-
109
-
110
-
 111
111 -
 112
112 -
 113
113 -
 114
114 -
 115
115 -
 116
116 -
 117
117 -
 118
118 -
 119
119 -
 120
120 -
 121
121 -
122
-
123
-
124
-
125
-
126
-
127
-
128
-
129
-
130
-
131
-
132
-
133
-
134
-
135
-
136
-
137
-
138
-
139
-
140
-
141
-
142
-
143
-
144
-
145
-
146
-
147
-
148
-
149
-
150
-
151
-
152
-
153
-
154
-
155
-
156
-
157
-
158
-
159
-
160
-
161
-
162
-
163
-
164
-
165
-
166
-
167
-
168
-
169
-
170
-
171
-
172
-
173
-
174
-
175
-
176
-
177
-
178
-
179
-
180
-
181
-
182
-
183
-
184
-
185
-
186
-
187
-
188
-
189
-
190
-
191
-
192
-
193
-
194
-
195
-
196
-
197
-
198
-
199
-
200
-
201
-
202
-
203
-
204
-
205
-
206
-
207
-
208
-
209
-
210
-
211
-
212
-
213
-
214
-
215
-
216
-
217
-
218
-
219
-
220
-
221
-
222
-
223
-
224
-
225
-
226
-
227
-
228
-
229
-
230
 |
 |

9-12
Dell Precision 610 Mini Tower Systems User’s Guide
Press the Slot 2 SEC cartridge firmly into its connector until it is fully seated.
You must use up to 25 lb of force to fully seat the Slot 2 SEC cartridge in its
connector. Install a second Slot 2 SEC cartridge/heat sink assembly into its con-
nector, if desired. Place the top bracket on top of the Slot 2 SEC cartridge(s) (see
Figure 9-8). Install or replace the four large thumbscrews through the top bracket
holes and through the holes in the guide bracket assembly to secure the heat
sink to the chassis.
top bracket
Slot 2 SEC
cartridge
guide bracket
assembly
thumbscrews (4)
heat sink
top bracket
holes (4)