Dell Precision 610 Dell Precision WorkStation 610 Mini Tower Systems User's Gu - Page 124
To replace a front-panel insert for a 5.25-inch bay
 |
View all Dell Precision 610 manuals
Add to My Manuals
Save this manual to your list of manuals |
Page 124 highlights
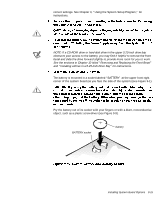
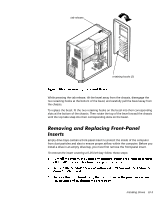
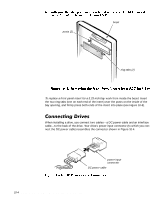
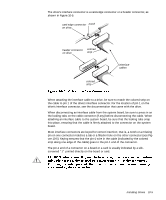
posts (2) bezel ring-tabs (2) To replace a front-panel insert for a 5.25-inch bay, work from inside the bezel. Insert the two ring-tabs (one on each end of the insert) over the posts on the inside of the bay opening, and firmly press both ends of the insert into place (see Figure 10-3). When installing a drive, you connect two cables-a DC power cable and an interface cable-to the back of the drive. Your drive's power input connector (to which you connect the DC power cable) resembles the connector shown in Figure 10-4. . power input connector DC power cable 10-4 Dell Precision 610 Mini Tower Systems User's Guide
-
 1
1 -
2
-
3
-
4
-
5
-
6
-
7
-
8
-
9
-
10
-
11
-
12
-
13
-
14
-
15
-
16
-
17
-
18
-
19
-
20
-
21
-
22
-
23
-
24
-
25
-
26
-
27
-
28
-
29
-
30
-
31
-
32
-
33
-
34
-
35
-
36
-
37
-
38
-
39
-
40
-
41
-
42
-
43
-
44
-
45
-
46
-
47
-
48
-
49
-
50
-
51
-
52
-
53
-
54
-
55
-
56
-
57
-
58
-
59
-
60
-
61
-
62
-
63
-
64
-
65
-
66
-
67
-
68
-
69
-
70
-
71
-
72
-
73
-
74
-
75
-
76
-
77
-
78
-
79
-
80
-
81
-
82
-
83
-
84
-
85
-
86
-
87
-
88
-
89
-
90
-
91
-
92
-
93
-
94
-
95
-
96
-
97
-
98
-
99
-
100
-
101
-
102
-
103
-
104
-
105
-
106
-
107
-
108
-
109
-
110
-
111
-
112
-
113
-
114
-
115
-
116
-
117
-
118
-
 119
119 -
 120
120 -
 121
121 -
 122
122 -
 123
123 -
 124
124 -
 125
125 -
 126
126 -
 127
127 -
 128
128 -
 129
129 -
130
-
131
-
132
-
133
-
134
-
135
-
136
-
137
-
138
-
139
-
140
-
141
-
142
-
143
-
144
-
145
-
146
-
147
-
148
-
149
-
150
-
151
-
152
-
153
-
154
-
155
-
156
-
157
-
158
-
159
-
160
-
161
-
162
-
163
-
164
-
165
-
166
-
167
-
168
-
169
-
170
-
171
-
172
-
173
-
174
-
175
-
176
-
177
-
178
-
179
-
180
-
181
-
182
-
183
-
184
-
185
-
186
-
187
-
188
-
189
-
190
-
191
-
192
-
193
-
194
-
195
-
196
-
197
-
198
-
199
-
200
-
201
-
202
-
203
-
204
-
205
-
206
-
207
-
208
-
209
-
210
-
211
-
212
-
213
-
214
-
215
-
216
-
217
-
218
-
219
-
220
-
221
-
222
-
223
-
224
-
225
-
226
-
227
-
228
-
229
-
230
 |
 |

10-4
Dell Precision 610 Mini Tower Systems User’s Guide
To replace a front-panel insert for a 5.25-inch bay
,
work
from inside the bezel. Insert
the two ring-tabs (one on each end of the insert) over the posts on the inside of the
bay opening, and firmly press both ends of the insert into place (see Figure 10-3).
&RQQHFWLQJ±’ULYHV±±±±
When installing a drive, you connect two cables—a DC power cable and an interface
cable—to the back of the drive. Your drive’s power input connector (to which you con-
nect the DC power cable) resembles the connector shown in Figure 10-4.
.
posts (2)
bezel
ring-tabs (2)
power input
connector
DC power cable