Epson 835p User Manual - Page 64
Configuring the Network Settings for Windows, Setting Up Your Macintosh for Ad Hoc Mode
 |
UPC - 010343851160
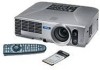
View all Epson 835p manuals
Add to My Manuals
Save this manual to your list of manuals |
Page 64 highlights
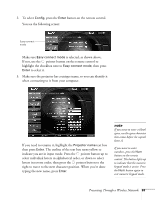
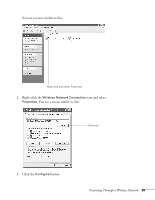
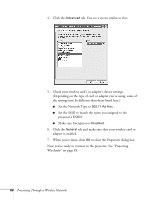
note The projector keyword changes each time you turn the projector off and then on again, or remove and reinsert the 802.11g card. Check the keyword on the EasyMP Network screen whenever you start EasyMP and enter that keyword on your computer. You can't connect using a previous keyword. It is recommended that the keyword setting is changed periodically. note On some Windows systems, you can right-click My Network Places or Network Neighborhood on the desktop and select Properties. Settings may vary, depending on your wireless network adapter. See the documentation for your adapter for more information. 4. If your network card supports an SSID or ESSID name (see page 66), highlight the ESSID text box, press Enter, and enter a name. When you're done, press Enter. Note that the ESSID is case-sensitive (if you enter the name in uppercase on the projector, you must type it the same way on the computer connecting to the projector). 5. If you want to create a password for remote access to the projector, highlight the Password for WEB control checkbox, press Enter, and enter a password of up to 8 alphanumeric characters. When you're done, press Enter. 6. If you want to set up a security keyword so that only people who are in the same room as the projector can access it, turn Projector keyword on. Then when you want to connect to the projector, it displays a randomized four-digit number or "keyword" on the screen. When prompted by NS Connection, you can enter the keyword on your computer to connect (see page 86). 7. When you're done making these settings, highlight the OK button at the top of the screen (you can either press the Esc button on the remote control or use the pointer button to highlight it), then press Enter. Highlight the OK button again and press Enter to return to the main EasyMP Network Screen. Now you're ready to set up your computer for wireless projecting. Go to "Configuring the Network Settings for Windows" below, or "Setting Up Your Macintosh for Ad Hoc Mode" on page 67. Configuring the Network Settings for Windows Before connecting to the projector, you need to make sure the settings for your notebook's or PC's network card match the settings you entered for the projector. 1. Access your wireless network Properties window. For example, in Windows XP you would click Start > Control Panel > Network and Internet Connections. Then click the Network Connections icon. 64 Presenting Through a Wireless Network
-
 1
1 -
2
-
3
-
4
-
5
-
6
-
7
-
8
-
9
-
10
-
11
-
12
-
13
-
14
-
15
-
16
-
17
-
18
-
19
-
20
-
21
-
22
-
23
-
24
-
25
-
26
-
27
-
28
-
29
-
30
-
31
-
32
-
33
-
34
-
35
-
36
-
37
-
38
-
39
-
40
-
41
-
42
-
43
-
44
-
45
-
46
-
47
-
48
-
49
-
50
-
51
-
52
-
53
-
54
-
55
-
56
-
57
-
58
-
 59
59 -
 60
60 -
 61
61 -
 62
62 -
 63
63 -
 64
64 -
 65
65 -
 66
66 -
 67
67 -
 68
68 -
 69
69 -
70
-
71
-
72
-
73
-
74
-
75
-
76
-
77
-
78
-
79
-
80
-
81
-
82
-
83
-
84
-
85
-
86
-
87
-
88
-
89
-
90
-
91
-
92
-
93
-
94
-
95
-
96
-
97
-
98
-
99
-
100
-
101
-
102
-
103
-
104
-
105
-
106
-
107
-
108
-
109
-
110
-
111
-
112
-
113
-
114
-
115
-
116
-
117
-
118
-
119
-
120
-
121
-
122
-
123
-
124
-
125
-
126
-
127
-
128
-
129
-
130
-
131
-
132
-
133
-
134
-
135
-
136
-
137
-
138
-
139
-
140
-
141
-
142
-
143
-
144
-
145
-
146
-
147
-
148
-
149
-
150
-
151
-
152
-
153
-
154
-
155
-
156
-
157
-
158
-
159
-
160
-
161
-
162
-
163
-
164
-
165
-
166
-
167
-
168
-
169
-
170
-
171
-
172
-
173
-
174
-
175
-
176
-
177
-
178
-
179
-
180
-
181
-
182
-
183
-
184
-
185
-
186
-
187
-
188
-
189
-
190
-
191
-
192
-
193
-
194
-
195
-
196
-
197
-
198
-
199
-
200
-
201
-
202
-
203
-
204
-
205
-
206
-
207
-
208
-
209
-
210
 |
 |
