Epson ET-4550 User Manual - Page 136
Available Scanned File Types and Optional Settings
 |
View all Epson ET-4550 manuals
Add to My Manuals
Save this manual to your list of manuals |
Page 136 highlights
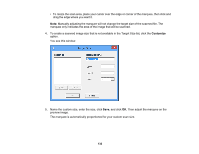
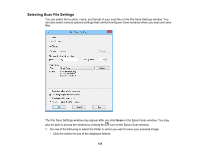
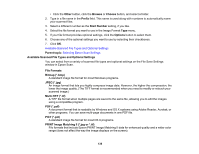
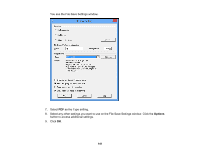
• Click the Other button, click the Browse or Choose button, and select a folder. 2. Type in a file name in the Prefix field. This name is used along with numbers to automatically name your scanned files. 3. Select a different number as the Start Number setting, if you like. 4. Select the file format you want to use in the Image Format Type menu. 5. If your file format provides optional settings, click the Options button to select them. 6. Choose any of the optional settings you want to use by selecting their checkboxes. 7. Click OK. Available Scanned File Types and Optional Settings Parent topic: Selecting Epson Scan Settings Available Scanned File Types and Optional Settings You can select from a variety of scanned file types and optional settings on the File Save Settings window in Epson Scan. File Formats Bitmap (*.bmp) A standard image file format for most Windows programs. JPEG (*.jpg) An image format that lets you highly compress image data. However, the higher the compression, the lower the image quality. (The TIFF format is recommended when you need to modify or retouch your scanned image.) Multi-TIFF (*.tif) A TIFF file format when multiple pages are saved to the same file, allowing you to edit the images using a compatible program. PDF (*.pdf) A document format that is readable by Windows and OS X systems using Adobe Reader, Acrobat, or other programs. You can save multi-page documents in one PDF file. PICT (*.pct) A standard image file format for most OS X programs. PRINT Image Matching II (*.jpg or *.tif) File formats that include Epson PRINT Image Matching II data for enhanced quality and a wider color range (does not affect the way the image displays on the screen). 136
-
 1
1 -
2
-
3
-
4
-
5
-
6
-
7
-
8
-
9
-
10
-
11
-
12
-
13
-
14
-
15
-
16
-
17
-
18
-
19
-
20
-
21
-
22
-
23
-
24
-
25
-
26
-
27
-
28
-
29
-
30
-
31
-
32
-
33
-
34
-
35
-
36
-
37
-
38
-
39
-
40
-
41
-
42
-
43
-
44
-
45
-
46
-
47
-
48
-
49
-
50
-
51
-
52
-
53
-
54
-
55
-
56
-
57
-
58
-
59
-
60
-
61
-
62
-
63
-
64
-
65
-
66
-
67
-
68
-
69
-
70
-
71
-
72
-
73
-
74
-
75
-
76
-
77
-
78
-
79
-
80
-
81
-
82
-
83
-
84
-
85
-
86
-
87
-
88
-
89
-
90
-
91
-
92
-
93
-
94
-
95
-
96
-
97
-
98
-
99
-
100
-
101
-
102
-
103
-
104
-
105
-
106
-
107
-
108
-
109
-
110
-
111
-
112
-
113
-
114
-
115
-
116
-
117
-
118
-
119
-
120
-
121
-
122
-
123
-
124
-
125
-
126
-
127
-
128
-
129
-
130
-
 131
131 -
 132
132 -
 133
133 -
 134
134 -
 135
135 -
 136
136 -
 137
137 -
 138
138 -
 139
139 -
 140
140 -
 141
141 -
142
-
143
-
144
-
145
-
146
-
147
-
148
-
149
-
150
-
151
-
152
-
153
-
154
-
155
-
156
-
157
-
158
-
159
-
160
-
161
-
162
-
163
-
164
-
165
-
166
-
167
-
168
-
169
-
170
-
171
-
172
-
173
-
174
-
175
-
176
-
177
-
178
-
179
-
180
-
181
-
182
-
183
-
184
-
185
-
186
-
187
-
188
-
189
-
190
-
191
-
192
-
193
-
194
-
195
-
196
-
197
-
198
-
199
-
200
-
201
-
202
-
203
-
204
-
205
-
206
-
207
-
208
-
209
-
210
-
211
-
212
-
213
-
214
-
215
-
216
-
217
-
218
-
219
-
220
-
221
-
222
-
223
-
224
-
225
-
226
-
227
-
228
-
229
-
230
-
231
-
232
-
233
-
234
-
235
-
236
-
237
-
238
-
239
-
240
-
241
-
242
-
243
-
244
-
245
-
246
-
247
-
248
-
249
-
250
-
251
-
252
-
253
-
254
-
255
-
256
-
257
-
258
-
259
-
260
-
261
-
262
-
263
-
264
-
265
-
266
-
267
-
268
-
269
-
270
-
271
-
272
-
273
-
274
-
275
-
276
-
277
-
278
-
279
-
280
-
281
-
282
-
283
-
284
-
285
-
286
-
287
-
288
 |
 |
