Epson ET-4550 User Manual - Page 153
Setting the Number of Rings to Answer, Selecting Advanced Fax Settings
 |
View all Epson ET-4550 manuals
Add to My Manuals
Save this manual to your list of manuals |
Page 153 highlights
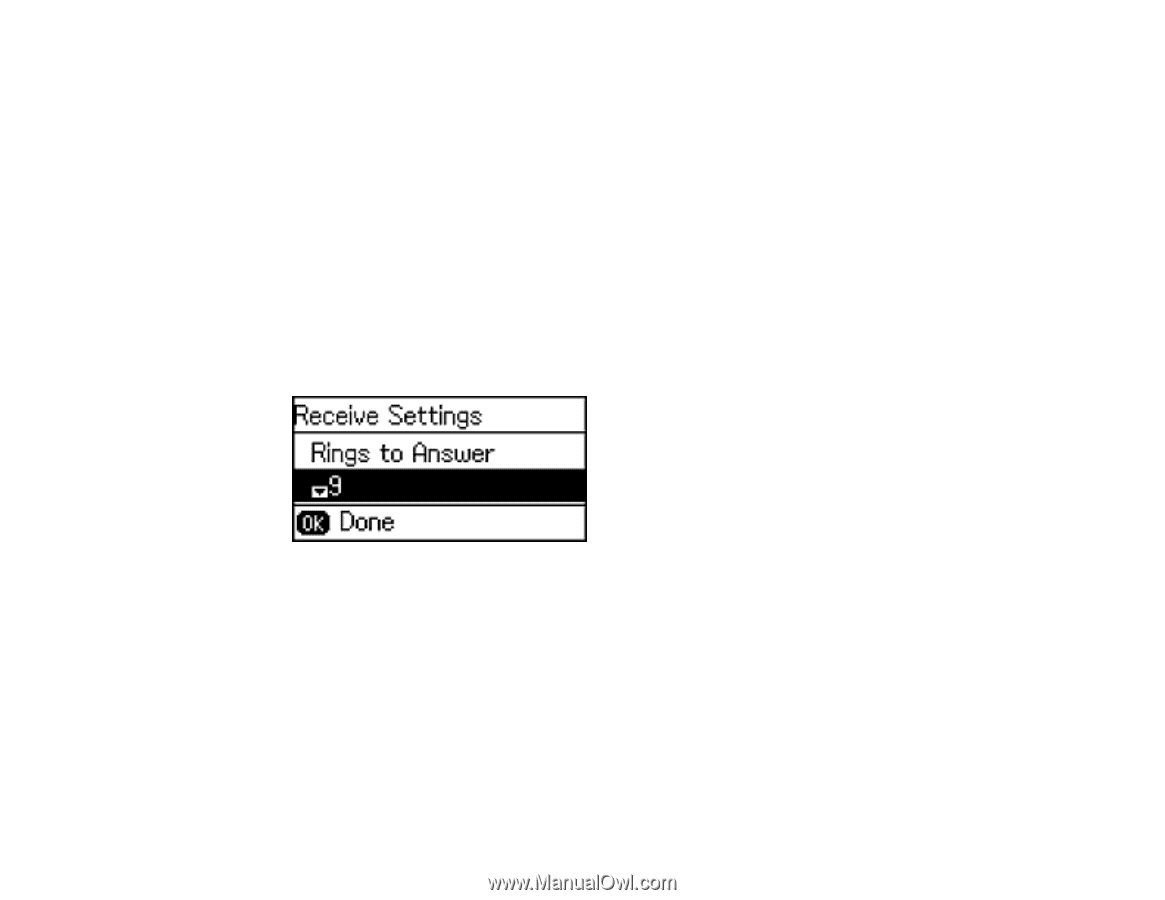
6. Select Use and press the OK button. 7. To enter an access code number (9 for example), use the numeric keypad to enter the code number and press the OK button. Parent topic: Setting Up Fax Features Using the Product Control Panel Setting the Number of Rings to Answer If you connect an external answering machine and select to receive faxes automatically, make sure the Rings to Answer setting is correct. The number of rings should be higher than the number of rings your answering machine is set to for answering a call. 1. Press the up or down arrow button, select Setup, and press the OK button. 2. Press the up or down arrow button, select Fax Settings, and press the OK button. 3. Press the up or down arrow button, select Receive Settings, and press the OK button. 4. Select Rings to Answer and press the OK button. You see this screen: 5. Select the number of rings and press the OK button. Make sure to select a number higher than the number of rings your answering machine is set to for answering a call. Note: The answering machine picks up every call faster than the product, but the product can detect fax tones and start receiving faxes. If you answer the phone and hear a fax tone, check that the product has started receiving the fax, then hang up. Parent topic: Setting Up Fax Features Using the Product Control Panel Selecting Advanced Fax Settings You can use the product's control panel to select settings for sending, receiving, and printing faxes. 153
-
 1
1 -
2
-
3
-
4
-
5
-
6
-
7
-
8
-
9
-
10
-
11
-
12
-
13
-
14
-
15
-
16
-
17
-
18
-
19
-
20
-
21
-
22
-
23
-
24
-
25
-
26
-
27
-
28
-
29
-
30
-
31
-
32
-
33
-
34
-
35
-
36
-
37
-
38
-
39
-
40
-
41
-
42
-
43
-
44
-
45
-
46
-
47
-
48
-
49
-
50
-
51
-
52
-
53
-
54
-
55
-
56
-
57
-
58
-
59
-
60
-
61
-
62
-
63
-
64
-
65
-
66
-
67
-
68
-
69
-
70
-
71
-
72
-
73
-
74
-
75
-
76
-
77
-
78
-
79
-
80
-
81
-
82
-
83
-
84
-
85
-
86
-
87
-
88
-
89
-
90
-
91
-
92
-
93
-
94
-
95
-
96
-
97
-
98
-
99
-
100
-
101
-
102
-
103
-
104
-
105
-
106
-
107
-
108
-
109
-
110
-
111
-
112
-
113
-
114
-
115
-
116
-
117
-
118
-
119
-
120
-
121
-
122
-
123
-
124
-
125
-
126
-
127
-
128
-
129
-
130
-
131
-
132
-
133
-
134
-
135
-
136
-
137
-
138
-
139
-
140
-
141
-
142
-
143
-
144
-
145
-
146
-
147
-
 148
148 -
 149
149 -
 150
150 -
 151
151 -
 152
152 -
 153
153 -
 154
154 -
 155
155 -
 156
156 -
 157
157 -
 158
158 -
159
-
160
-
161
-
162
-
163
-
164
-
165
-
166
-
167
-
168
-
169
-
170
-
171
-
172
-
173
-
174
-
175
-
176
-
177
-
178
-
179
-
180
-
181
-
182
-
183
-
184
-
185
-
186
-
187
-
188
-
189
-
190
-
191
-
192
-
193
-
194
-
195
-
196
-
197
-
198
-
199
-
200
-
201
-
202
-
203
-
204
-
205
-
206
-
207
-
208
-
209
-
210
-
211
-
212
-
213
-
214
-
215
-
216
-
217
-
218
-
219
-
220
-
221
-
222
-
223
-
224
-
225
-
226
-
227
-
228
-
229
-
230
-
231
-
232
-
233
-
234
-
235
-
236
-
237
-
238
-
239
-
240
-
241
-
242
-
243
-
244
-
245
-
246
-
247
-
248
-
249
-
250
-
251
-
252
-
253
-
254
-
255
-
256
-
257
-
258
-
259
-
260
-
261
-
262
-
263
-
264
-
265
-
266
-
267
-
268
-
269
-
270
-
271
-
272
-
273
-
274
-
275
-
276
-
277
-
278
-
279
-
280
-
281
-
282
-
283
-
284
-
285
-
286
-
287
-
288
 |
 |