Epson Ensemble HD 720 User's Guide - Page 34
Linking Audio and Video Sources, button to highlight
 |
View all Epson Ensemble HD 720 manuals
Add to My Manuals
Save this manual to your list of manuals |
Page 34 highlights
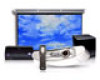
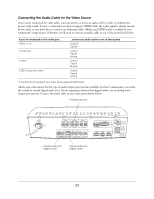
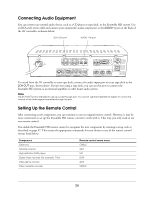
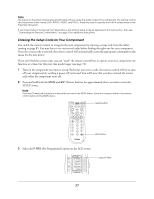
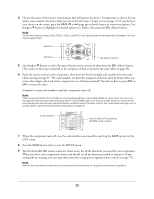
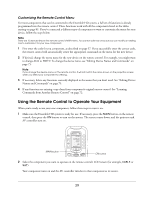
Linking Audio and Video Sources Once you've connected the audio and video cables, you need to tell the Ensemble HD system which audio and video ports to use together. That way, when you select a device with the remote control (VCR, cable, satellite, etc.), the matching audio and video sources will be automatically used. You link the audio and video sources together using the Source Assign screen. Note The label you assign to a device (e.g. "CABLE") is what you see on the projection screen when you're selecting sources. It doesn't affect the device names shown on the remote control's LCD screen. 1 Make sure the MAIN menu is displayed on the remote control. If necessary, press the MAIN button. 2 Point the remote control at the screen and press the MENU button. You see the Ensemble HD menu screen: Audio Video Language Preference Reset Voice Bass Treble Surround Front Distance Center Distance Rear Distance Test Tone Move 0 dB 0 dB 0 dB 0 dB 5 ft. 5 ft. 5 ft. Sel Enter Menu Exit 3 Use the d button to highlight Video, then press the SEL (Select) button. 4 Use the d button to highlight Source Assign, then press the SEL d button (Select) button. You see the screen shown below. The video port to which you've connected your video equipment is listed in the left-hand column: [Source Assign] Video Input HDMI1 HDMI2 Component S-Video Composite Label Cable Sat HD DVR Video Audio Input HDMI1 HDMI2 Coax Optical Analog ESC Return Move Adjust Menu Exit 34
-
 1
1 -
2
-
3
-
4
-
5
-
6
-
7
-
8
-
9
-
10
-
11
-
12
-
13
-
14
-
15
-
16
-
17
-
18
-
19
-
20
-
21
-
22
-
23
-
24
-
25
-
26
-
27
-
28
-
 29
29 -
 30
30 -
 31
31 -
 32
32 -
 33
33 -
 34
34 -
 35
35 -
 36
36 -
 37
37 -
 38
38 -
 39
39 -
40
-
41
-
42
-
43
-
44
-
45
-
46
-
47
-
48
-
49
-
50
-
51
-
52
-
53
-
54
-
55
-
56
-
57
-
58
-
59
-
60
-
61
-
62
-
63
-
64
-
65
-
66
-
67
-
68
-
69
-
70
-
71
-
72
-
73
-
74
-
75
-
76
-
77
-
78
-
79
-
80
-
81
-
82
-
83
-
84
-
85
-
86
-
87
-
88
-
89
-
90
-
91
-
92
-
93
-
94
-
95
-
96
-
97
-
98
-
99
-
100
-
101
-
102
-
103
-
104
-
105
-
106
-
107
-
108
-
109
-
110
-
111
-
112
-
113
-
114
-
115
-
116
-
117
-
118
-
119
-
120
-
121
-
122
-
123
-
124
-
125
-
126
-
127
-
128
-
129
-
130
-
131
-
132
 |
 |