Epson Ensemble HD 720 User's Guide - Page 71
Using Advanced Remote Control Features, Adjusting the LCD Screen
 |
View all Epson Ensemble HD 720 manuals
Add to My Manuals
Save this manual to your list of manuals |
Page 71 highlights
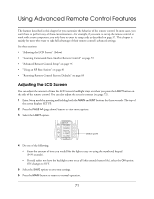
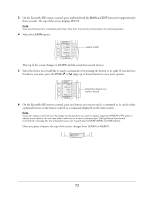
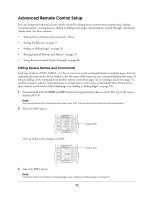
Using Advanced Remote Control Features The features described in this chapter let you customize the behavior of the remote control. In most cases, you won't have to perform any of these customizations-for example, if you want to set up the remote control to work with a new component, you only have to enter its setup code as described on page 37. This chapter is mainly for users who want to take full advantage of their remote control's advanced settings. See these sections: • "Adjusting the LCD Screen" (below) • "Learning Commands from Another Remote Control" on page 72 • "Advanced Remote Control Setup" on page 75 • "Using an RF Base Station" on page 81 • "Restoring Remote Control Factory Defaults" on page 83 Adjusting the LCD Screen You can adjust the amount of time the LCD screen's backlight stays on when you press the LIGHT button on the side of the remote control. You can also adjust the screen's contrast (see page 72). 1 Enter Setup mode by pressing and holding both the MAIN and ENT buttons for three seconds. The top of the screen displays SETUP. 2 Press the PAGE (page down) button to view more options. 3 Select the LIGHT option. SETUP PUNCH ERASE RECAL LIGHT CLONE 2 OF 3 Select LIGHT 4 Do one of the following: • Enter the amount of time you would like the light to stay on using the numbered keypad (0-99 seconds). • If you'd rather not have the backlight come on at all (this extends battery life), select the ON option: ON changes to OFF. 5 Select the SAVE option to save your settings. 6 Press the MAIN button to return to normal operation. 71
-
 1
1 -
2
-
3
-
4
-
5
-
6
-
7
-
8
-
9
-
10
-
11
-
12
-
13
-
14
-
15
-
16
-
17
-
18
-
19
-
20
-
21
-
22
-
23
-
24
-
25
-
26
-
27
-
28
-
29
-
30
-
31
-
32
-
33
-
34
-
35
-
36
-
37
-
38
-
39
-
40
-
41
-
42
-
43
-
44
-
45
-
46
-
47
-
48
-
49
-
50
-
51
-
52
-
53
-
54
-
55
-
56
-
57
-
58
-
59
-
60
-
61
-
62
-
63
-
64
-
65
-
 66
66 -
 67
67 -
 68
68 -
 69
69 -
 70
70 -
 71
71 -
 72
72 -
 73
73 -
 74
74 -
 75
75 -
 76
76 -
77
-
78
-
79
-
80
-
81
-
82
-
83
-
84
-
85
-
86
-
87
-
88
-
89
-
90
-
91
-
92
-
93
-
94
-
95
-
96
-
97
-
98
-
99
-
100
-
101
-
102
-
103
-
104
-
105
-
106
-
107
-
108
-
109
-
110
-
111
-
112
-
113
-
114
-
115
-
116
-
117
-
118
-
119
-
120
-
121
-
122
-
123
-
124
-
125
-
126
-
127
-
128
-
129
-
130
-
131
-
132
 |
 |
