Epson Ensemble HD 720 User's Guide - Page 47
Using Test Tones to Adjust the Sound, Changing the Surround Sound Format
 |
View all Epson Ensemble HD 720 manuals
Add to My Manuals
Save this manual to your list of manuals |
Page 47 highlights
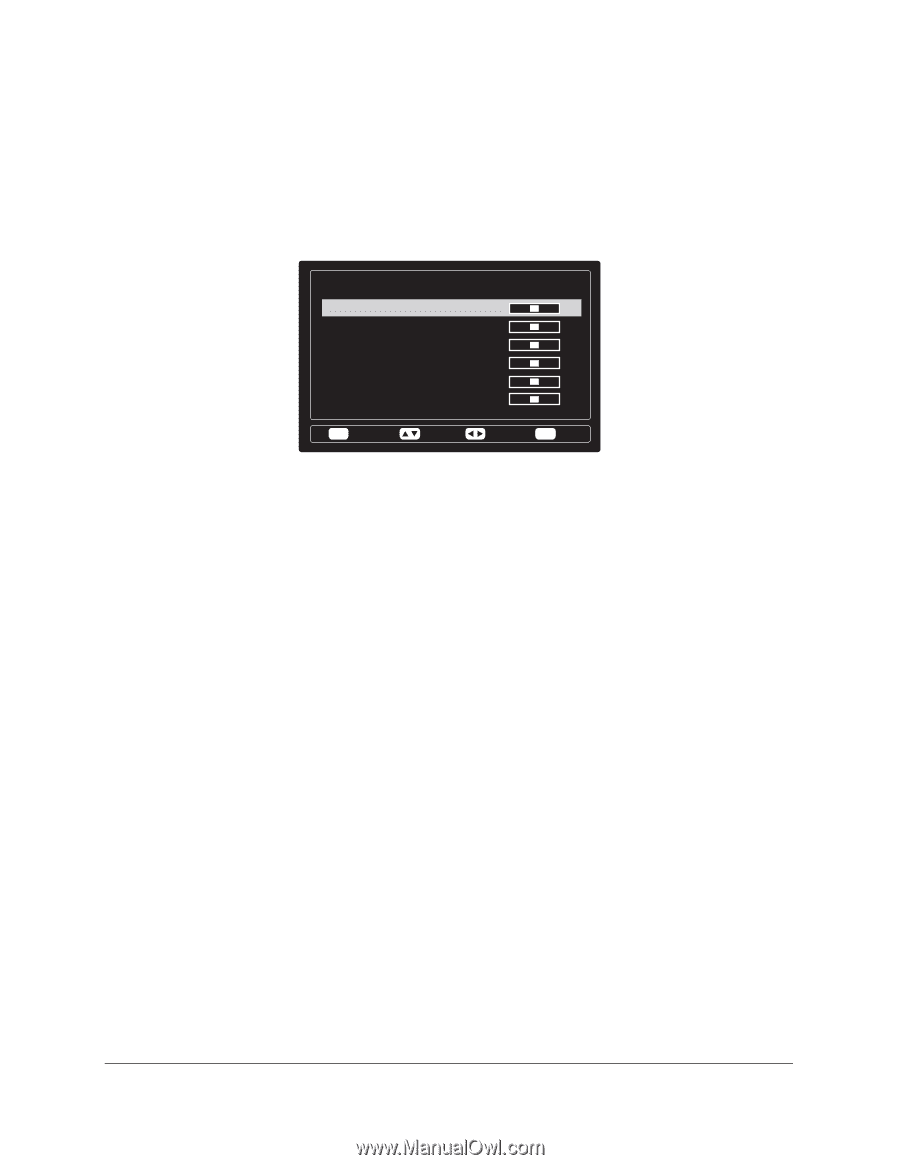
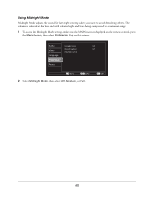
Using Test Tones to Adjust the Sound Use the test tones to adjust the volume for each speaker independently or to verify that each speaker is working properly. Use a sound-level meter to ensure that the tone emitted from each speaker is 75 dB. If you're not using a meter, make sure all the speakers sound consistent in volume. 1 Make sure the MAIN menu is displayed on the remote control, press the MENU button, select Audio, then select Test Tone. You see this screen: [ Te s t To n e ] Left Speaker Center Speaker Right Speaker Rear Right Speaker Rear Left Speaker Subwoofer Speaker 0 dB 0 dB 0 dB 0 dB 0 dB 0 dB ESC Return Move Adjust Menu Exit The speakers automatically begin emitting tones, one by one. 2 Use a sound-level meter to measure the volume from the usual seating area. Set the meter for C weight and slow response. Use the u or d button to move the test tone to a different speaker. Press the u button as needed to keep the test tone from advancing to the next speaker. 3 Use the l or r button to change the speaker's output. Make sure all the speakers output sound at 75 dB. 4 When you're done adjusting the settings, press the MENU button to exit the menu system. Changing the Surround Sound Format Depending on your audio source, you may be able to select from one or more surround sound formats. 1 Make sure the MAIN menu is displayed on the remote control, then select the AUDIO option. 2 Select the SURR (Surround) option to change the audio format. Each time you press SURR, the format changes to one of the following settings: • DPLII Movie or DPLII Music (Dolby Pro Logic II) for extracting 5.1-channel sound from recordings made with Dolby Surround technology. If the source is digitally encoded, you see the type of encoding-Dolby Digital or DTS (Digital Theatre Sound)-displayed on the screen. • STEREO for digital and analog sources recorded in 2-channel stereo, when you don't want to hear it using any surround sound effects. Note When you're viewing a particular source, you can press the OSD (On-Screen Display) button to display the current audio format. 47
-
 1
1 -
2
-
3
-
4
-
5
-
6
-
7
-
8
-
9
-
10
-
11
-
12
-
13
-
14
-
15
-
16
-
17
-
18
-
19
-
20
-
21
-
22
-
23
-
24
-
25
-
26
-
27
-
28
-
29
-
30
-
31
-
32
-
33
-
34
-
35
-
36
-
37
-
38
-
39
-
40
-
41
-
 42
42 -
 43
43 -
 44
44 -
 45
45 -
 46
46 -
 47
47 -
 48
48 -
 49
49 -
 50
50 -
 51
51 -
 52
52 -
53
-
54
-
55
-
56
-
57
-
58
-
59
-
60
-
61
-
62
-
63
-
64
-
65
-
66
-
67
-
68
-
69
-
70
-
71
-
72
-
73
-
74
-
75
-
76
-
77
-
78
-
79
-
80
-
81
-
82
-
83
-
84
-
85
-
86
-
87
-
88
-
89
-
90
-
91
-
92
-
93
-
94
-
95
-
96
-
97
-
98
-
99
-
100
-
101
-
102
-
103
-
104
-
105
-
106
-
107
-
108
-
109
-
110
-
111
-
112
-
113
-
114
-
115
-
116
-
117
-
118
-
119
-
120
-
121
-
122
-
123
-
124
-
125
-
126
-
127
-
128
-
129
-
130
-
131
-
132
 |
 |